What Is That Recessed Metal Cabinet in an Old Apartment Bathroom? (Vintage Laundry Hamper Explained)
-
 Olivia Reed
 - 09 Jun, 2026
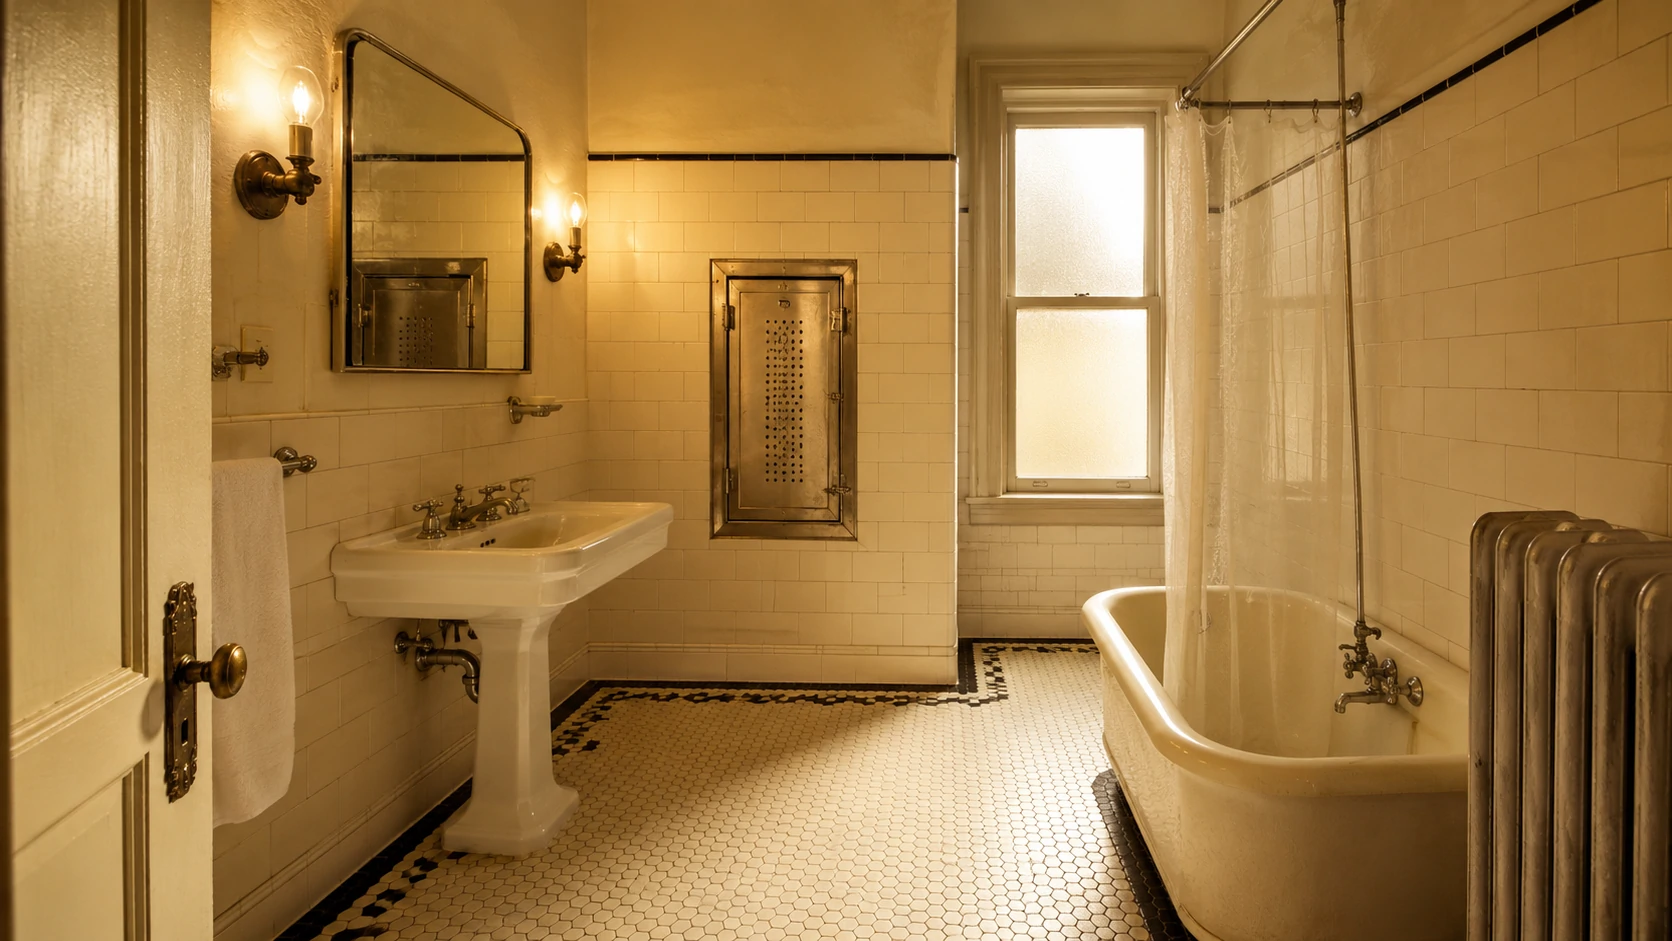
If you’ve just moved into an older building and you’re standing in the bathroom staring at a small metal cabinet built into the wall — hinged door, odd slot near the top, and no obvious label — you’re not imagining things. And you’re definitely not the first person to spend fifteen minutes searching online with nothing to show for it.
That unit is a recessed laundry hamper: a factory-installed, wall-mounted storage unit built directly into the bathroom wall cavity of older apartment buildings. They were considered a premium convenience feature when new. The narrow slot at the top is a drop-slot for feeding laundry in one-handed without opening the main door. Some versions connect to a building-wide laundry chute running to the basement. Most are self-contained cavities.
Popular from roughly the 1920s through the early 1960s, these fixtures are concentrated in urban apartment buildings across New York, Chicago, Boston, Philadelphia, and San Francisco. If your building predates 1965 and you’re in a multi-unit structure, this is almost certainly what you’re looking at.
Quick Takeaways
- Common in pre-war and mid-century American urban apartment buildings
- The top slot is a laundry drop-slot — not a vent, not a broken part
- Some units connect to a building-wide laundry chute; many are standalone sealed cavities
- Not a health concern if dry and intact, but worth a quick inspection for rust, mold, and paint condition
- Renters should not permanently modify or remove the unit without landlord permission
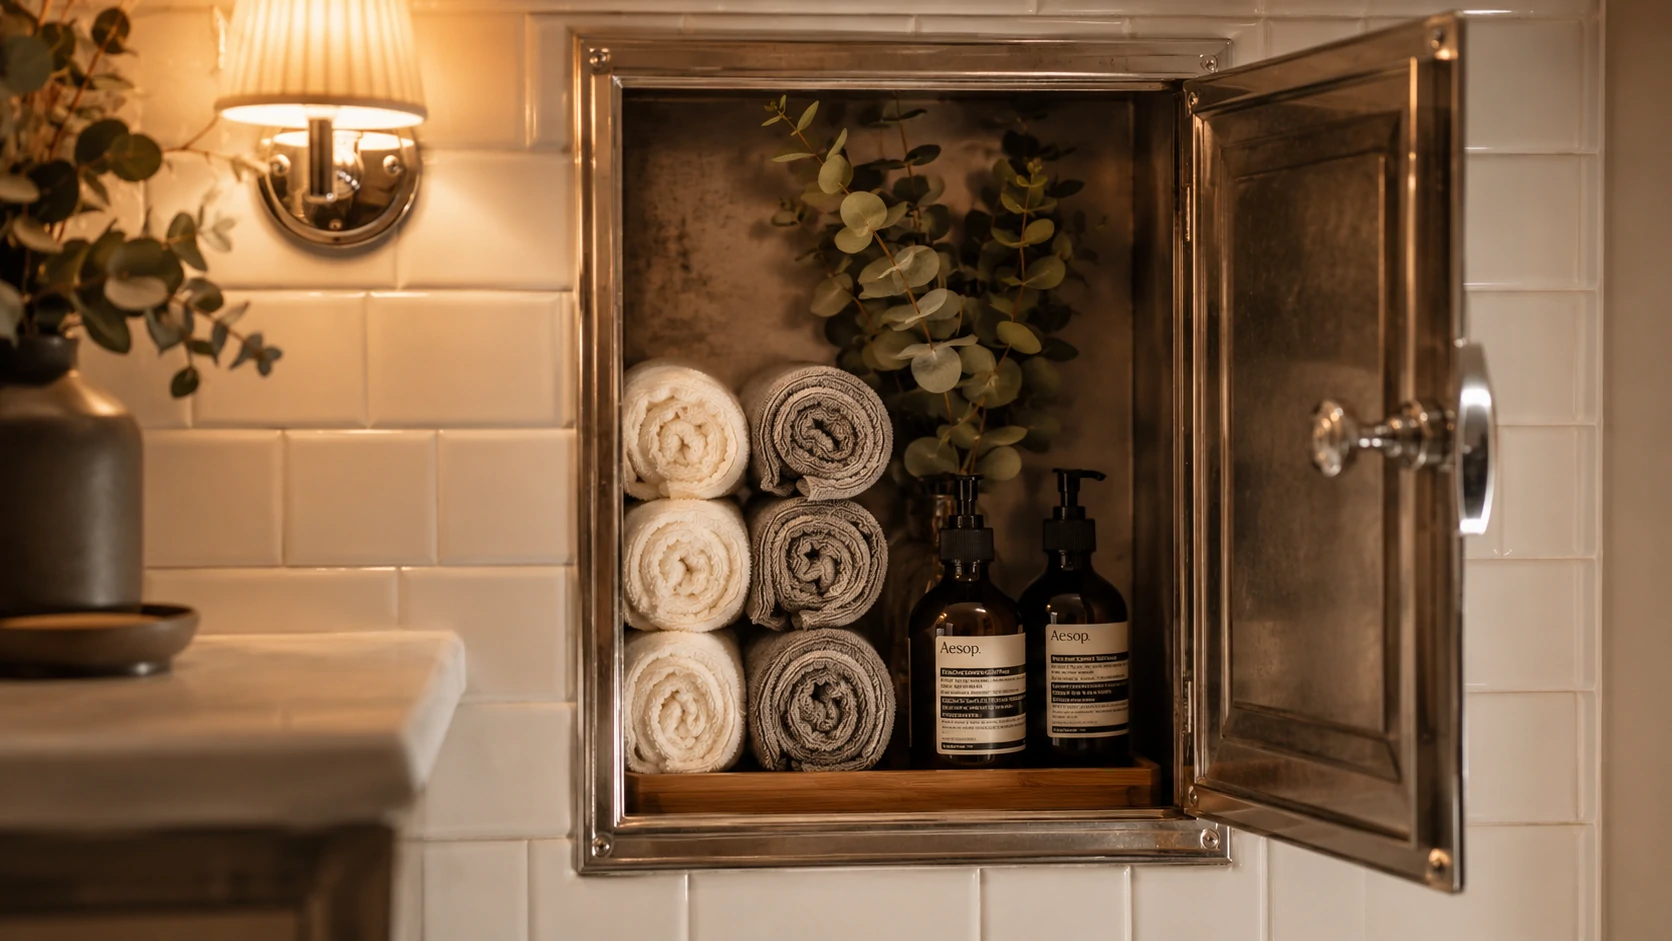
- Can be repurposed as recessed bathroom storage if the unit is structurally sound
- Restoration is possible with rust converter, metal-safe primer, and rust-inhibiting topcoat
What the Slot Opening at the Top Actually Does

That narrow slot is one of the more overlooked design decisions in mid-century residential construction — and also the most common source of confusion for anyone encountering these units for the first time.
It’s not a vent. It’s not broken. It’s a laundry drop-slot, and it served a specific ergonomic purpose.
Rather than opening the full-size door every time a resident tossed in a shirt or a towel, they could push laundry through the slot one-handed without disturbing anything else in the bathroom. It reduced hinge wear, kept the bathroom tidier, and made a small daily routine slightly faster. Think of it as the mid-century version of a convenience feature that nobody noticed because it worked.
The opening is intentionally narrow — wide enough for clothing, not wide enough for anything to easily fall back out, and sized to limit odor escape from the cavity below. In chute-connected versions, the slot also added a second separation layer between residents and the open shaft running below.
If the slot on your unit looks painted shut or like it’s never been touched, that’s common. Many of these fixtures sat completely unused for decades before the current tenant discovered them.
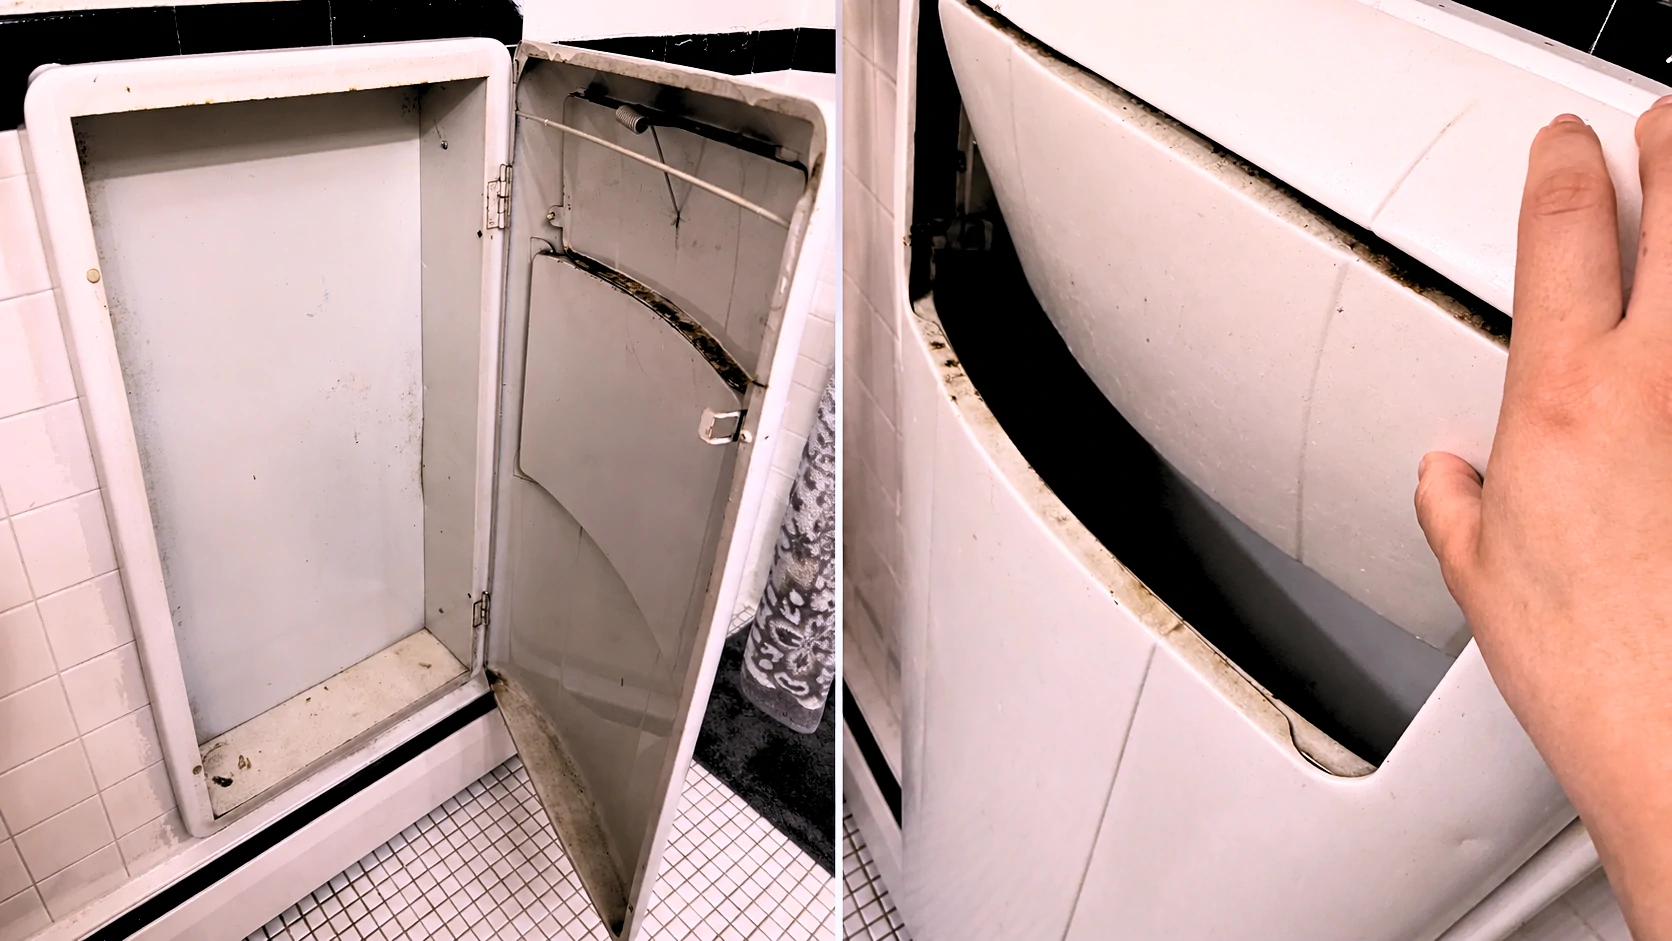
Is Yours a Standalone Hamper or a Laundry Chute?
This distinction matters more than it might seem. A standalone unit is a sealed metal cavity — essentially a built-in laundry bin with a solid floor. A chute-connected unit opens into a vertical shaft that passes through multiple floors of the building down to a central collection room, typically in the basement.
The two variants have meaningfully different maintenance implications, safety considerations, and removal complexity. Getting this wrong before you start poking around can create problems that were entirely avoidable.
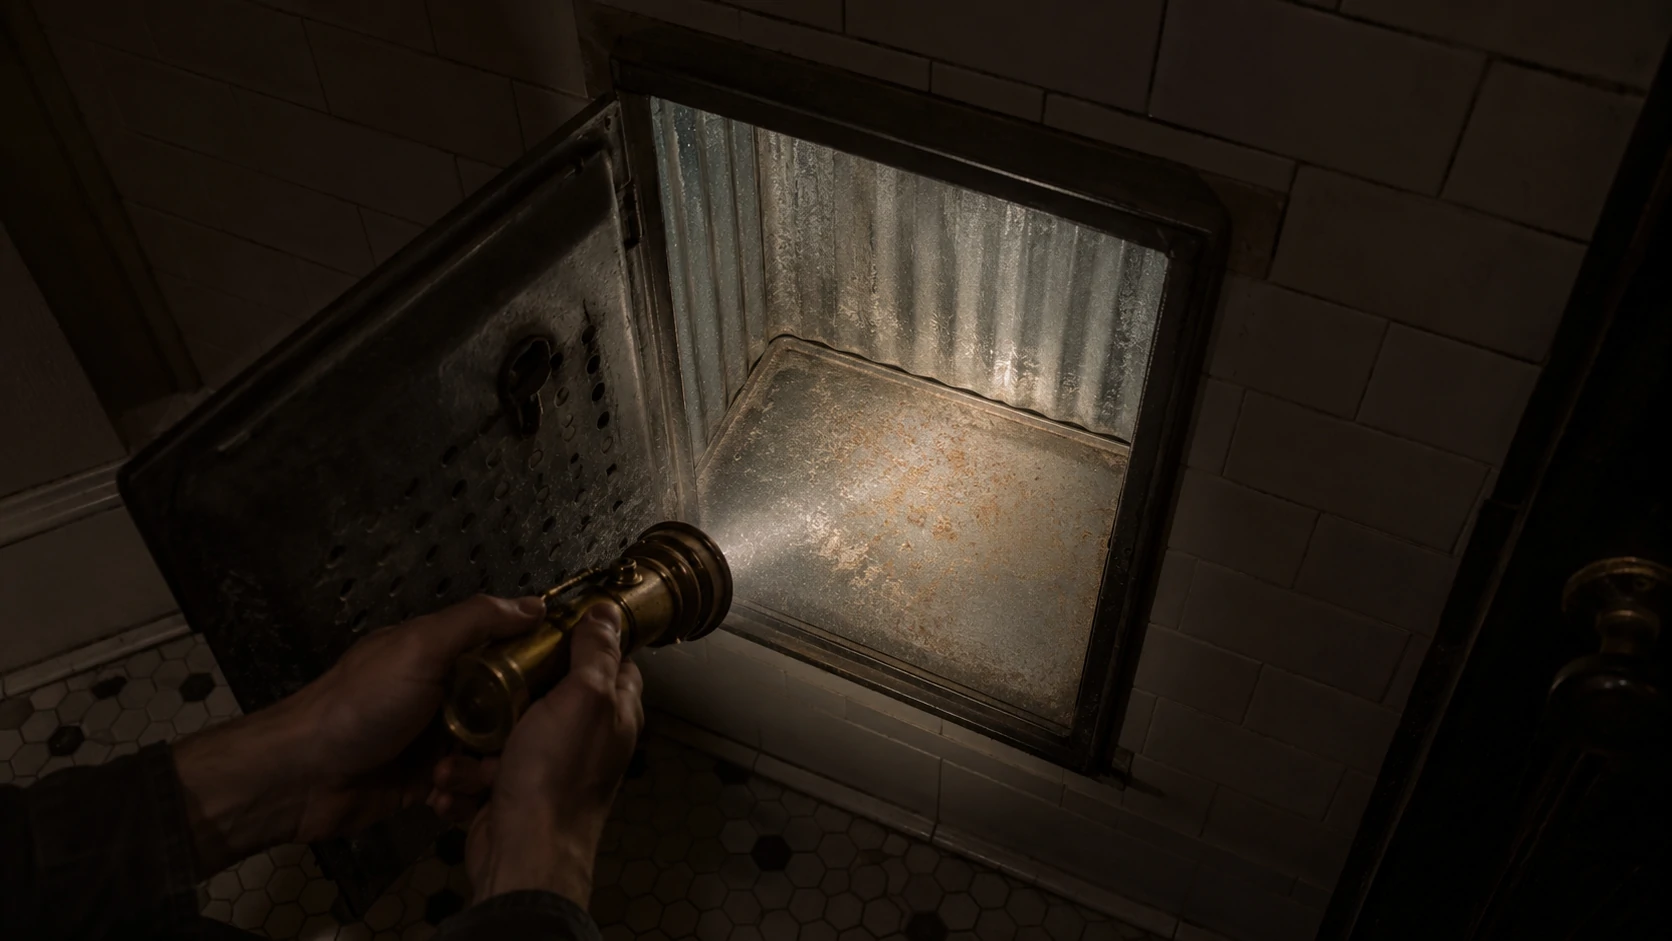
Here’s how to tell the difference right now:
Grab a flashlight, open the main access door (or shine the light through the drop slot if the door is stiff), and look at the bottom of the unit.
| What You See | What It Means |
|---|---|
| A solid metal floor pan at the bottom of the cavity | Standalone unit — the cavity is self-contained |
| An open shaft descending below floor level | Chute-connected — part of a building laundry system |
If it’s chute-connected, avoid putting anything other than laundry into it. And don’t seal it permanently without first confirming with your building manager. Active chutes are shared building infrastructure — building staff may need access, and other residents may still be using the system from floors above or below.
When Were These Built and Why Did Buildings Have Them?
Recessed laundry hampers began appearing in American residential construction in the early twentieth century and reached their peak installation during the post-war apartment building boom of the 1940s and 1950s.
The fixture made particular sense in dense urban apartment buildings, where in-unit laundry wasn’t possible and residents needed a practical way to hold dirty clothes between trips to a shared laundry room or building chute. Installing the hamper directly into the bathroom wall cavity kept it out of the living space entirely, eliminated the need for freestanding laundry bins, and — critically — served as a marketing feature. Buildings with recessed hampers were positioned as offering modern conveniences that lower-budget construction didn’t bother with.
Cities with large surviving pre-war and mid-century residential stock are the most common places to find them: New York, Chicago, Boston, Philadelphia, San Francisco, and Baltimore all have notable concentrations. They appeared in row houses and duplexes of the same period too, though less frequently than in purpose-built multi-unit buildings.
Manufacturing varied by building grade. Standard units were galvanized steel or chrome-plated steel. Higher-end buildings sometimes featured interiors with porcelain enamel coatings. Construction was typically robust — these weren’t afterthoughts. They were framed directly into the wall stud cavity with metal flanges, wood blocking set into plaster-and-lathe walls, and hardware that included a piano hinge on the main door and a magnetic or spring latch. The units were designed to last the life of the building, and most of the surviving ones prove that point.
Why You Almost Never See These in Newer Buildings
Several things converged between the 1960s and 1980s that effectively ended the recessed hamper’s run in new residential construction.
The biggest factor was in-unit washer/dryer hookups becoming a standard apartment amenity. Once residents could do laundry inside their own unit, centralized chute systems and dedicated bathroom hamper niches stopped being conveniences and started being architectural complications.
Fire code changes accelerated the shift. Laundry chute shafts running vertically through multiple floors create a direct path for fire and smoke to travel between levels. Building codes tightened requirements around chute shaft construction, fire-damper installation, and the materials used for access doors. Compliance became more expensive and technically demanding, making the systems harder to justify in new construction.
Construction economics also shifted dramatically. The labor and material cost of custom-fabricating a recessed metal unit and properly framing it into each individual bathroom wall didn’t survive the value-engineering that characterized residential construction from the 1970s onward. A plastic laundry basket costs nothing and requires nothing from the contractor.
The result is that anyone under about 50 has likely never seen one of these fixtures before moving into an older building — which explains exactly why they’re so disorienting the first time.
Is It Safe to Use or Leave In Place?
For most people, the honest answer is yes — with a brief inspection first. A dry, structurally sound unit in a post-1980 building is not a meaningful health concern under normal circumstances.
In older buildings, a few specific things are worth checking before you use the unit or start handling its surfaces aggressively.
Interior rust: Look for flaking or pitting rather than just surface discoloration. Surface oxidation is cosmetic and manageable. Actively flaking rust — where scale is loose and separating from the metal — suggests the floor pan or walls of the cavity may have deteriorated significantly, particularly at the base where moisture accumulates over time.
Moisture and mold: Open the door and let the unit air out before doing anything else. A musty odor means the cavity trapped moisture at some point, possibly for years. Surface mold on the metal interior is treatable, but you need to address it, not seal it back in. Look carefully at the floor pan and the back wall of the cavity.
⚠️ Warning: Pre-1980 Buildings — Read Before Touching the WallAsbestos: The insulation, fire-stop material, or joint compound surrounding the unit in a pre-1980 building wall cavity may contain asbestos. Do not cut, sand, drill, or otherwise disturb the wall surround without professional asbestos testing first. This applies to any demolition work around the unit, not just full removal.Lead paint: In pre-1978 buildings, painted metal surfaces — including the hamper door and interior — may contain lead paint. Wear gloves when handling painted surfaces. Do not sand painted surfaces without appropriate respiratory protection and containment measures.
For renters specifically: using the unit as-is for general storage is generally fine once you’ve confirmed it’s dry, structurally intact, and free of visible flaking rust or mold. You don’t have to do anything to it to be safe in normal use — but knowing what you’re working with matters before you start pulling on trim pieces or scrubbing aggressively.
How to Clean and Deodorize a Vintage Recessed Hamper
Decades of use — or decades of sitting unused — leave behind a residue that a quick wipe down won’t fix. Here’s a proper sequence that addresses the problem without introducing new ones.
- Open the unit and let it air out for at least 24 hours before doing anything else. Don’t rush this step. Sealed cavities hold odors that need time to dissipate naturally first.
- Vacuum loose debris from the interior — accumulated lint, dust, and anything sitting at the bottom of the cavity. A crevice attachment works cleanly along the floor pan and seams.
- Wipe all interior surfaces with a cloth dampened with a mild all-purpose cleaner diluted in warm water. Don’t saturate the metal. The goal here is cleaning, not introducing more moisture into a cavity that you’re trying to dry out.
- Treat surface rust spots with a rust converter spray or gel before they spread. Apply only to affected areas. Don’t use acidic rust removers across the full interior unless you plan to repaint — they leave the surface in a condition that requires priming regardless.
- Deodorize the cavity by placing an open box of baking soda inside for 48 hours with the door slightly ajar. A cloth wiped with undiluted white vinegar along the interior surfaces also neutralizes organic odors effectively before the baking soda treatment.
- Dry completely before closing. Leave the door propped open for another 24 hours after cleaning. Sealing moisture back inside is how a clean unit becomes a mold problem three months later.
One thing to avoid: bleach directly on rusted or bare metal surfaces. It accelerates oxidation rather than treating it.
How to Restore a Rusted or Chipped Recessed Hamper
Surface corrosion on these units is expected, not alarming. The original factory paint or enamel wasn’t intended to last 80 years without maintenance. Most units are fully restorable with the right materials and a patient afternoon.
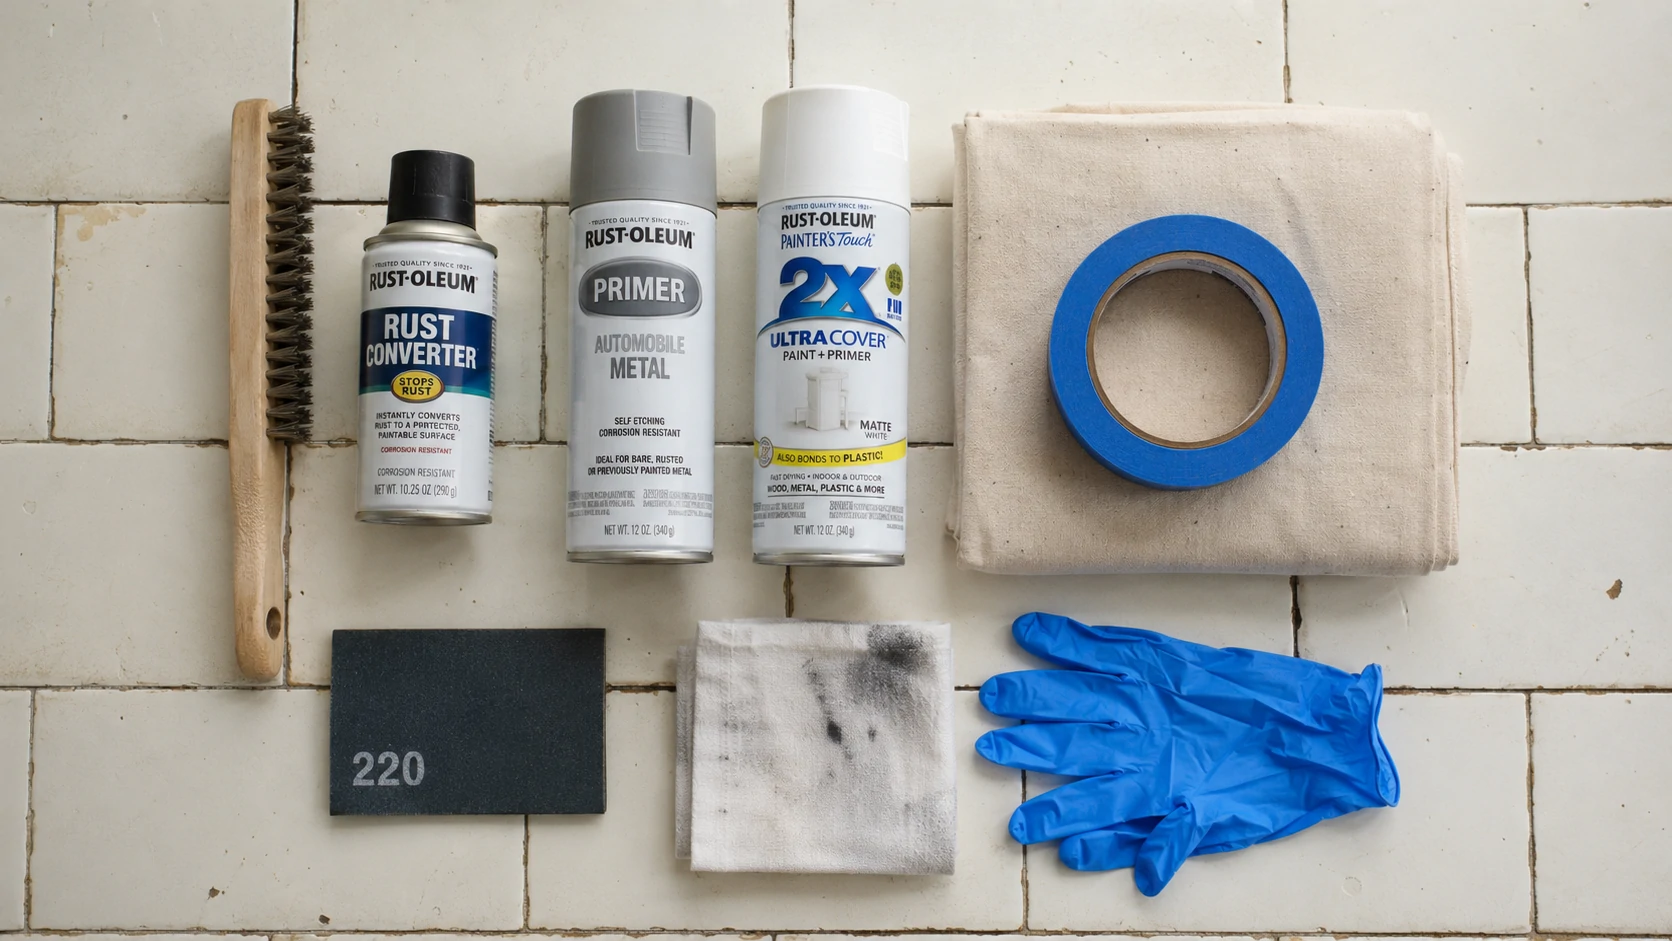
What you’ll need:
- Wire brush or fine steel wool — for removing loose rust scale before treatment
- Rust converter gel or spray — neutralizes existing rust chemically, converts it to a stable compound
- Metal-safe primer — standard wall primer will not adhere to bare metal reliably; this is the step most DIY restores skip and then wonder why the paint peels
- Rust-inhibiting spray paint in your preferred finish (satin or semi-gloss reads cleanest on interior metal surfaces)
- Painter’s tape and drop cloth for masking the surrounding wall trim and tile
- 220-grit sandpaper for light scuff-sanding between coats
Restoration steps:
- Wire-brush all visibly rusted areas to remove loose scale and flaking paint. Applying converter over loose material delays the problem rather than solving it.
- Apply rust converter to affected surfaces per the product instructions. Full cure time matters — typically 24 hours. Don’t shortcut it.
- Scuff-sand lightly with 220-grit to give the primer a mechanical surface to grip. Wipe off dust with a tack cloth before priming.
- Apply metal-safe primer in two thin coats, allowing full dry time between coats. Two thin coats outperform one thick coat in adhesion and long-term durability.
- Apply rust-inhibiting topcoat in 2–3 light passes from 10–12 inches away. Light passes prevent runs, which are difficult to sand out inside a cavity.
- Allow 48–72 hours cure time before loading the unit with anything.
A mistake that shows up repeatedly in older rental properties: painting directly over rust with standard interior wall paint, no surface prep. It looks acceptable for a few months, then blisters and peels. Doing it properly once is far less work than doing it wrong twice.
How to Re purpose It If You’re a Renter (No Permanent Modifications)
The renovations aren’t yours to make. But the cavity is legitimate storage real estate, and with a small amount of organization it becomes genuinely useful rather than just strange.
Most recessed laundry hampers have interior dimensions in the range of 12–16 inches wide, 18–24 inches tall, and 8–12 inches deep. That’s enough space to matter without requiring any tools or modifications.
Practical no-modification uses:
- Rolled towels. Towels rolled rather than folded fit cleanly in the cavity, look intentional, and are easy to grab one-handed. This is basically what the unit was ergonomically designed for, just with different contents.
- Cleaning supply niche. Toilet bowl cleaner, a spare brush, surface spray, a bottle of drain cleaner — the items that normally crowd the floor under the sink.
- Toiletry overflow. Extra toilet paper rolls, backup soap, travel-size products, hair supplies that don’t fit in the medicine cabinet.
- Removable shelf liner insert. A cut-to-fit piece of shelf liner on the floor of the cavity stabilizes items and makes wipe-down much easier. Completely removable and leaves zero trace.
One thing to avoid: sealing a chute-connected unit with anything permanent. If the chute is part of the building’s infrastructure and maintenance staff need access, you do not want to be the tenant who blocked it.
Should Landlords Keep, Restore, or Remove These Units?
This is a more nuanced question than it looks from the outside.
In period-appropriate buildings — pre-war brownstones, classic-six apartments, 1940s courtyard buildings — a functional, well-maintained recessed hamper is a genuine character detail. Some tenants actively seek out buildings with intact original architectural features, and a restored unit in a period bathroom reads as considered preservation rather than neglect. In that context, removing it to patch a rectangular hole in a tile wall doesn’t necessarily improve anything.
The case for removal strengthens considerably when the unit is structurally compromised, the surrounding wall shows signs of water damage, or the bathroom is being fully renovated anyway. At that point, the labor is already being paid for, and patching the cavity to install a modern recessed niche or additional storage makes more practical sense than restoring a fixture the renovation will make visually inconsistent.
A practical decision framework:
- Clean and keep: Unit is functional, interior is dry, metal surfaces are intact or easily treated. Building is period-appropriate. No safety concerns.
- Restore cosmetically: Surface corrosion is present but the metal structure is sound. Bathroom is not being renovated. Cost-to-benefit ratio favors restoration over removal.
- Remove and patch: Unit is structurally compromised, connected to a decommissioned chute, showing moisture intrusion into the wall cavity, or the bathroom is being fully gutted regardless.
| Approach | Approximate Cost (U.S.) | Best For |
|---|---|---|
| Clean and leave in place | $0–$50 DIY | Rentals, period buildings, functional units |
| Cosmetic restoration (rust treatment + repaint) | $50–$150 DIY / $200–$400 contractor | Structurally sound units with surface corrosion |
| Full removal + wall patch | $300–$900 contractor | Gut renovations, compromised units, safety concerns |
| Asbestos testing before removal | $200–$500 | Pre-1980 construction — treat this as non-negotiable |
Costs are estimated ranges for the U.S. market. Regional labor rates vary significantly. Get multiple quotes before committing to contractor work, particularly in high-cost urban markets where these units are most common.
When to Call a Contractor Instead of DIYing It
Cleaning and cosmetic restoration are well within DIY range for most people. The line shifts quickly once the wall itself is involved.
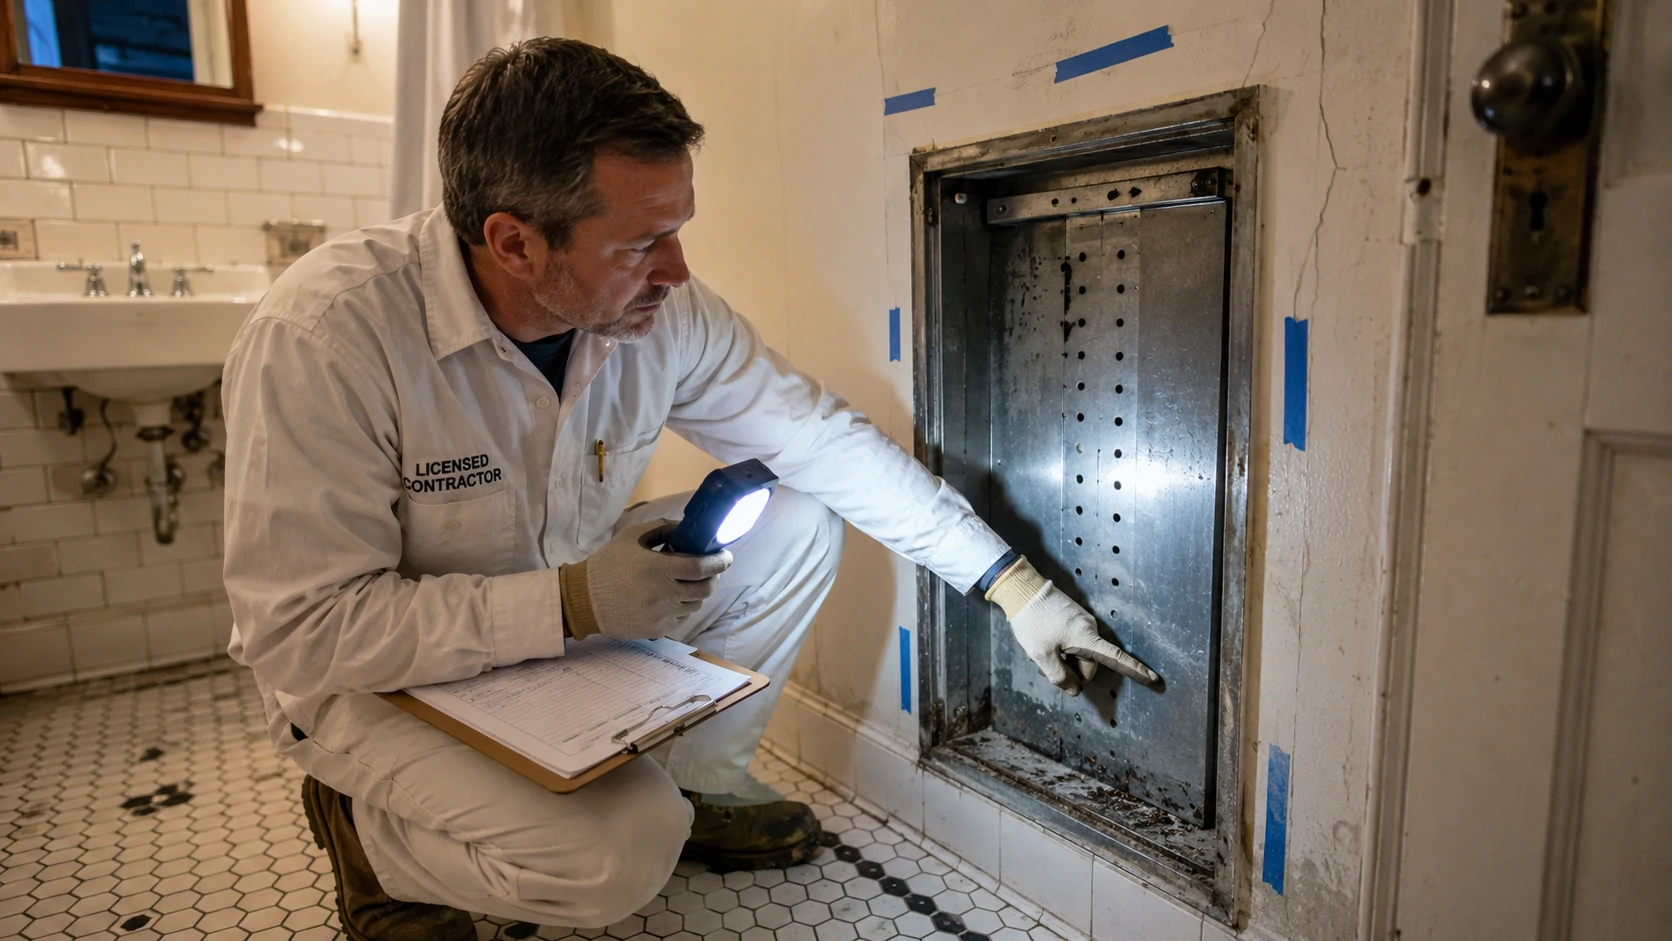
Get a licensed contractor involved when:
- The surrounding wall plaster shows visible cracks, bulging, or water staining around the unit — these point to moisture that has already reached the wall cavity, not just the metal surface
- The unit appears to connect to a multi-floor laundry chute that may still be active shared building infrastructure
- You’re in a pre-1980 building and any wall demolition is involved — asbestos testing before demo is a professional obligation, not an optional precaution
- There is active mold in the wall cavity itself, not just on the metal surfaces accessible from the front
- The floor pan is corroded through and there’s evidence moisture has reached the subfloor or structural framing below
- You’re a landlord planning a full bathroom renovation that requires the wall to be patched, tiled, and finished to match existing surfaces — that’s a finish carpentry and tile work problem, not a hamper removal problem
Removing a recessed unit looks deceptively simple from the bathroom side. Inside the wall, the unit is typically anchored with metal flanges screwed into studs and surrounded by wood blocking that’s been in place since the original construction. Prying it out without understanding what’s behind it is how plaster cracks, surrounding tiles break, and wall cavities get opened without appropriate testing or containment.
Frequently Asked Questions
What is the small slot opening at the top of a built-in bathroom hamper for?
The slot is a laundry drop-slot, designed so residents could push clothing into the hamper one-handed without opening the main access door. It reduced hinge wear and kept the routine faster and tidier. It is a designed feature, not damage or a broken hinge.
How do I know if my recessed hamper connects to a laundry chute or is just a wall cavity?
Open the access door and shine a flashlight into the unit. A visible solid metal floor pan at the bottom means it’s a standalone cavity. An open shaft descending below floor level means it’s connected to a building laundry chute running to the basement or a central collection area.
Is it safe to use a vintage metal laundry hamper in an old apartment?
Generally yes, after a basic inspection. Check for flaking rust, interior mold, and moisture inside the cavity. If the unit is dry and structurally intact, it poses no meaningful health risk in normal use. In pre-1978 buildings, handle painted surfaces carefully due to potential lead paint content.
What era of apartment buildings typically had recessed metal laundry hampers?
These fixtures were most common in American apartment buildings constructed between roughly 1920 and 1965. The highest concentration is in urban residential stock in the Northeast and Midwest — New York, Chicago, Boston, and Philadelphia in particular.
Can I remove a built-in laundry hamper if I’m renting?
Not without explicit written permission from your landlord. The unit is a fixed part of the building. Unauthorized removal or permanent modification typically constitutes a lease violation and can result in liability for the full cost of restoring the wall to its original condition.
How do I clean and deodorize a recessed metal hamper that hasn’t been used in decades?
Air it out for at least 24 hours first. Then vacuum loose debris, wipe interior surfaces with diluted mild cleaner, treat any rust spots with rust converter, and leave an open baking soda box inside for 48 hours with the door slightly ajar. Keep the door propped open during drying. Avoid bleach on bare or rusted metal.
How do I treat rust on a vintage metal laundry hamper?
Wire-brush loose scale first, apply rust converter to affected areas and allow full cure time, then prime with metal-safe primer and finish with rust-inhibiting spray paint in thin coats. The most common failure in DIY touch-ups is painting directly over rust without any surface preparation — it looks fine briefly and fails within a year.
Why did builders stop installing recessed laundry hampers in new construction?
In-unit washer/dryer hookups became standard, fire codes tightened significantly around laundry chute shaft construction requirements, and construction economics eliminated fixtures that required custom fabrication and precise wall framing. All three factors converged in the 1970s and early 1980s.
Does a vintage built-in hamper add or reduce property value in a bathroom renovation?
Context determines this entirely. In a period-appropriate building with a well-maintained unit, it’s a character detail that appeals to the right buyer or tenant. In a fully modernized bathroom, it reads as an inconsistency. Condition and surrounding aesthetic matter far more than the fixture’s inherent presence or absence.
Is there asbestos risk when removing a recessed metal hamper from an older wall?
Potentially yes. Insulation, fire-stop material, or joint compound in the surrounding wall cavity of a pre-1980 building may contain asbestos. Professional testing before any wall demolition in buildings of that era is the responsible step — this applies to the wall surround, not just the metal unit itself.
What can I use a recessed hamper cavity for besides laundry storage?
Rolled towels, cleaning supplies, toiletry overflow, or a removable shelf liner insert for bathroom sundries all work well without requiring any modification. The cavity offers genuine utility with a small amount of organization.
How much does it cost to professionally remove and patch a recessed wall hamper?
Typical U.S. contractor range is $300–$900 for removal and wall patching, depending on wall material (plaster vs. drywall), tile involvement, and whether asbestos testing is required first. In high-cost urban markets where these units are most common, the upper end of that range or beyond is realistic.
Are there modern replacements that fit the same wall opening as vintage units?
No direct off-the-shelf equivalent exists. Custom metal fabrication can replicate the form, but it’s rarely cost-effective. Most renovation projects fill the opening with a recessed wall niche or a standard recessed medicine cabinet if the dimensions allow.
What materials were vintage recessed laundry hampers made from?
Most were galvanized steel or chrome-plated steel. Higher-end buildings sometimes featured porcelain enamel interior coatings. The frame and surround were typically anchored into the wall with wood blocking and metal flanges. Hardware consisted of a piano hinge on the main door and a magnetic or spring latch.
Which cities and building types are most likely to have recessed bathroom hampers?
Urban apartment buildings in New York, Chicago, Boston, Philadelphia, San Francisco, and Baltimore are the most common sources. Row houses, duplexes, and courtyard apartment buildings from the 1920–1965 period are also likely candidates. Purpose-built mid-range and luxury apartment construction of the era was more likely to include them than budget housing stock of the same period.
Related Reading: