Small Kitchen Renovation Before and After: A Real Case Study (Layout, Costs, and What Actually Worked)
-
 Olivia Reed
 - 15 Jun, 2026
.webp)
Most before-and-after kitchen renovations look inevitable in hindsight. The result is polished, the process is compressed into a few tidy paragraphs, and anything complicated gets quietly omitted.
This one covers the full picture — what the original kitchen looked like, what the design process involved, what turned up inside the walls, what that changed, and what the finished result actually cost in time and money. The goal is to give you enough detail to judge whether your own project is realistic, not to make this one look easier than it was.
Quick Answer
Renovating a small kitchen in an older home generally follows this sequence: confirm structural and asbestos status before any demolition; model the layout in 3D software before ordering cabinets; combine flat-pack cabinetry with one upgraded element — typically a hardwood benchtop; and retain original materials (floors, wall paneling) wherever possible to control cost and preserve character. Design, demolition, and cabinet installation are realistic DIY tasks. Electrical, plumbing, structural work, and asbestos removal require licensed tradespeople.
Quick Takeaways
- Never start demolition without confirming services are isolated, wall structure is known, and asbestos status is assessed
- Model the full layout in 3D before ordering a single cabinet — changing pixels costs nothing, changing installed cabinetry costs a lot
- Original pine floorboards under vinyl flooring are often in better condition than the vinyl itself
- Flat-pack cabinets paired with a reclaimed hardwood bench top is a proven strategy for controlling cost while lifting the overall finish
- When full wall removal isn’t structurally possible, repurposed framing timber becomes a feature — not a compromise
- Budget three to four times your initial timeline estimate if you’re working around full-time employment
- Pre-1990s Australian homes should be asbestos-assessed before any wall, floor, or ceiling disturbance
Before: What the Original Kitchen Actually Looked Like
**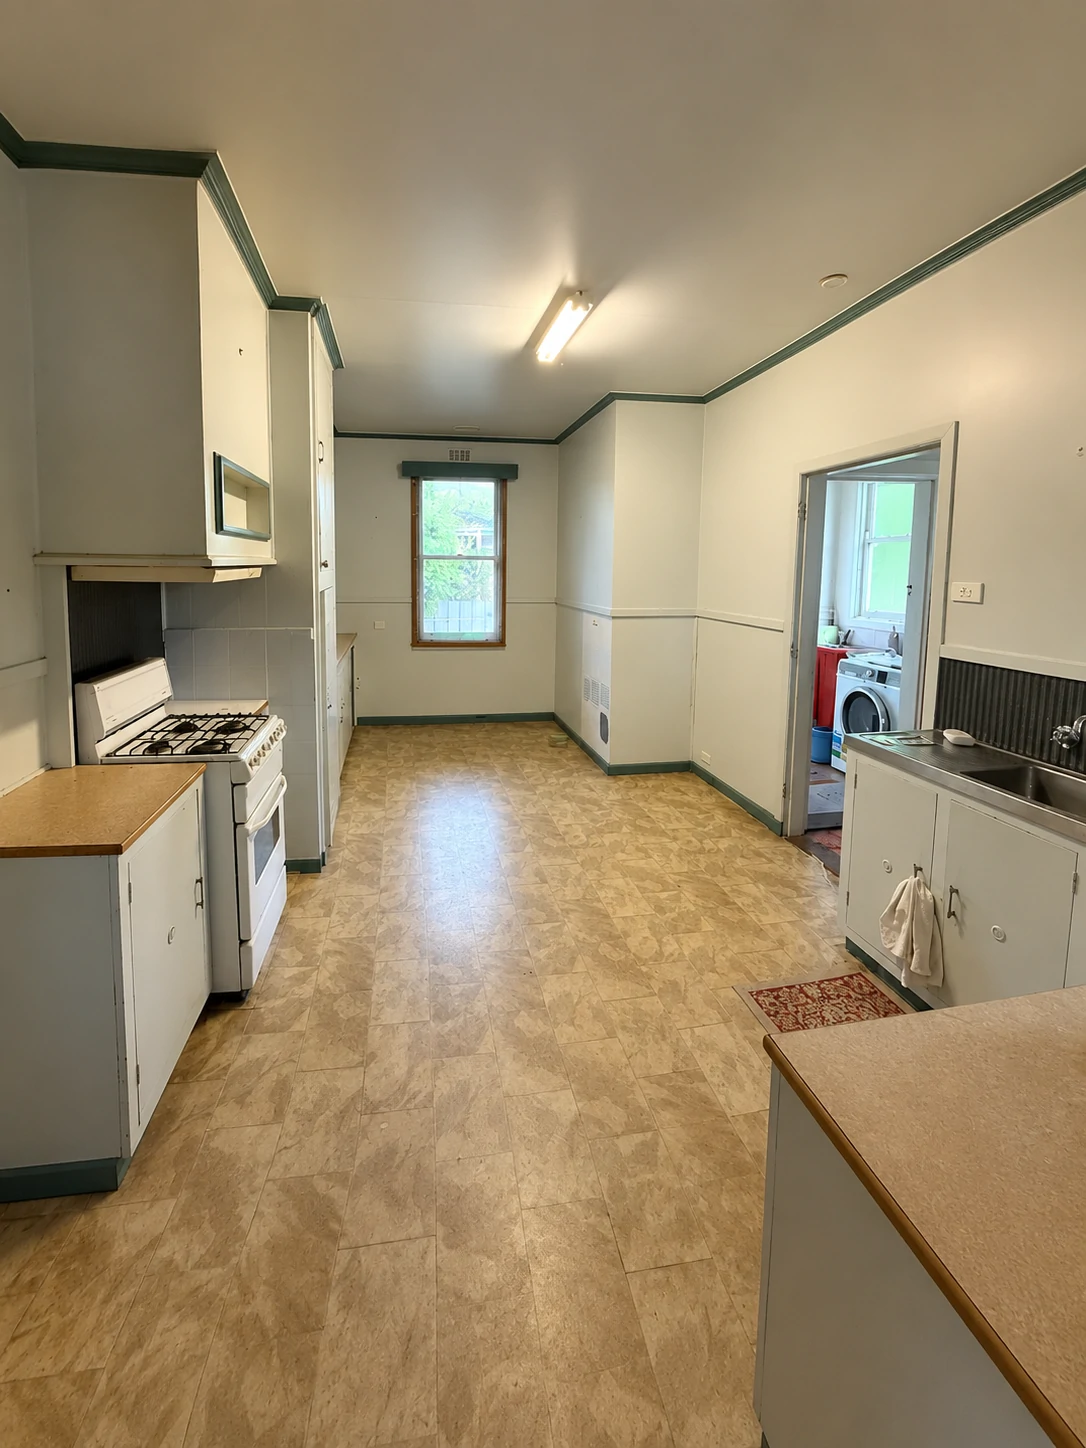
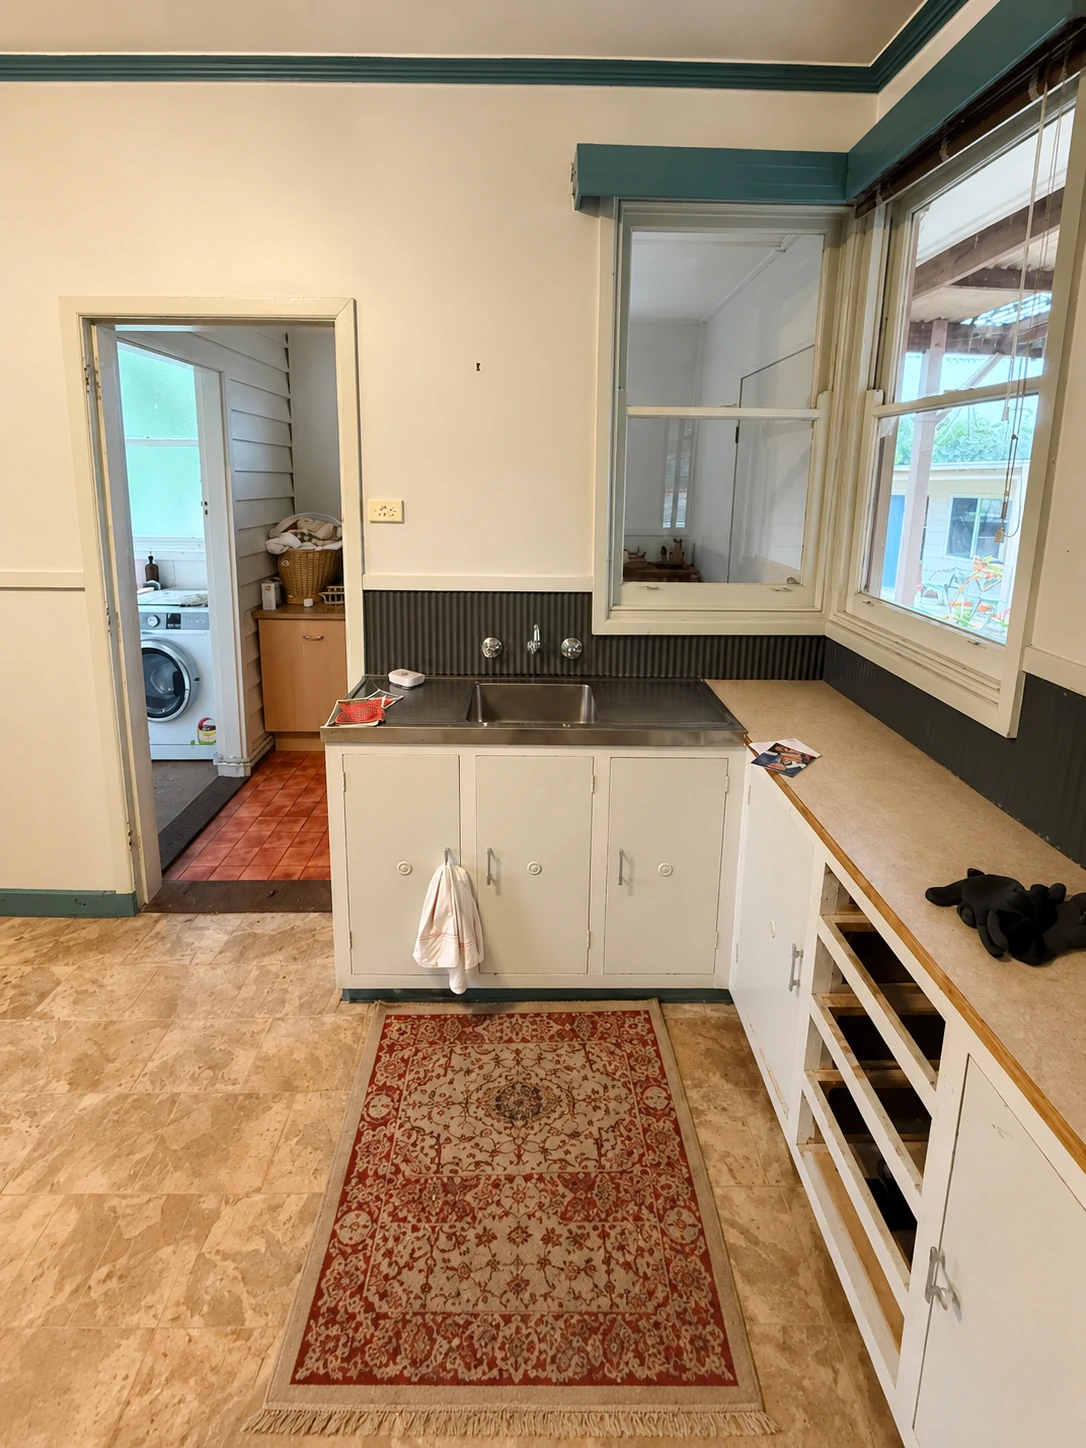
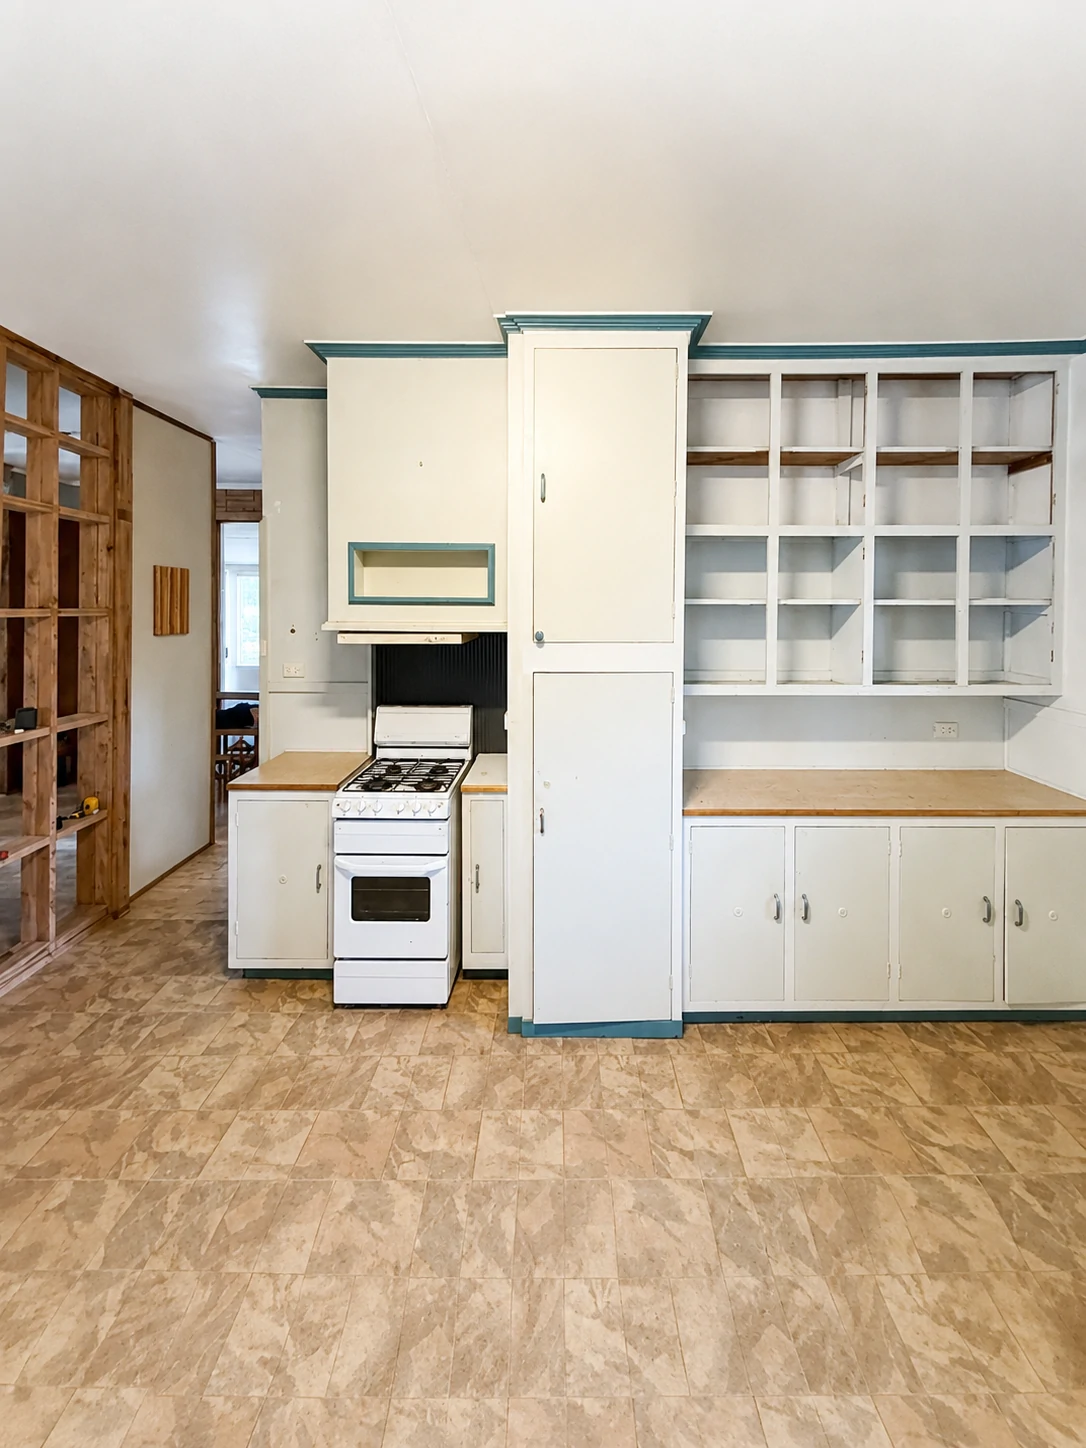
The original kitchen was functional in the loosest sense. Grey-green painted cabinetry with blue-teal cornice detail ran along two walls. The benchtops were laminate. Behind the sink, a corrugated iron splashback. Above the cooking zone, a fluorescent strip light that made everything look slightly worse than it was.
The floor was vinyl tile — the kind that conceals whatever’s underneath. That turned out to matter more than expected.
The most significant problem wasn’t the finish. It was the wall. A full-height partition separated the kitchen from the living room next to it, making the kitchen feel smaller and more isolated than its actual footprint justified. The initial plan was straightforward: take the wall down, open the space up, let the kitchen and living area breathe as one.
That plan survived most of the project. The wall didn’t make it quite that simple.
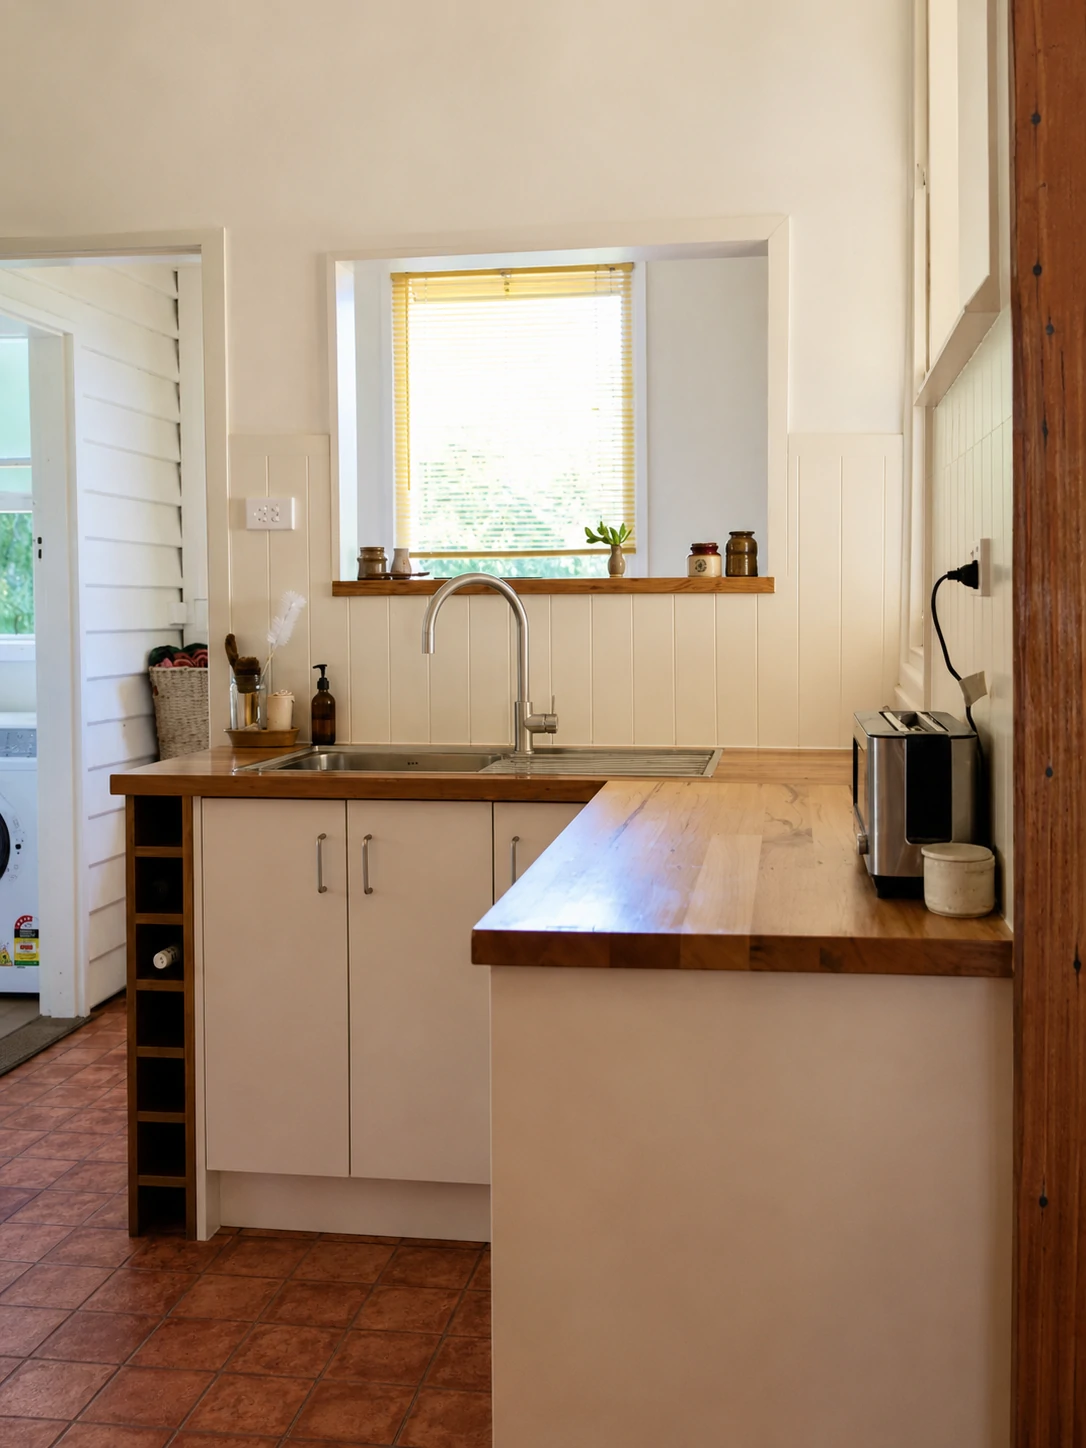
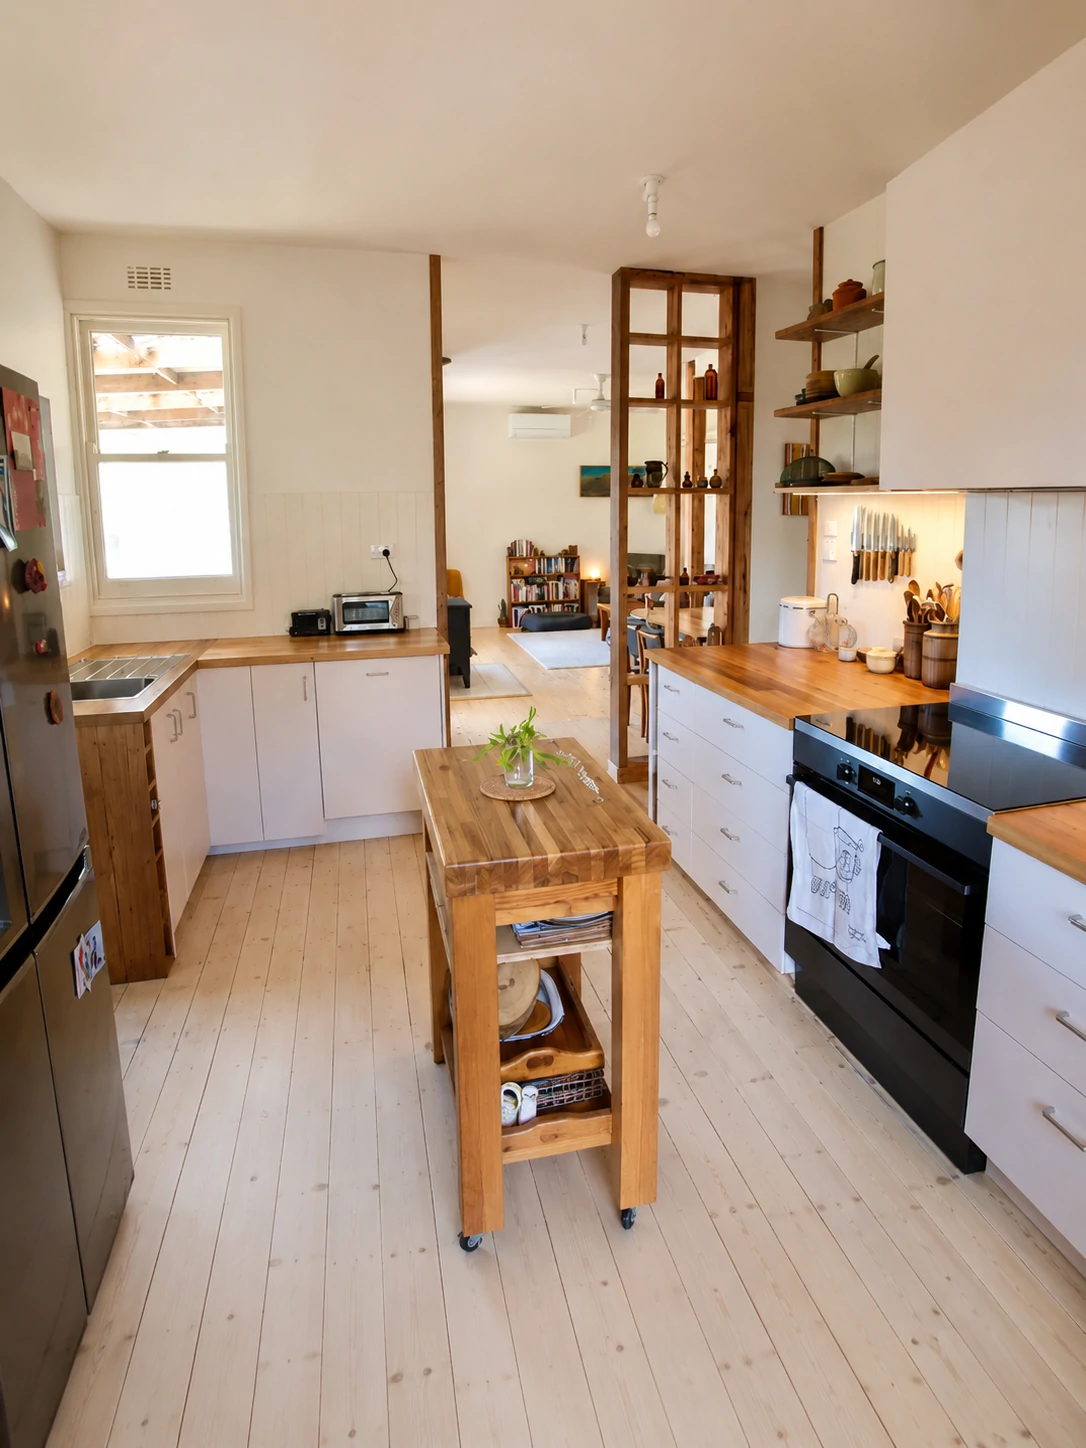
After: The Finished Result
**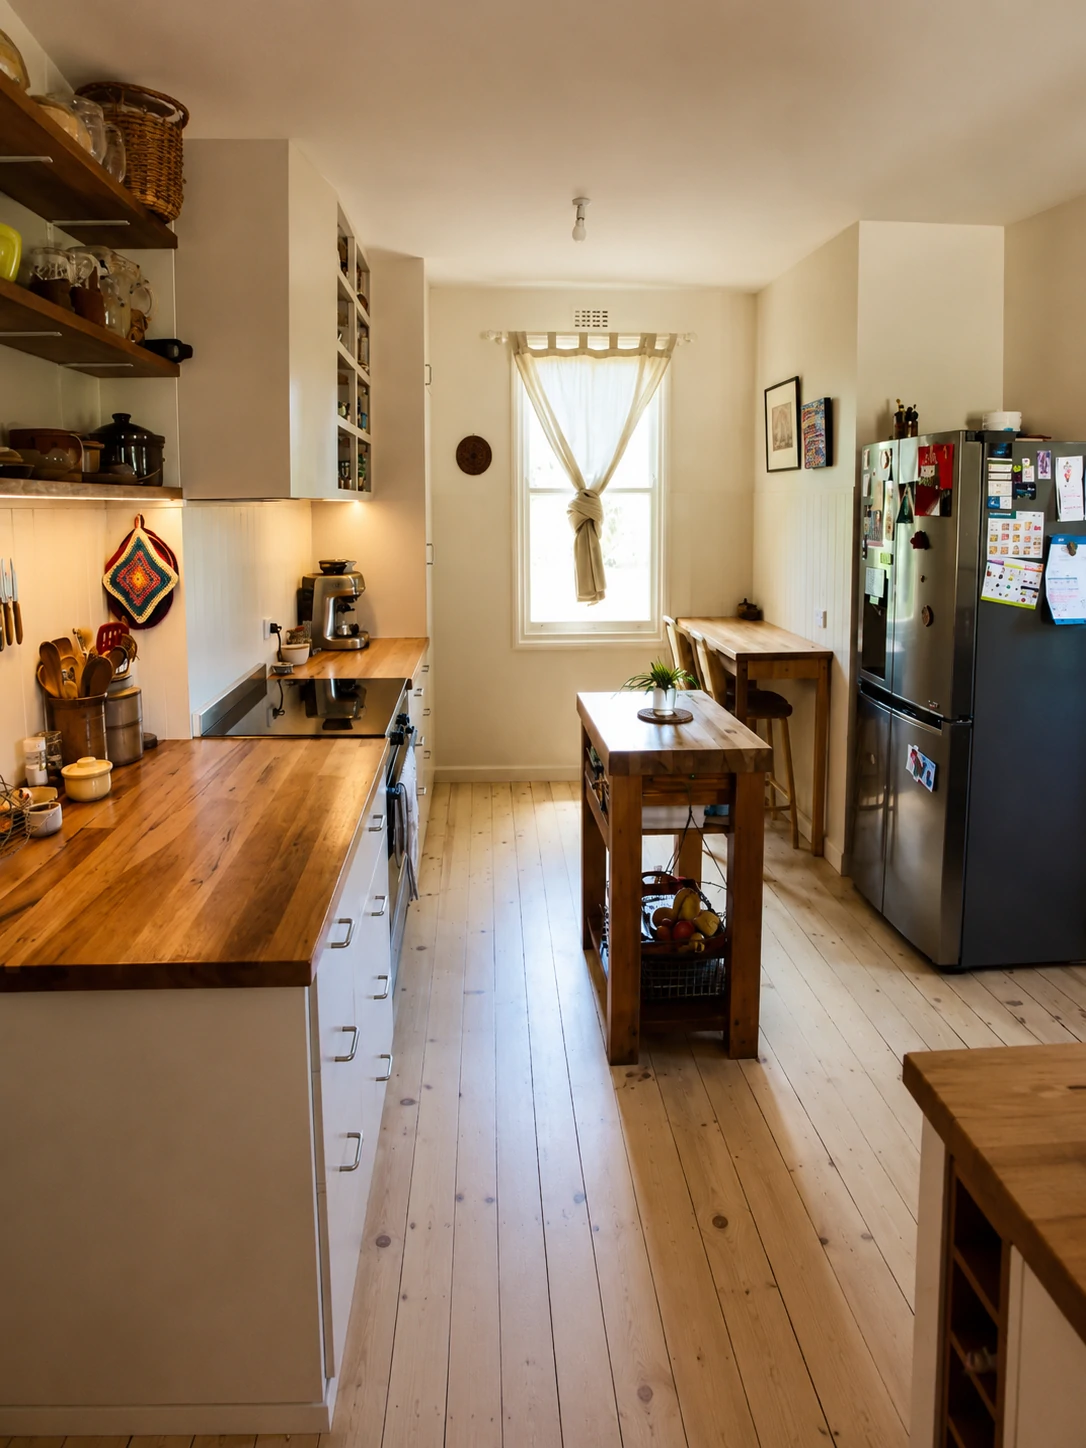
Project summary at a glance:
| Element | Decision |
|---|---|
| Layout | L-shaped with freestanding island |
| Cabinets | Flat-pack, white, simple profile |
| Benchtop | Reclaimed hardwood timber |
| Flooring | Original pine boards, sanded and oiled |
| Splashback | Existing VJ wall paneling, painted white |
| Between-room feature | Repurposed structural framing as open timber shelving unit |
| Cooktop | Induction |
| Oven | Built-in single, underbench |
| Tap | Gooseneck stainless mixer |
| DIY scope | Design, demolition, cabinet installation, joinery, floor sanding, painting |
| Licensed trades | Electrical, plumbing, structural engineering assessment |
| Planned timeline | 6 weeks |
| Actual timeline | ~5 months |
Planning the Layout
**
The kitchen footprint wasn’t going to change. What could change was how the space was organised within it — and how it connected to the living room next door.
For tight spaces, layout decisions come down to one thing: keeping the three main work zones — sink, cooktop, preparation bench — as close together as the footprint allows. Three layouts do this well:
Galley: Two parallel runs of cabinetry with a walkway between. Efficient for cooking, less so for socialising. Works best when the kitchen is a self-contained room.
L-shaped: Cabinetry on two adjacent walls with an open corner. Better when the kitchen flows into a dining or living area. Leaves room for a freestanding island or table in the centre.
U-shaped: Three walls. Maximum storage in a tight footprint, but the central walkway narrows quickly. Practical in rooms around 3–4m wide; cramped in anything narrower.
This kitchen became an L-shaped layout — cooking and preparation along the main wall, sink on the perpendicular wall toward the laundry. That configuration put the three work zones within a few steps of each other without sacrificing the open corner that makes the space liveable rather than just functional.
The freestanding island in the centre isn’t fixed cabinetry. It doubles as extra bench space and an informal eating spot, and — practically — it can move. That flexibility doesn’t exist with a built-in bench.
Designing It Before Buying Anything
**
The entire kitchen was modelled in SketchUp before a single cabinet was ordered. This step is skipped more often than it should be, usually because it sounds more complicated than it actually is.
SketchUp Free costs nothing. Cabinet manufacturers — including IKEA — have pre-built models in the SketchUp Warehouse that match actual product dimensions. The process involves building the room walls to scale, dropping in the cabinet units, and moving them around until the layout works. It takes a weekend if you haven’t used the software before. Less, if you have.
What 3D modelling catches before purchase:
- Benchtop overhangs that conflict with window sills
- Door swings that hit adjacent cabinets or appliances
- Sight lines from the living area — what will and won’t be visible
- Appliance placement relative to existing electrical circuits and plumbing rough-in locations
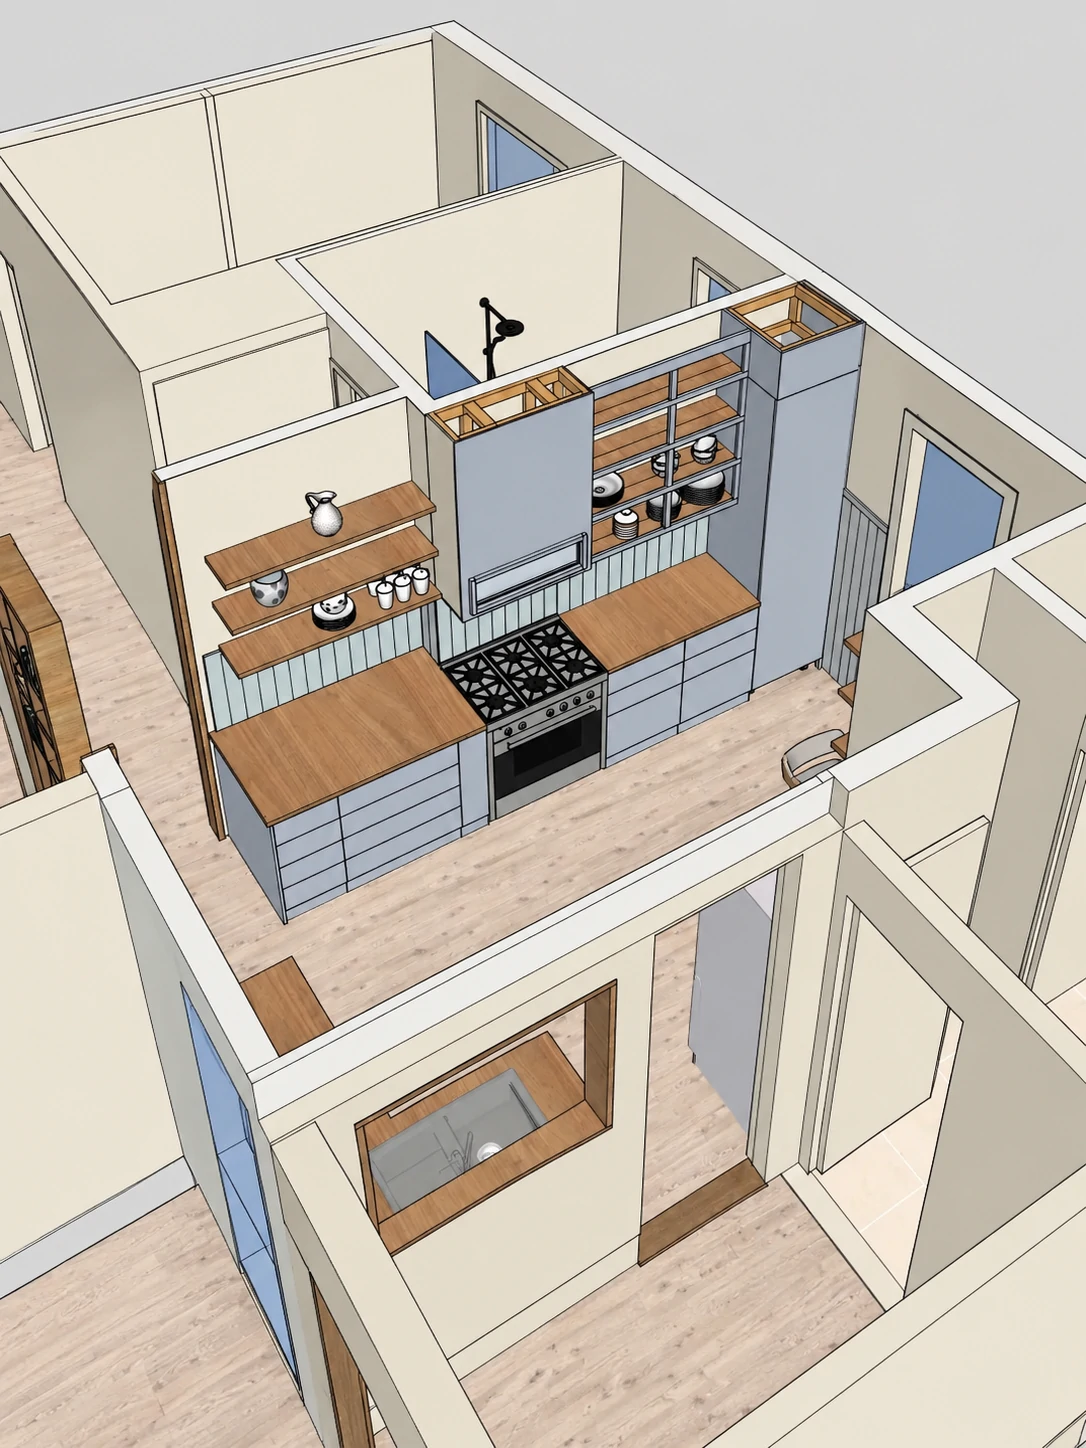
The design render in the images shows the kitchen modelled with actual cabinet unit dimensions, the planned open shelving above the cooking zone, and the room divider feature — all before walls came down. Several layout details changed between the first version and the one shown. That’s the point. Revising a 3D model costs nothing. Revising installed cabinetry costs significantly more.
One common homeowner mistake is ordering cabinets based on the layout plan provided by the supplier. Supplier plans optimise for the number of units sold, not for how the kitchen will actually be used. A 3D model you build and control does neither of those things.
Demolition: What to Confirm Before Touching Anything
**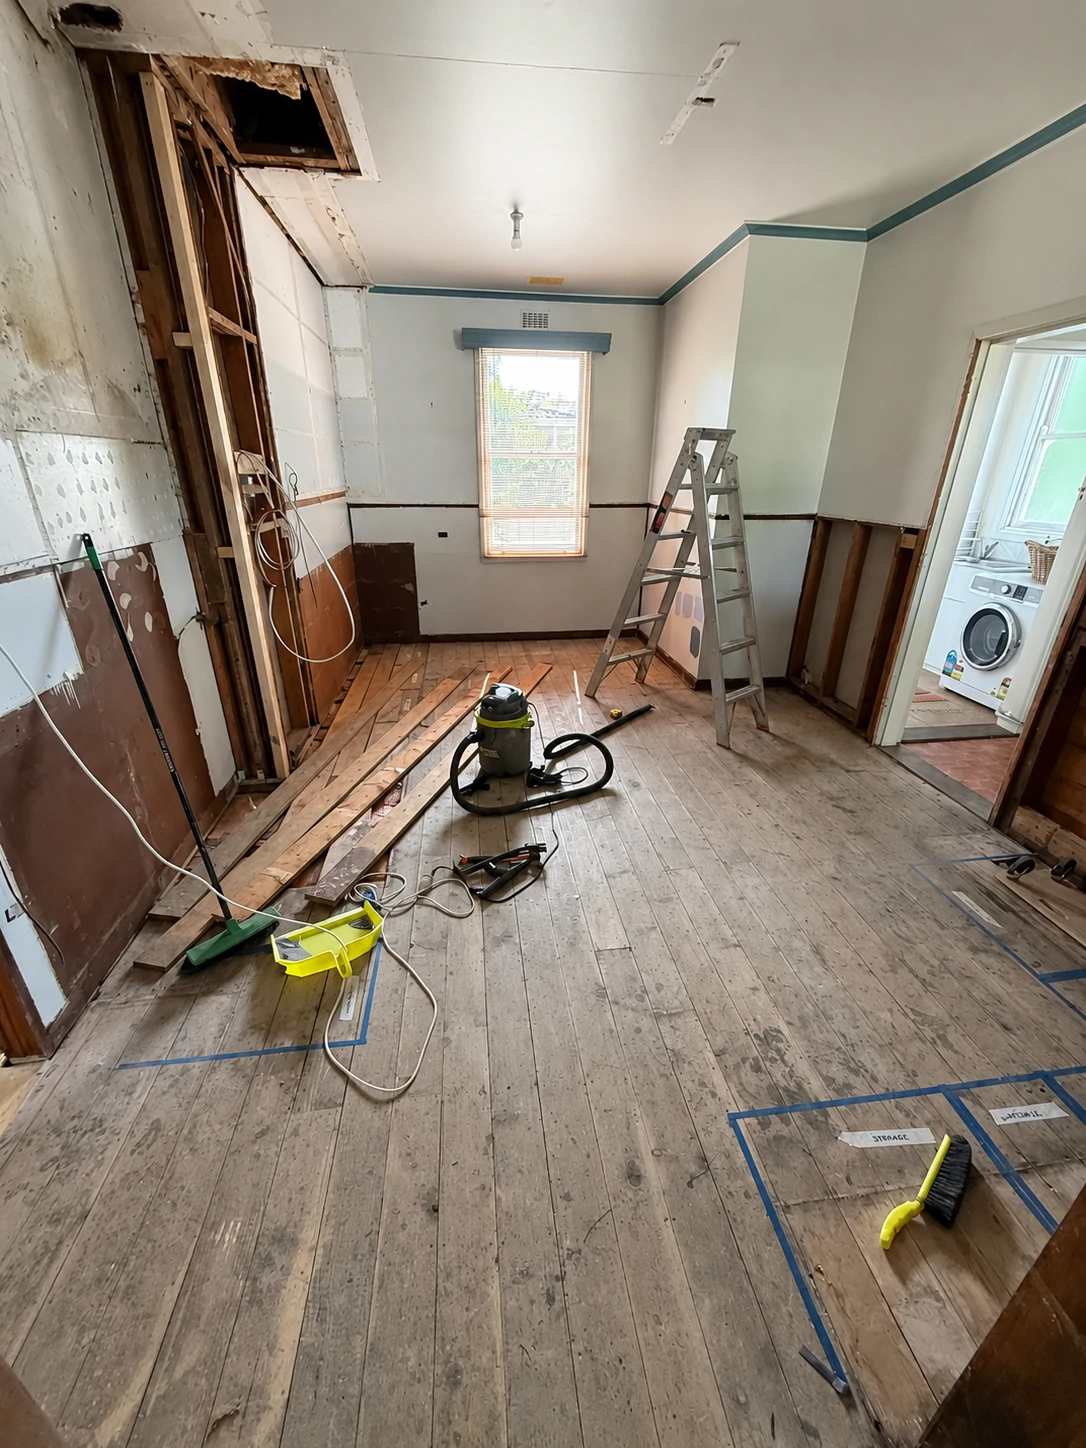
The demolition photo tells a familiar story. Wall linings gone. Electrical cables hanging. Original floorboards revealed. Blue painter’s tape on the floor marking where the cabinets will land.
What the photo doesn’t show is everything that had to be confirmed before any of that started.
Pre-Demolition Checklist
- Electrical service isolated — confirmed by a licensed electrician, not just a switched breaker
- Plumbing supply shut off at the isolation valve and pipes drained
- Gas service disconnected — licensed gas fitter only; not a DIY task in any state
- Wall structure assessed — stud locations and load-bearing status confirmed before cutting
- Asbestos status assessed — required for any pre-1990s Australian home before any wall, floor, or ceiling disturbance
- Subfloor condition known — particularly under vinyl or linoleum, which can hide moisture damage, rot, or — as happened here — original floorboards worth keeping
⚠️ Safety note: Cutting into a wall before services are confirmed isolated is how people get seriously hurt. Cutting into a wall that contains asbestos-containing materials without a prior assessment is how people get seriously ill. Neither shortcut saves meaningful time in the context of a full renovation.
One finding during the electrical phase: the wiring was older than the home’s age suggested and needed a partial re-run before walls could be closed. Inspection reports from homes of this era frequently flag ageing electrical as deferred work. Renovation is often the first opportunity to address it properly. Budget for it as a possibility rather than a surprise.
Dealing with Asbestos in an Older Home
Any Australian home built before 1990 is a potential asbestos-containing material (ACM) site. Homes built before 1980 carry a higher likelihood. Wall linings, flooring adhesives, ceiling sheeting, and some roofing materials from this era may contain asbestos fibres.
This is not a reason to abandon the project. It is a reason to test before cutting.
How Testing Works
A licensed asbestos assessor takes a small sample from the suspect material — wall lining, flooring adhesive, ceiling sheet — and sends it to a NATA-accredited laboratory. Results typically return within a few business days. Cost is usually $250–$500 for a basic residential assessment covering several samples from different materials.
What the Results Determine
| Test Result | What It Means | Practical Options |
|---|---|---|
| Non-detect | Material is clear | Proceed with demolition as planned |
| Asbestos present — material intact, bonded | ACM present but not friable | Encapsulation in place, or licensed removal |
| Asbestos present — material disturbed or friable | Active fibre risk | Licensed asbestos removalist required |
Encapsulation — sealing the ACM in place rather than removing it — is the outcome in many residential cases. It’s less expensive than full removal, and for intact sheeting behind wall linings, often carries lower risk. The practical consequence is that it fixes the wall positions. You cannot remove a wall you’ve encapsulated.
This is the point where many renovation projects diverge sharply from their original scope. The open-plan kitchen the homeowner planned isn’t achievable because the wall contains material that can only be managed, not removed. The layout has to adapt. In this project, what looked like a constraint produced one of the renovation’s most distinctive features.
When You Can’t Fully Open a Wall: The Structural Framing Solution
The wall between this kitchen and the living room couldn’t come down entirely. The structural assessment identified a partial load path through it. Full removal would have required a steel beam, temporary propping during construction, engineer certification, and a building permit. All achievable — but scope-expanding in a project already navigating asbestos findings in the adjacent wall sheeting.
The solution was to remove the wall linings and most of the internal material but retain and expose the structural stud framing, then build it into a feature: a full-height open shelving unit constructed from the existing timber posts, with additional shelves spanning between them.
Look at the finished cooking-zone photo. The room divider sits exactly where the wall was. It’s a timber grid that connects kitchen to living room without fully opening the space. Light passes through it. Objects can be displayed on it. It reads as a deliberate design decision — which, eventually, it was.
The timber it’s built from was already in the wall.
Most renovation content treats wall removal as binary: complete removal or leave it entirely. The middle option — retaining and exposing the structural framing as a feature — appears almost nowhere in competitor content, probably because it requires a structural finding and an actual engineering assessment to make sense of. It’s also harder to photograph in progress, which may explain the gap.
What to know before trying this approach:
- The retained framing needs engineer confirmation that it continues to carry load in its exposed configuration
- The timber should be assessed for pest damage and moisture before being left in place as a feature
- In a wall where ACM was found, any sheeting must be properly encapsulated before the framing is dressed and finished
- The result should be documented for future buyers — any building work affecting structure should be disclosable
Choosing Cabinets and Benchtops
This is where most small kitchen renovations have to make a genuine decision about where the money goes.
The approach used here is common because it works: cost-effective flat-pack cabinet carcasses paired with one higher-quality element, the benchtop, doing the visual heavy lifting.
Cabinet Systems Compared
| System | Approx. Cost AU (full kitchen) | Finish Quality | Customisability | DIY-Friendly? |
|---|---|---|---|---|
| Flat-pack (IKEA, Kaboodle, Freedom) | $3,000–$7,000 | Good | Moderate | Yes |
| Semi-custom (builder’s supply, direct joinery) | $7,000–$15,000 | Very good | Good | Partial |
| Custom joinery | $15,000–$40,000+ | Excellent | Full | No |
Flat-pack systems suit small kitchens specifically because most small footprints fit standard 600mm base units without awkward gaps. The carcasses are structurally adequate for residential use. The doors and drawer fronts carry the visual finish — and in most flat-pack systems, those can be upgraded or replaced without touching the carcass.
The white shaker-adjacent profile here is deliberately understated. The benchtop does the design work.
Benchtop Materials Compared
| Material | Approx. Cost per Lineal Metre (AU) | Durability | Maintenance | Visual Character |
|---|---|---|---|---|
| Laminate | $150–$600 | Good | Very low | Low |
| Engineered stone (Caesarstone, Silestone) | $700–$1,400 | Excellent | Very low | Moderate |
| Porcelain slab | $900–$1,600 | Excellent | Very low | Moderate–High |
| Solid hardwood / butcher block | $600–$1,200 | Good (maintained) | Moderate | High |
| Reclaimed hardwood | $800–$1,800 | Variable | Moderate | Very high |
The benchtop in this kitchen is reclaimed hardwood. Up close, you can see grain variation, colour differences from previous sun exposure, and nail holes that have been filled. That’s not a defect to be hidden — it’s the reason anyone chooses reclaimed timber over a uniform engineered product.
What hardwood benchtops require is honest maintenance:
- Re-oiling with a food-safe penetrating oil every 6–12 months
- Avoiding standing water, particularly around the sink cutout
- Using a chopping board rather than cutting directly on the surface
In a household with light-to-moderate cooking use and willingness to maintain it, a hardwood benchtop is difficult to match for warmth and character. In a busy family kitchen, engineered stone is more forgiving and requires almost nothing from you year to year.
⚠️ One mistake worth knowing: Ordering a hardwood benchtop before cabinets are fully installed and levelled. Hardwood benchtops are cut to measure from a template taken off the finished cabinet installation. Any cabinet that isn’t at final height or is out of square creates a problem. Install and level first. Template last.
Storage in Awkward Spaces
**
Small kitchens have awkward gaps that most cabinet plans fill with filler panels. Several of those gaps were converted into storage here.
The end-of-run wine rack. A 300mm gap at the end of the base cabinet run was fitted with horizontal timber dowels rather than a filler panel. The dowels cost almost nothing. The gap that would have been visual dead space became functional storage without any special product or supplier.
The window sill extended as a shelf. The hardwood benchtop continues to the window sill, and the sill itself is timber-clad to match the benchtop depth. What was a gap between the sink cabinet and the window frame is now a usable display surface — herbs, small jars, a plant. It reclaims 200–300mm of horizontal surface that most kitchens ignore.
Open shelving above the cooktop instead of upper cabinets. Upper cabinets directly above a cooking surface are prone to grease accumulation and hard to keep clean. Open shelves positioned slightly higher keep frequently used items accessible without the grease-trap problem. The trade-off is that open shelves require discipline about what goes on them — items that aren’t used regularly accumulate dust quickly.
The knife strip on VJ paneling. The knife storage visible in the after photo is mounted to the VJ board splashback rather than a tiled surface or the wall behind. VJ boarding accepts a screw cleanly and holds a magnetic knife strip without specialist wall anchors. The result is secure knife storage that didn’t require any modification to the wall structure.
Keeping Original Floors and Walls
**
Under the vinyl tile was a full run of original pine floorboards. The boards were in better condition than the vinyl that had been covering them — sound, flat, with no significant rot and only a handful that needed replacing. Decades protected from foot traffic and UV exposure had left them well-preserved.
This is a common discovery in homes from this era. Vinyl and linoleum were frequently laid over original timber floors from the 1950s through to the 1980s as a low-cost update. The boards underneath were sealed from wear. Many come up better than boards in adjacent rooms that were never covered.
Cost comparison:
| Floor treatment | Approximate Cost per m² (AU) | Result |
|---|---|---|
| Sand and oil original boards (DIY) | $30–$60 (equipment hire + materials) | Restored original character |
| Sand and professionally coat | $50–$90 | Professional finish, less labour input |
| New engineered timber, installed | $90–$160 | New product, uniform appearance |
| New solid timber, installed | $120–$200+ | New product, can be refinished repeatedly |
The cost difference between restoring original boards and replacing with new flooring can be $1,500–$3,000 on a 20m² kitchen floor. In most cases, the restored original boards also look more interesting — particularly when they continue into the rest of the home without a transition threshold. Replacement creates a visual break at the kitchen doorway that sometimes makes a space feel more carved up, not less.
The VJ wall paneling was already present throughout the home and was retained as the splashback and general wall finish. Painted white and fitted with a matching timber window ledge, it required no specialist product and no tile setter. The material was already there. The labour cost was paint and time.
In older homes, that’s often the cheaper and more characterful choice. Working with what exists almost always beats replacing it.
What to DIY and What to Leave to a Licensed Tradesperson
Regulations vary by state and territory in Australia. The following reflects the general position, but check with your local council or fair trading authority before starting.
| Task | DIY | Licensed Trade Required | Notes |
|---|---|---|---|
| Design and 3D planning | ✓ | — | — |
| Asbestos assessment | ✗ | Licensed assessor | Required before cutting into any pre-1990 wall |
| Cabinet demolition | ✓ | — | After services isolated |
| General demolition | ✓ | — | Subject to asbestos status |
| Asbestos removal (bonded, <10m²) | State-dependent | Check locally | Varies significantly by state |
| Asbestos removal (>10m² or friable) | ✗ | Licensed removalist | — |
| Structural wall assessment | ✗ | Structural engineer | Do not rely on visual indicators alone |
| Non-structural wall framing | ✓ | — | Confirm non-structural first |
| Structural framing modification | ✗ | Engineer sign-off required | Includes partial removal |
| Electrical wiring and connections | ✗ | Licensed electrician | — |
| New circuits or power points | ✗ | Licensed electrician | — |
| Plumbing connection (sink, tap) | ✗ (most states) | Licensed plumber | Fines apply for unlicensed work |
| Gas disconnection or connection | ✗ | Licensed gas fitter | No exceptions |
| Cabinet carcass installation | ✓ | — | — |
| Stone benchtop templating/install | ✗ | Stone fabricator | — |
| Timber benchtop templating/install | ✓ | — | Template after cabinets are fully levelled |
| Floor sanding and finishing | ✓ | — | Hire drum sander and edge sander |
| Tiling | ✓ | — | — |
| Painting | ✓ | — | — |
The plumbing restriction catches many people. Disconnecting and reconnecting a tap or sink to an existing supply and waste line is restricted work in most Australian states, even when no new pipes are being installed. It’s worth confirming the local position before assuming the connection is a five-minute DIY task — the fine for unlicensed plumbing can exceed the cost of hiring a plumber for the job.
Realistic Timelines for a DIY Kitchen Renovation
The planned timeline for this project was six weeks. That assumed continuous, full-time work.
The actual project ran across weekends and evenings around full-time employment, with trade availability gaps layered on top: waiting for an electrician to complete the re-run before walls could be closed, waiting on asbestos lab results before ceiling work could proceed, waiting on the benchtop fabricator’s lead time after templates were taken.
The result was approximately five months to full completion.
Planned vs. Actual
| Phase | Planned | Actual |
|---|---|---|
| Asbestos assessment and results | 1 week | 1.5 weeks |
| Electrical pre-work | 2 days | 1 week |
| Demolition | 4 days | 1 week |
| Structural / framing work | 3 days | 2 weeks |
| Cabinet installation | 1 week | 2 weeks |
| Benchtop template + fabrication + install | 3 days | 10 days |
| Plumbing | 2 days | 5 days |
| Floor sanding and finishing | 3 days | 4 days |
| Painting and finish work | 5 days | 2 weeks |
| Total | ~6 weeks | ~5 months |
The gap between those two numbers isn’t a sign of poor management. It’s what most owner-led kitchen renovations look like when they happen around a working life.
Practical advice: Set up a temporary kitchen before demolition begins — a camp stove, a microwave, a bar fridge in the dining room. You’ll use it for longer than you expect. Then plan for the project to take three to four times your initial estimate, not as a worst-case scenario, but as a realistic baseline. Most people who plan for two months and take five aren’t surprised. Most people who plan for six weeks and take five months are living without a kitchen sink for a very long time.
Cost Breakdown
Costs below reflect South-East Queensland and coastal NSW conditions as of late 2024 – early 2025. They vary by supplier, trade availability, and project scope.
| Category | Approximate Cost (AUD) |
|---|---|
| Asbestos assessment (samples + lab) | $300–$500 |
| Structural engineering assessment | $500–$1,200 |
| Asbestos encapsulation (if required) | $500–$2,000 |
| Demolition and waste disposal (skip bin hire + DIY labour) | $500–$1,500 |
| Electrical — partial rewire, new circuits | $2,500–$5,000 |
| Plumbing — sink, tap, dishwasher rough-in | $1,200–$3,000 |
| Flat-pack cabinet system (full kitchen) | $3,000–$7,000 |
| Reclaimed hardwood benchtop (custom) | $1,500–$4,000 |
| Appliances — induction cooktop, oven, rangehood | $2,000–$6,000 |
| Sink and gooseneck tap | $400–$1,200 |
| Floor sanding, oiling (DIY + equipment hire) | $600–$1,200 |
| Painting — walls, paneling, trim (DIY) | $300–$600 |
| Reclaimed timber for shelving and room divider | $200–$800 |
| Lighting | $300–$1,000 |
| Fixings, consumables, incidentals | $300–$600 |
| Estimated total — DIY-led project | $14,000–$35,000+ |
The wide range reflects the biggest variables: appliances and benchtop material. A budget induction cooktop and a quality laminate benchtop brings the total down. A freestanding range cooker and a custom reclaimed hardwood benchtop pushes it toward the upper figure.
💡 Budget 15–20% on top of your estimate as contingency before starting any project in a pre-1990s home. Something unexpected is usually inside the walls. The question is what, not whether.
Maintaining Your Renovated Kitchen
Maintenance Schedule
| Item | Task | Frequency |
|---|---|---|
| Hardwood benchtop | Re-oil with food-safe penetrating oil (Rubio, Osmo, or similar) | Every 6–12 months |
| Hardwood benchtop | Check seal around sink cutout for water ingress | Every 3–6 months |
| Cabinet hinges (concealed European) | Check alignment and adjust with built-in three-axis adjustment | Annually |
| Drawer runners | Clean track and apply silicone lubricant | Annually |
| VJ paneling splashback | Touch-up paint in high-splatter zones near cooktop | As needed |
| Pine floorboards (oiled finish) | Spot-apply oil to high-traffic areas | Annually |
| Pine floorboards | Full re-oil | Every 2–3 years |
| Pine floorboards | Sand back and refinish | Every 10–15 years, depending on traffic |
| Under-sink plumbing | Inspect for slow drips at connections | Every 6 months |
| Rangehood filters | Clean mesh filter or replace charcoal filter | Every 3–6 months |
The hardwood benchtop is the most active maintenance commitment in this renovation. A well-oiled benchtop develops a patina and ages well. One that dries out and isn’t re-oiled will begin to crack at seams and lift at the sink cutout — the most water-exposed part of the surface. Repair at that stage is possible but significantly more involved than prevention.
Cabinet hinges and drawer runners are the other overlooked maintenance point. Most flat-pack systems use quality European-style concealed hinges with three-axis adjustment built in. Two or three years after installation, drawers that feel loose or doors that have dropped slightly can usually be returned to proper alignment with a few minutes and a screwdriver. Knowing how to do this adjustment is worth five minutes on the manufacturer’s website. Most homeowners who never discover it assume the cabinet quality has degraded, when the hardware just needs a simple correction.
FAQ
Can I remove a wall between my kitchen and living room myself?
You can remove plaster sheeting, wall linings, and non-structural noggins yourself — but only after a structural engineer has assessed the wall and an asbestos assessor has cleared the material. If the wall carries any load, modifying the structural framing requires temporary propping, engineer certification, and usually a building permit. Removing structural elements without those sign-offs is both dangerous and unpermitted.
How do I know if a wall is load-bearing before I start?
A structural engineer’s assessment is the only reliable answer. Visual indicators help — walls that run perpendicular to floor joists, walls directly above or below walls on other levels, walls near the centre of the house — but they aren’t conclusive. Many homeowners have interpreted these signs correctly and still been wrong. An engineer assessment costs $500–$1,200 in most Australian capitals. It removes the guesswork entirely.
What should I do if asbestos is found during a renovation?
Stop work in the affected area. Engage a licensed asbestos assessor to characterise the material — is it friable or bonded? What’s the extent? Depending on the finding, options include encapsulation in place, professional removal, or working around the material. Do not attempt to remove asbestos-containing material yourself. In most Australian states, removal of friable asbestos is always restricted to licensed contractors. Bonded asbestos below 10m² may be removed by a homeowner in some states — but the rules vary, so check locally before assuming.
Can flat-pack cabinets work well in a small kitchen?
Yes, reliably. The carcass quality in current systems from IKEA, Kaboodle, Freedom, and similar suppliers is structurally adequate for a residential kitchen. The visual result depends on door and drawer front selection, benchtop quality, and hardware choice — not on the carcass. Small kitchens are well-suited to flat-pack systems because standard 600mm module widths typically fill a small footprint without awkward gaps that need custom infill panels.
Is a hardwood benchtop worth the extra cost over laminate?
It depends on the household. Hardwood benchtops are warmer visually, can be spot-repaired locally (sand, re-oil, done), and tend to age better than laminate, which can’t be meaningfully refinished when it’s damaged. The trade-off is ongoing maintenance and water sensitivity. In a household with young children, heavy daily cooking, or limited interest in maintenance schedules, engineered stone is more forgiving and requires very little from you year to year. In a household willing to oil it twice a year and use a chopping board, hardwood is difficult to match for character.
How long does a DIY small kitchen renovation realistically take?
Working on evenings and weekends around full-time employment, three to five months is a realistic expectation — assuming no major unexpected findings. Six weeks is achievable if you take time off work and have trades lined up in advance before demolition begins. The most consistent causes of timeline extension are trade availability gaps, material lead times, and mid-project discoveries (asbestos, electrical, structural) that require professional input before work can continue.
Do I need a permit to remove an interior wall?
In most Australian states, removing or significantly modifying a load-bearing wall requires a building permit. Non-load-bearing internal walls typically don’t. The rules vary by state and by the nature of the work. Check with your local council before starting. Working without a required permit can complicate future property sales and may affect your insurance position if something goes wrong during the work.
Can structural framing timber be reused as open shelving?
Yes — where the structural assessment confirms it can safely remain exposed in its retained configuration. Framing timber in older Australian homes is frequently hardwood or dense pine in excellent condition, often better quality than modern framing. Check for pest damage and moisture before leaving it exposed. If the timber is structurally sound and pest-free, it can be sanded, oiled, and used as a shelving framework or room divider without significant additional material cost. This approach directly produced the room divider feature in this renovation.
Should original floorboards be restored or replaced?
Restore them where possible. Original boards in a pre-1970s home are typically denser and better-seasoned than new timber flooring products. If they’re structurally sound — no significant rot, no bounce from sub-floor failure — the main question is surface condition, which sanding addresses. Isolated board replacement for damaged sections is straightforward. Full replacement makes sense only when damage is too extensive for repair, or when the boards simply aren’t there (some older kitchens had concrete slab under the vinyl).
How can a narrow galley kitchen be made to feel less cramped?
Light, visual continuity, and reduced mass are the main tools. Pale cabinetry reflects light rather than absorbing it. Continuing the floor material from kitchen into adjoining rooms — as happens naturally when original floorboards are retained throughout — removes the visual break that makes a galley feel like a separated, smaller space. Replacing full upper cabinets on one wall with open shelving reduces visual mass without reducing storage significantly. And replacing a full wall with a partially open element — a timber room divider, a half-wall, a pass-through — connects the kitchen to an adjacent room without requiring full structural removal.
What’s a practical way to design a kitchen layout before ordering cabinets?
SketchUp Free is the most accessible option for a full 3D model. Download the room dimensions, model the walls accurately, then add cabinet components from the SketchUp Warehouse — IKEA has a large downloadable library that matches actual product dimensions. This process shows exact benchtop overhangs, appliance clearances, door swings, and sight lines before any purchase is committed. Most flat-pack suppliers also offer online planning tools, but these tend to optimise for the number of units you buy. A model you build and control does neither of those things.
How much contingency should be budgeted for unexpected costs in an older home?
Add 15–20% of your total budget as a contingency line before starting. For pre-1980s homes, allow toward the higher end. The most common unexpected costs are asbestos findings requiring professional management, electrical wiring past serviceable life, and structural issues that change what demolition or layout change is feasible. These aren’t rare exceptions in homes of this era — they’re common findings. Projects that budget for them run over estimate by a manageable amount. Projects that don’t budget for them can stall mid-demolition.
Cost figures are approximate and reflect Australian market conditions (South-East Queensland / coastal NSW) as at late 2024 – early 2025. Building, electrical, plumbing, and asbestos regulations vary by state and territory. Always confirm the current requirements with your local council or fair trading authority before commencing work.