Master Bathroom Renovation Ideas: A Real Before and After (And What the Photos Don't Show)
-
 Olivia Reed
 - 14 Jun, 2026
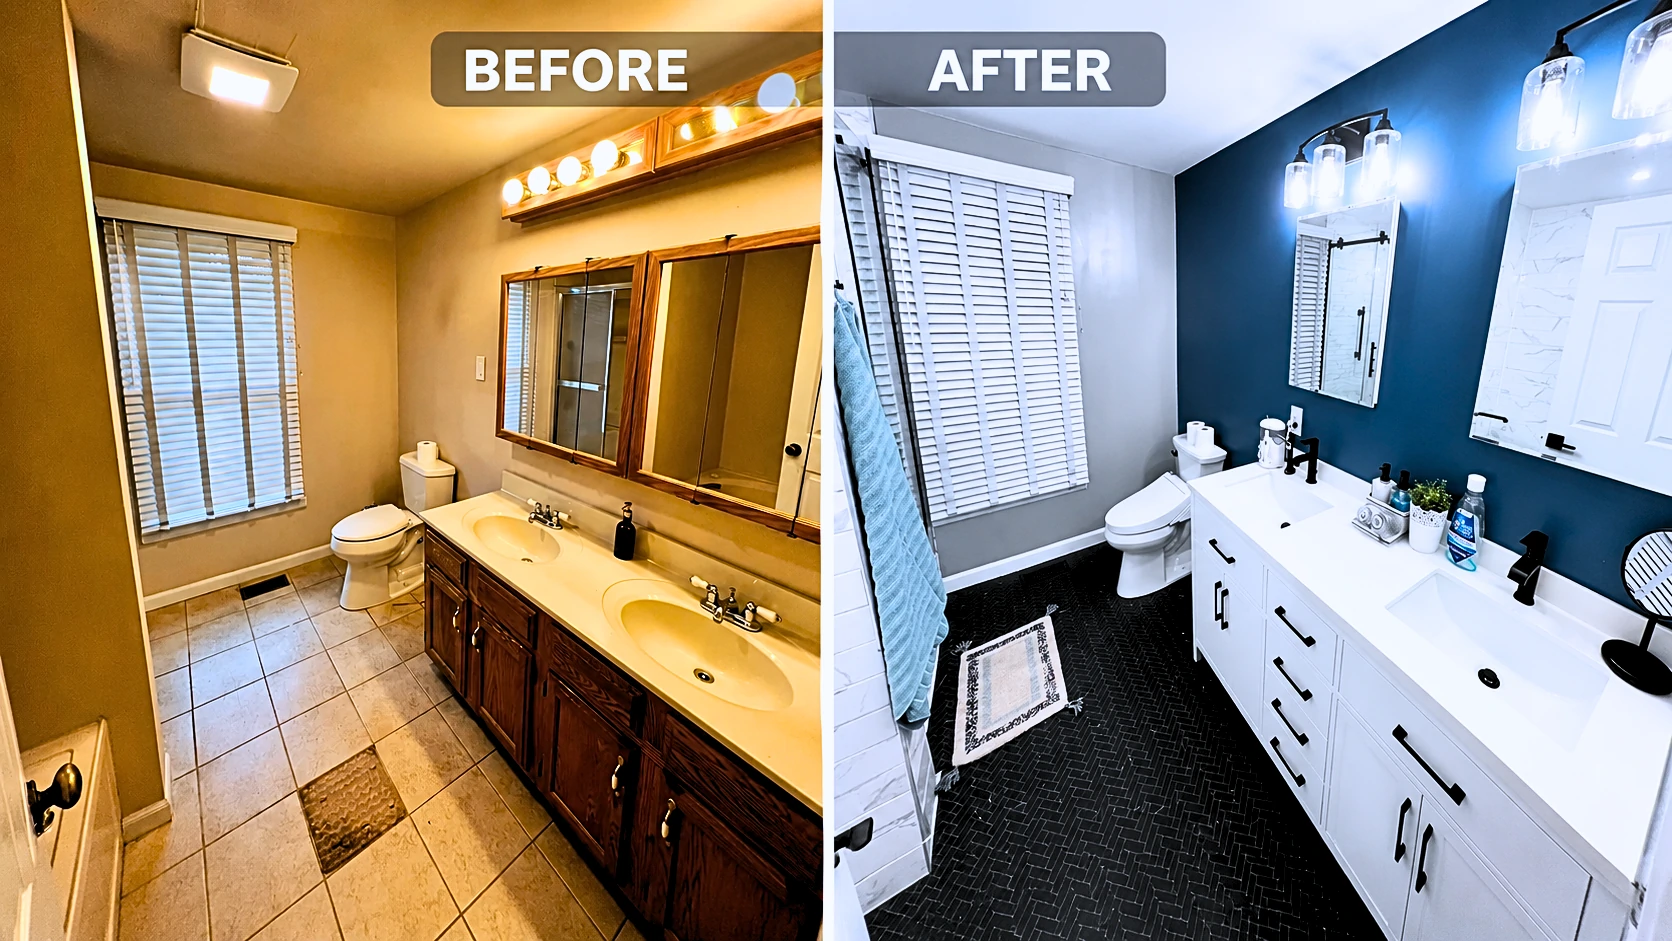
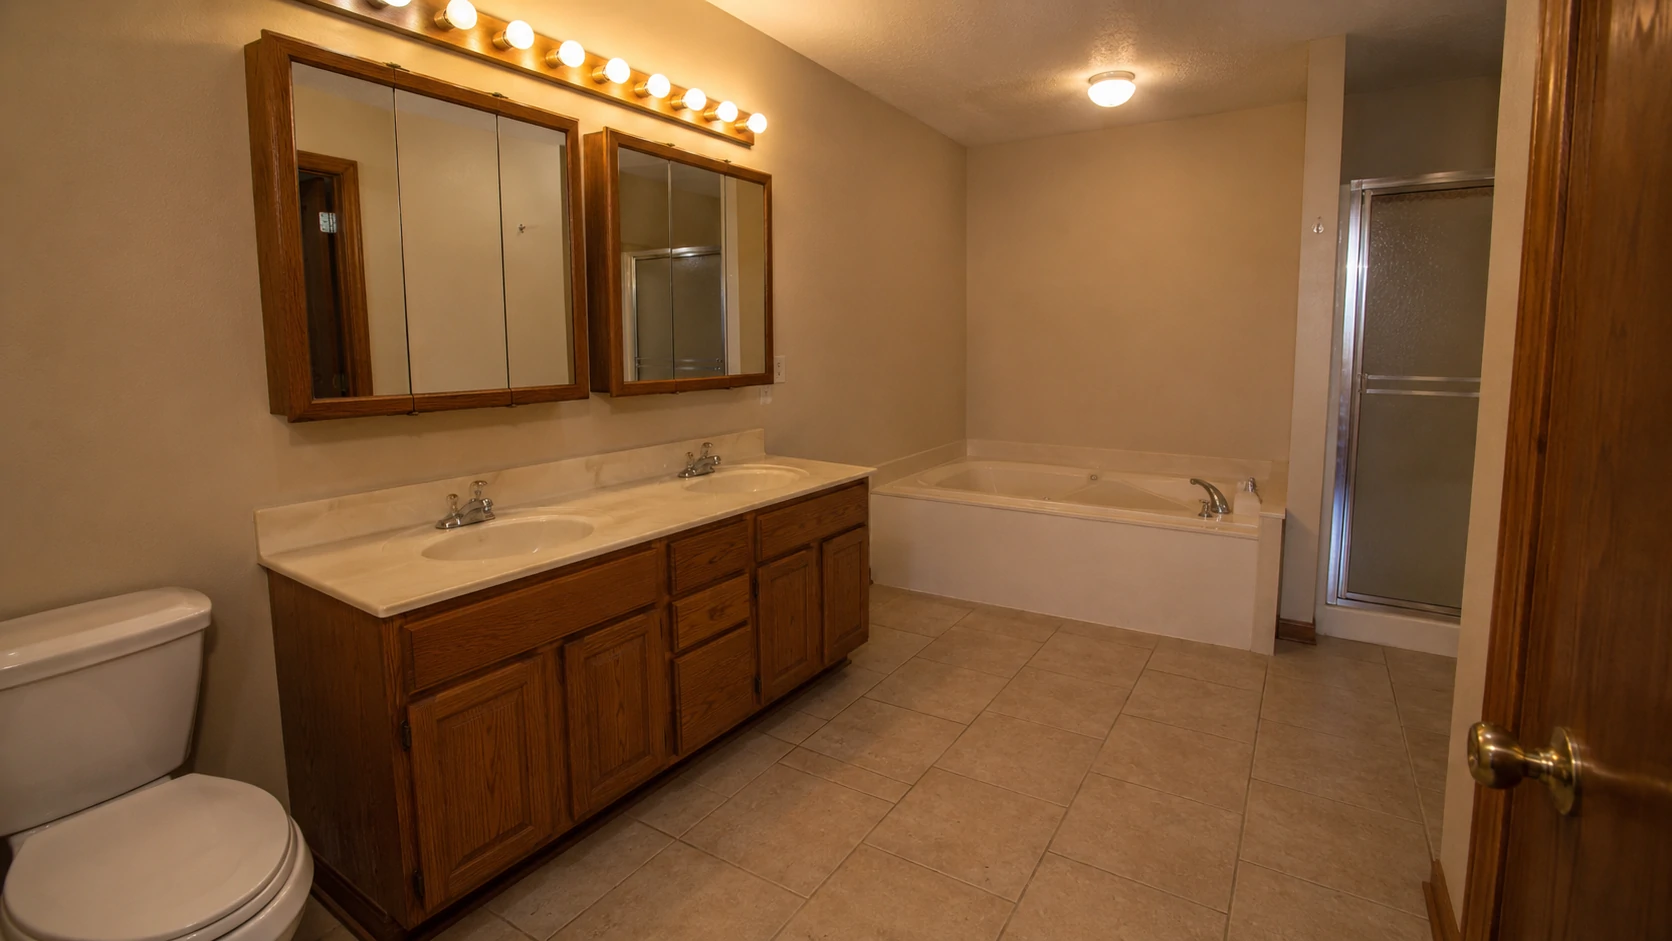
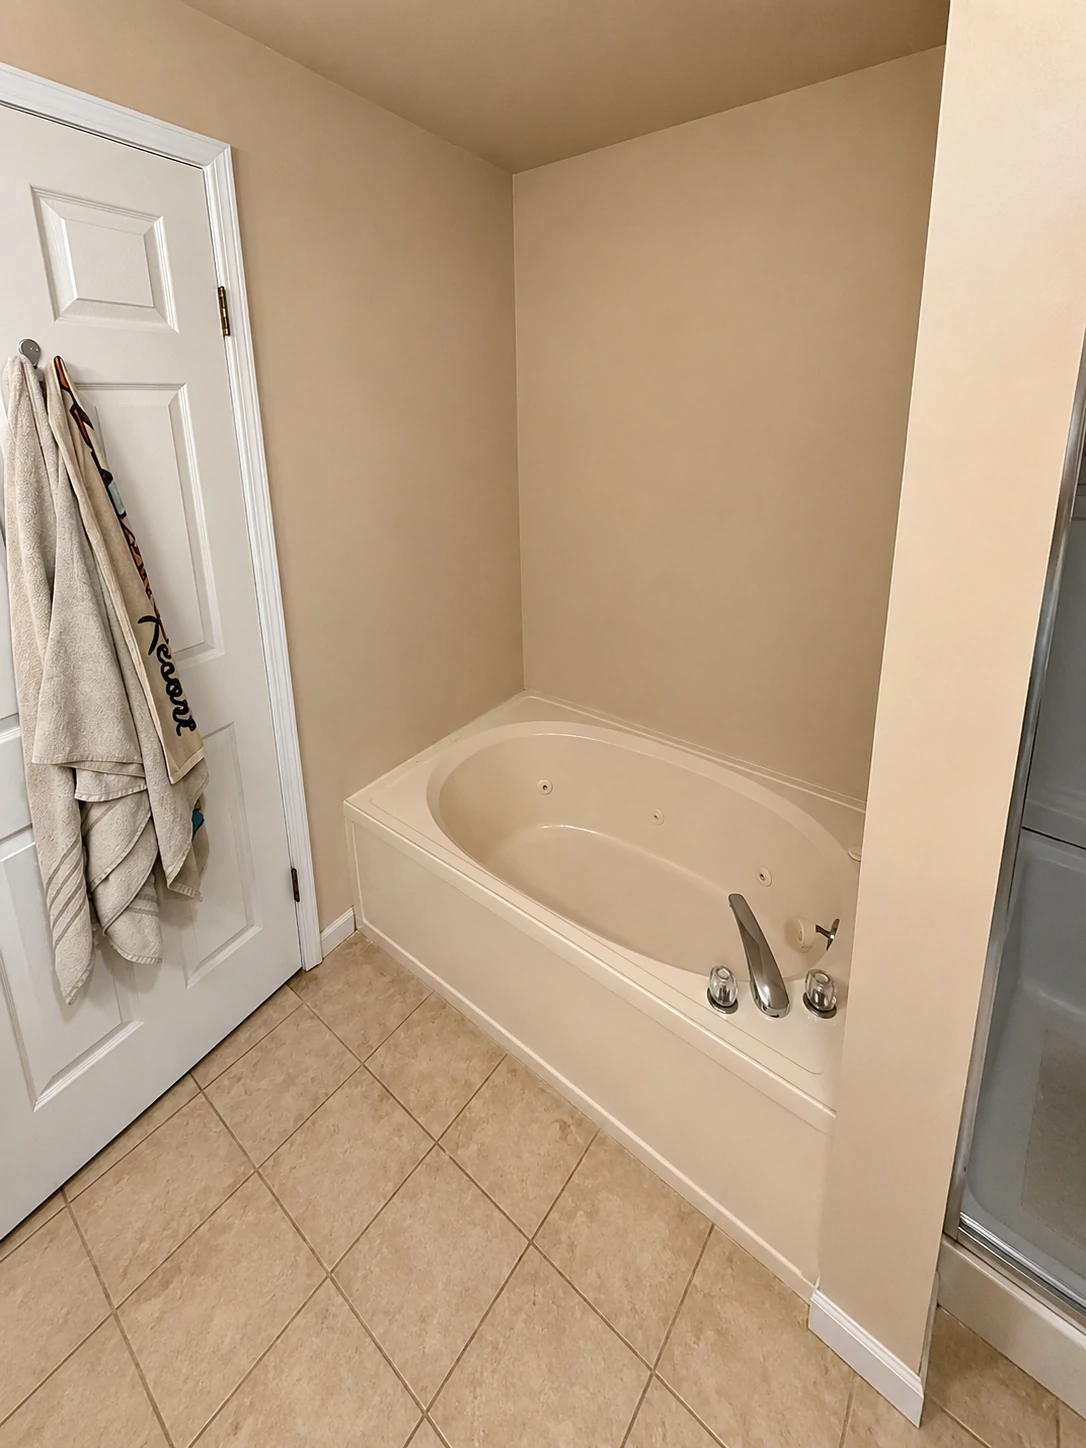
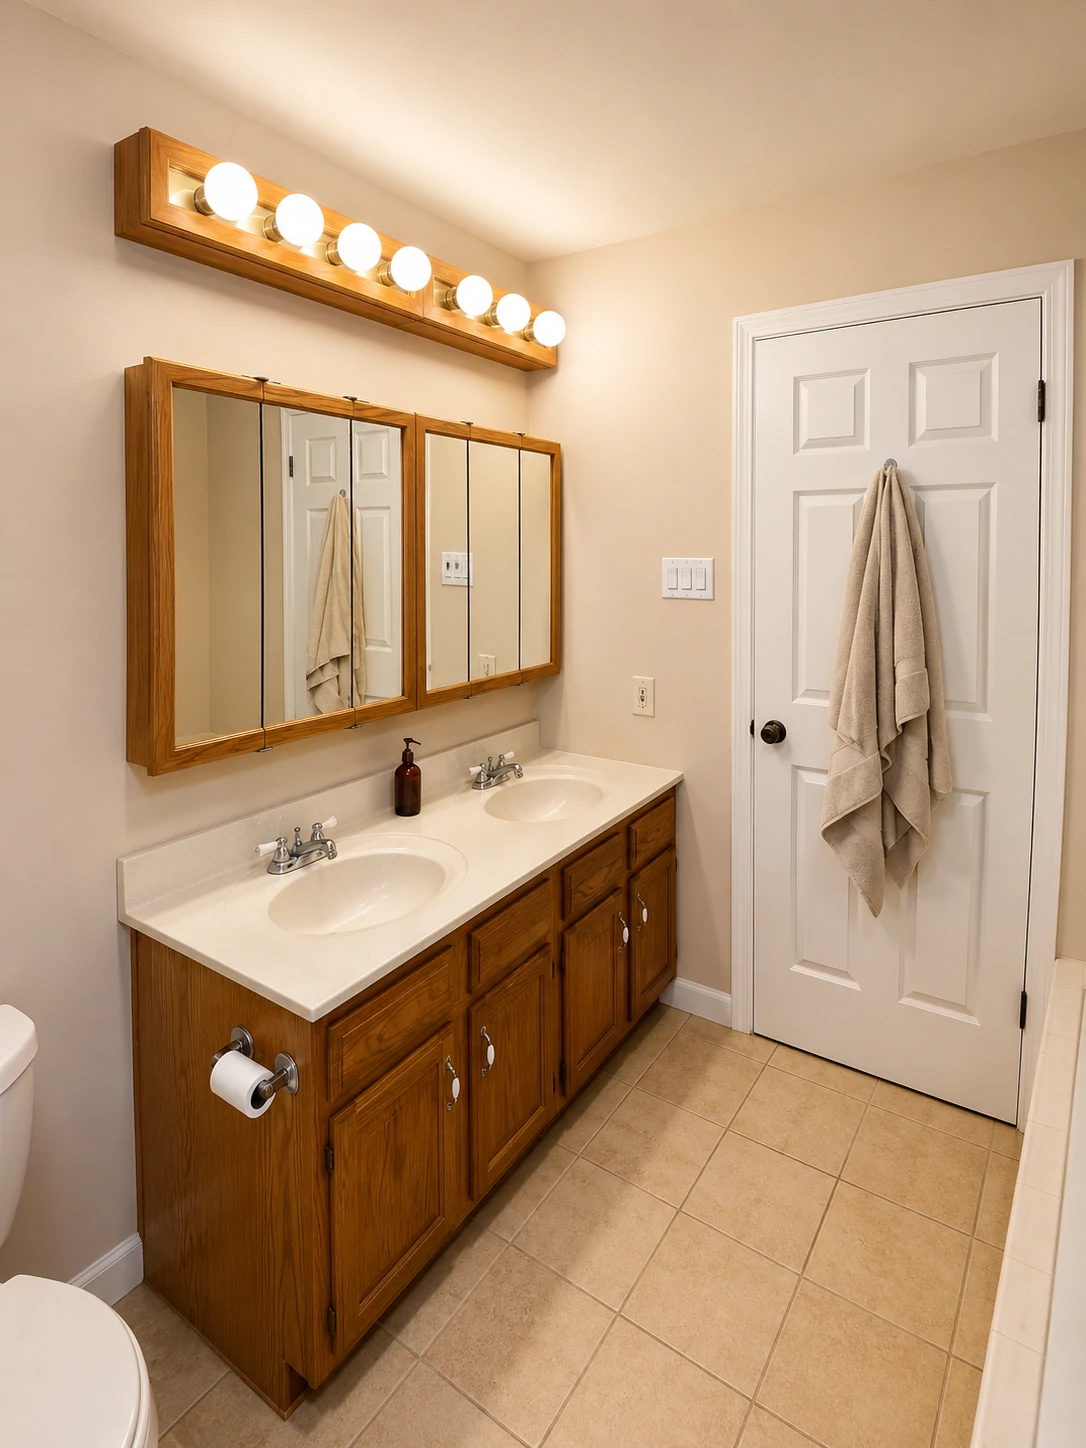
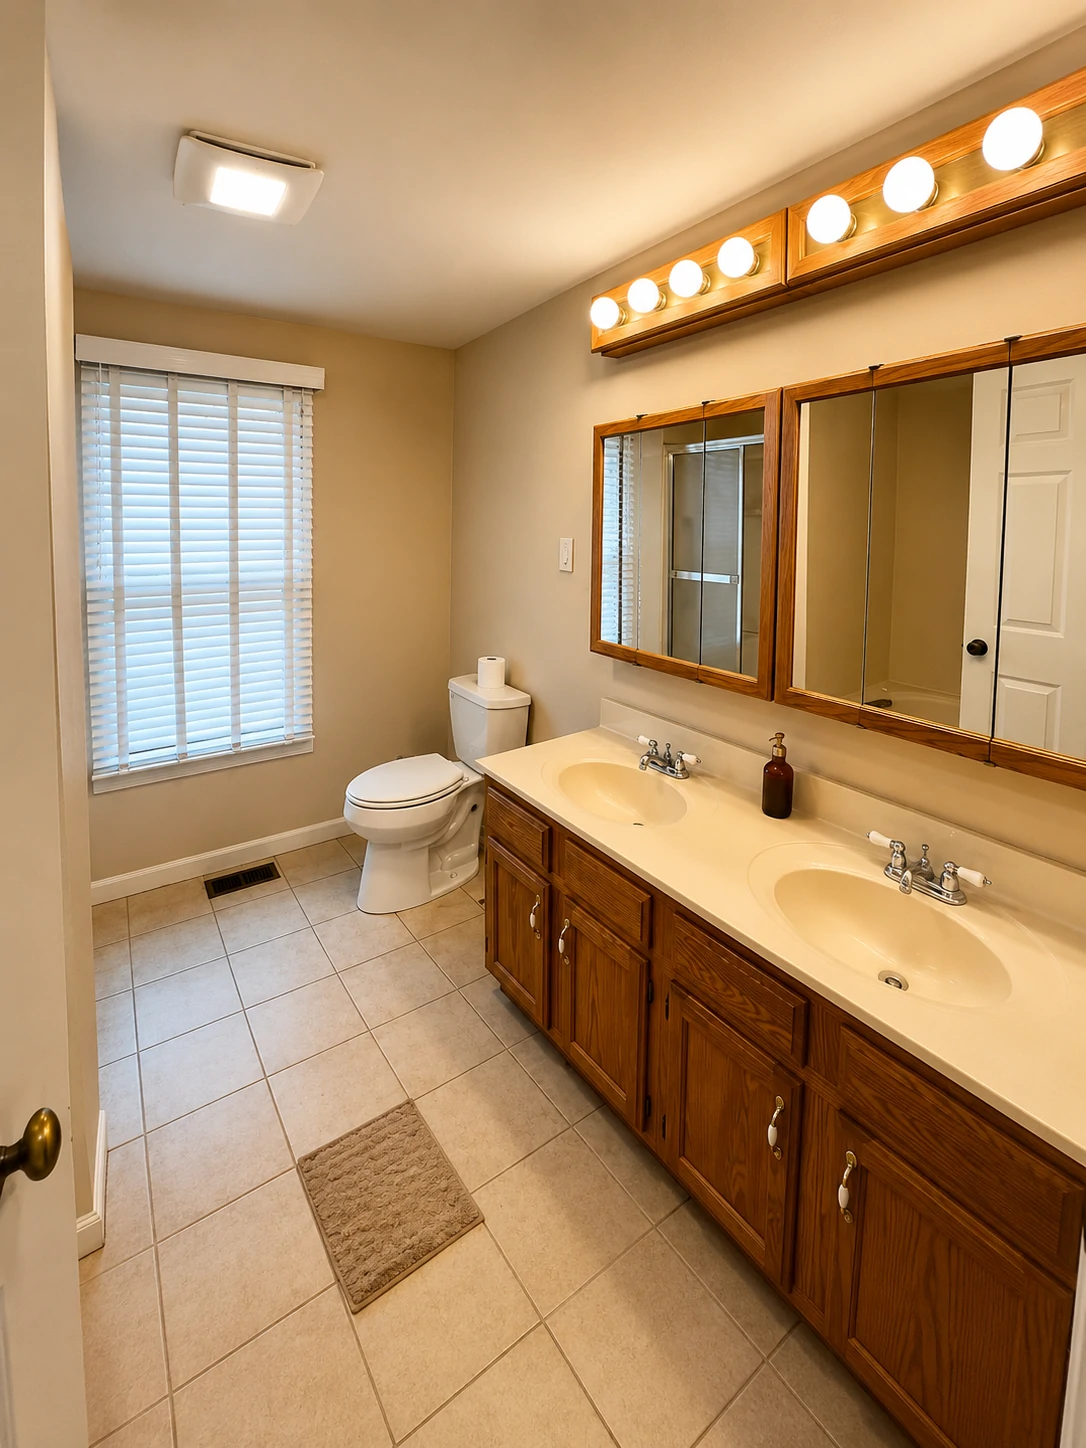
The bathroom in these photos represents one of the most common starting points for a master bathroom gut renovation: honey oak vanity cabinets, a cream cultured marble countertop with integrated oval sinks, Hollywood globe lighting above a pair of medicine cabinet mirrors, a jetted whirlpool tub sitting unused in its own alcove, and a cramped separate shower behind a chrome-framed sliding door with frosted textured glass.
On the floor, one tile had cracked and been patched with a section of plywood — the kind of small problem that looks like nothing until demo day reveals what’s underneath.
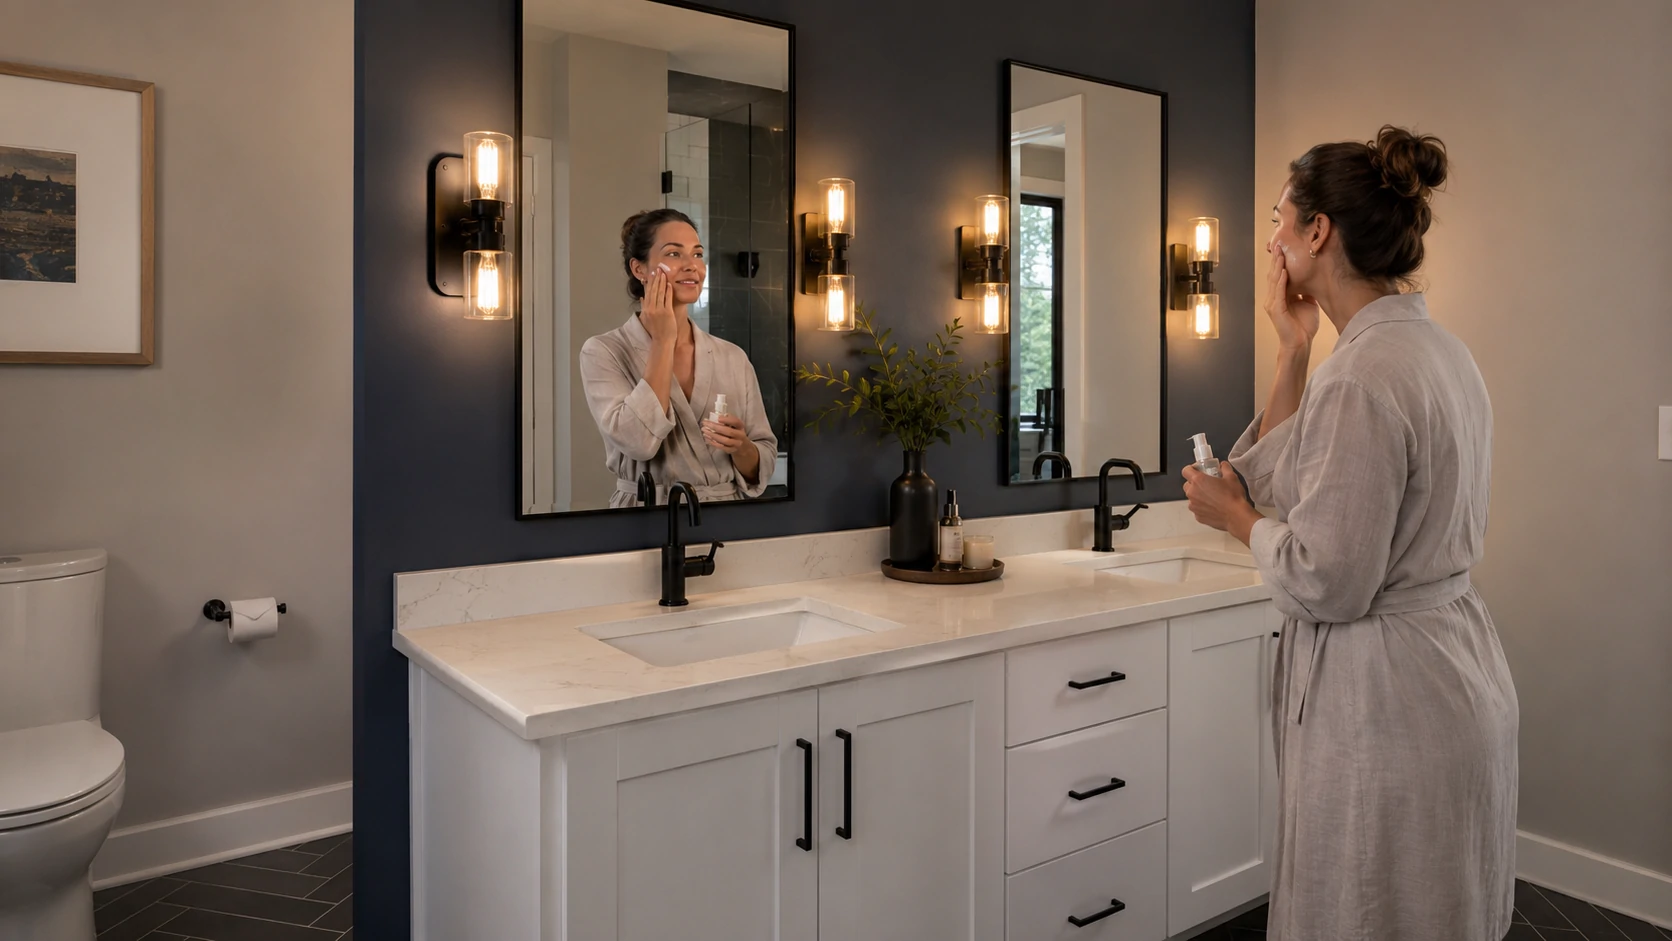
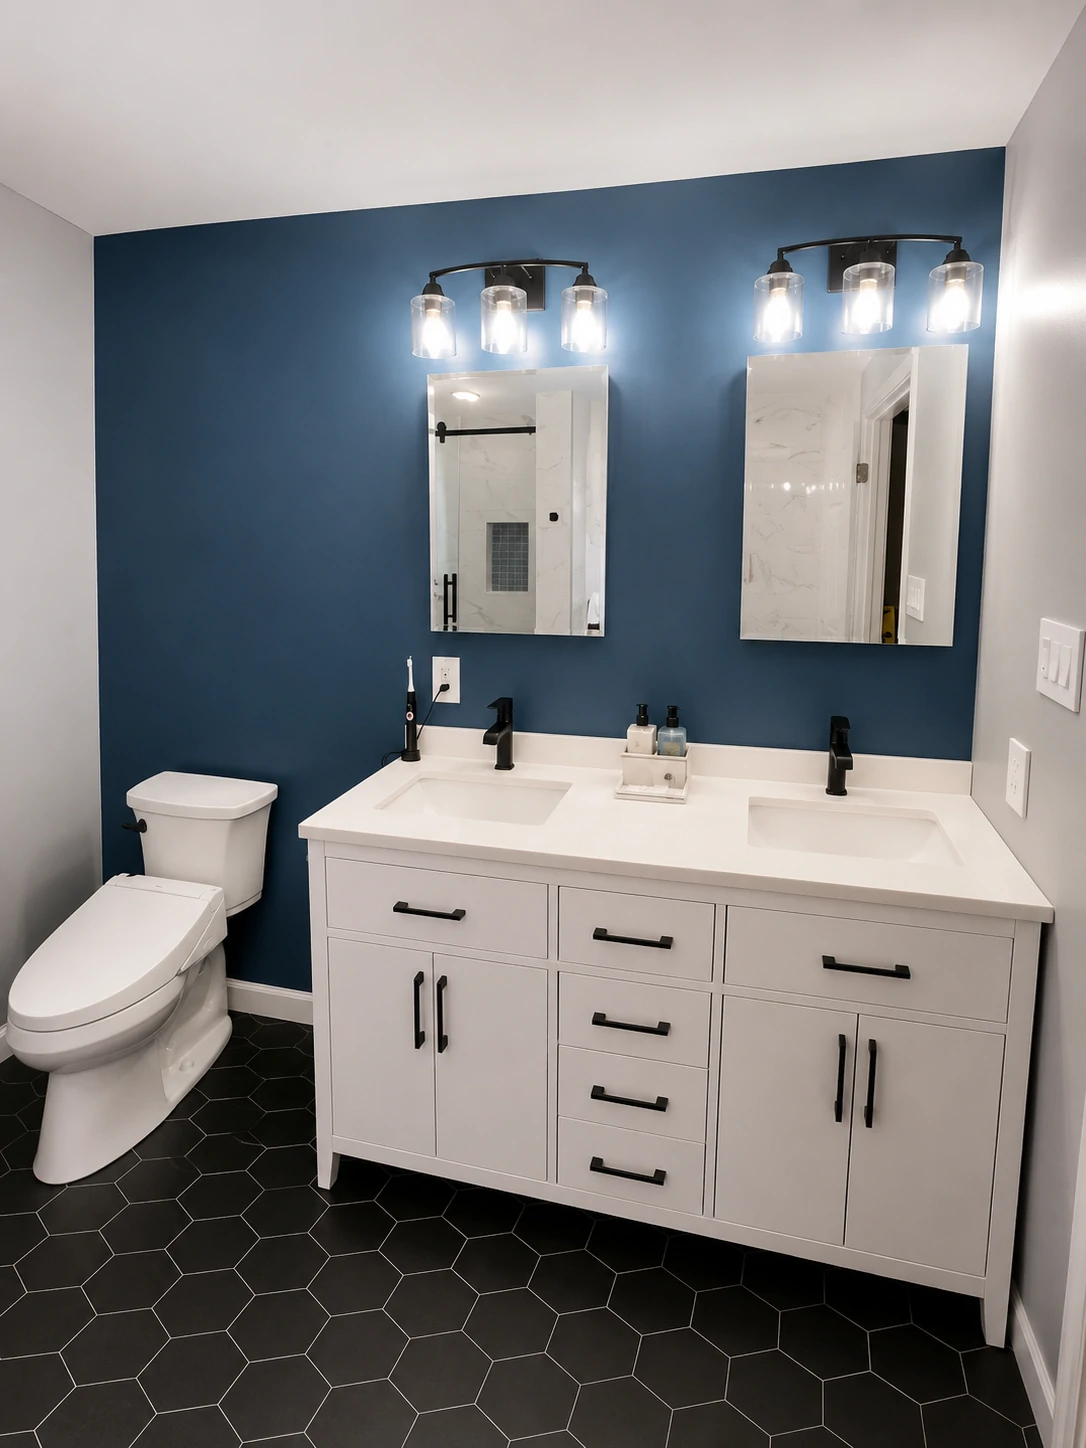
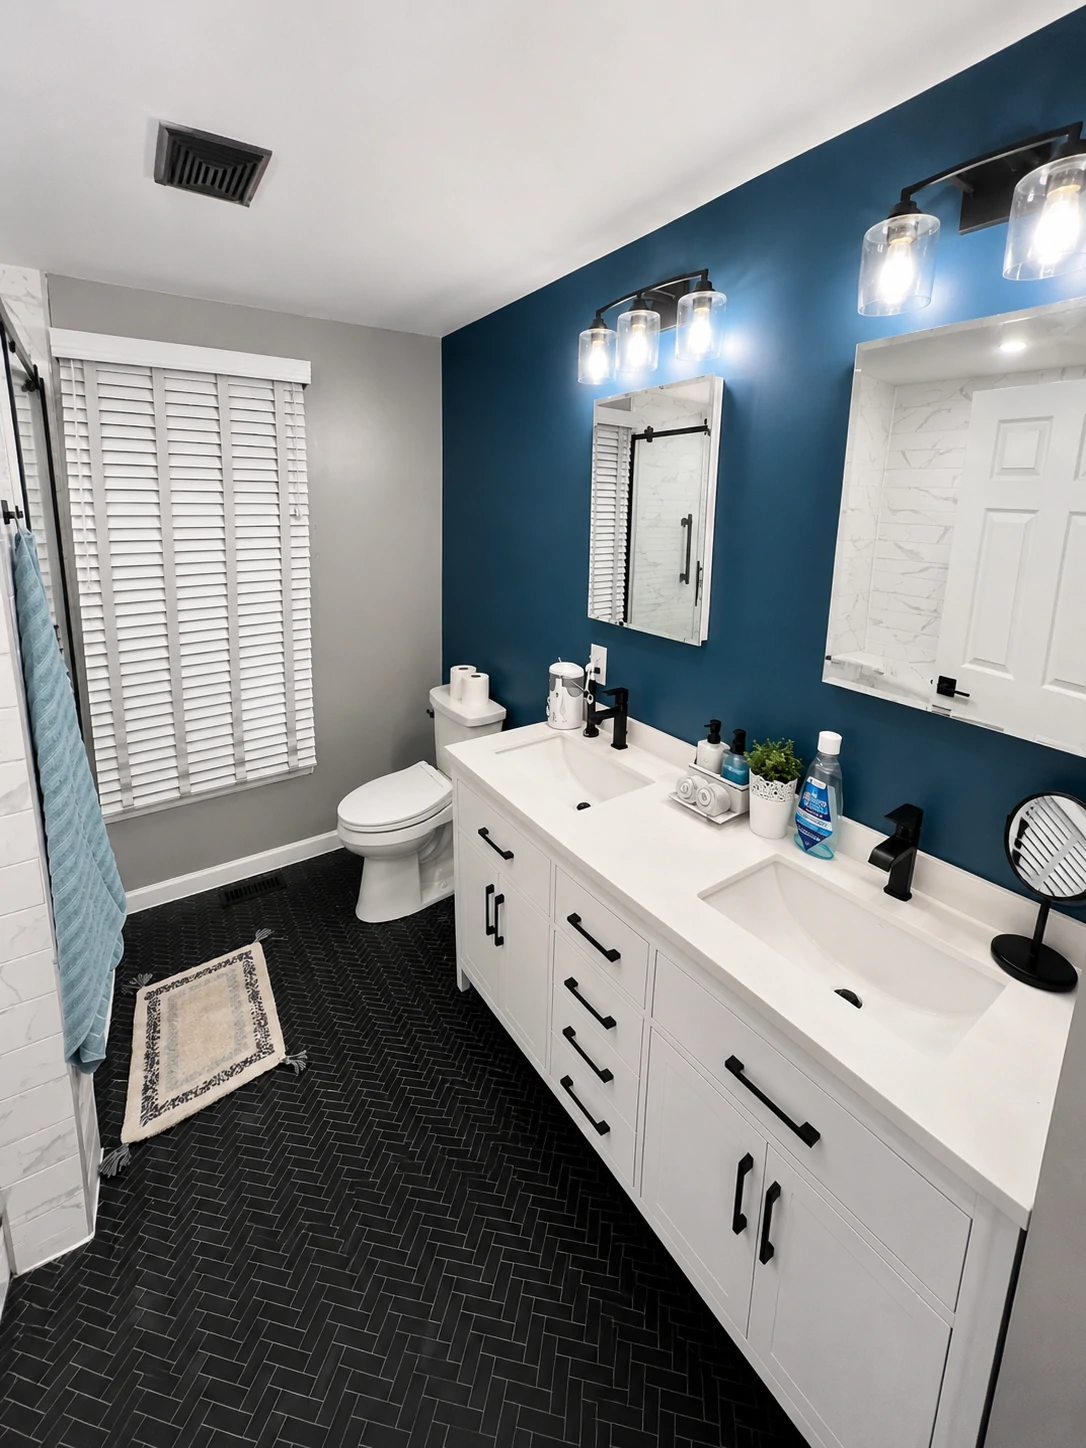
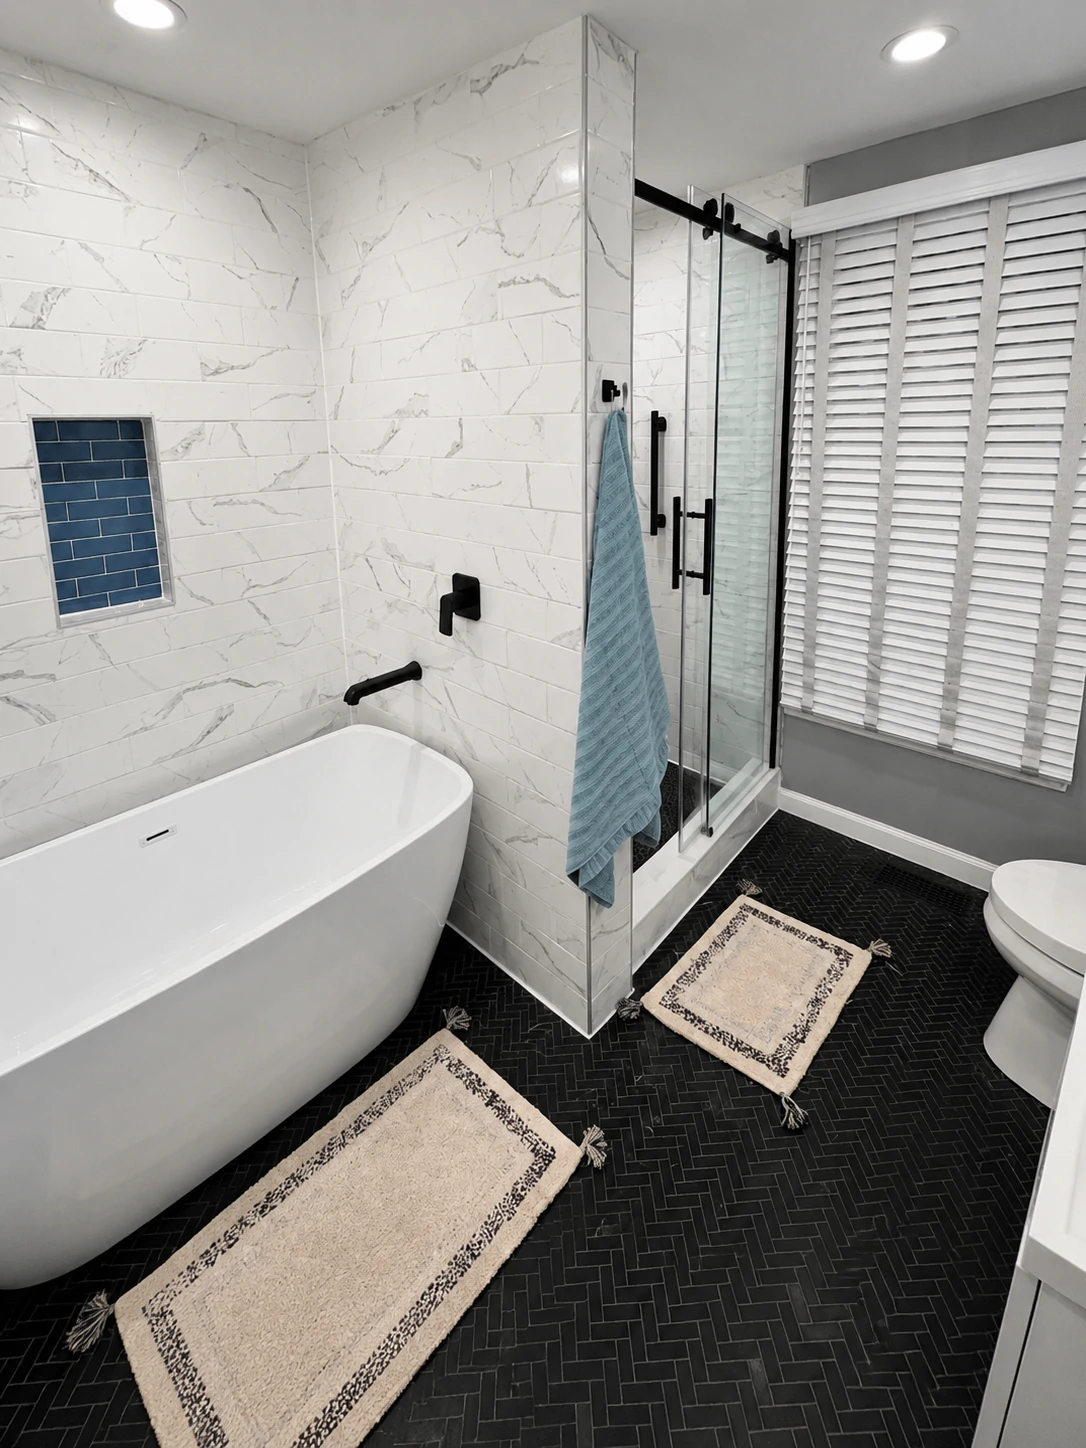
Six months later: marble-look porcelain tile across every wet surface, dark black herringbone floor tile from wall to wall, a freestanding soaking tub against a fully tiled accent wall, a generous walk-in shower with a barn-style frameless glass slider, a white shaker double vanity with quartz countertops and matte black faucets, layered sconce lighting, and a slate blue accent wall that anchors the whole vanity zone.
This article uses those before and after photos as the foundation for practical guidance on every major decision in a master bathroom renovation — layout, tile, fixtures, lighting, comfort upgrades, and the parts of the process that inspiration content typically skips: what things actually cost, why timelines stretch, which tasks require licensed trades, and what gets discovered the moment demolition begins.
Quick Answer: Popular master bathroom renovation ideas include converting a separate tub and shower into a walk-in shower plus a separate freestanding soaking tub, upgrading to a double vanity with a quartz countertop and undermount sinks, switching to matte black or brushed gold fixtures, using a contrasting dark floor tile (such as herringbone) against lighter wall tile, and adding a bold accent wall color behind the vanity. A full gut renovation in the US typically costs $25,000–$55,000+ and takes 2–4 months from demolition to final inspection.
What Changed at a Glance
| Removed | Added |
|---|---|
| Honey oak double vanity | White shaker double vanity with quartz countertop |
| Cultured marble one-piece top with integrated oval sinks | Undermount rectangular sinks with matte black faucets |
| Globe-strip Hollywood vanity lighting | Individual vanity sconces (clear glass, matte black) |
| Chrome-framed sliding shower with frosted glass | Frameless barn-style sliding glass door, matte black hardware |
| Jetted whirlpool tub in walled alcove | Freestanding soaking tub with wall-mounted matte black tub filler |
| Beige large-format floor tile (with cracked, patched section) | Dark black herringbone mosaic tile throughout |
| Plain beige walls | Marble-look porcelain brick tile (wet zones); slate blue accent wall |
| Standard toilet | Modern elongated toilet with integrated bidet seat |
The Big Layout Decision: Rethinking What Goes Where
The most important decision in a master bathroom renovation isn’t which tile to choose or which finish to put on the faucets. It’s what happens to the floor plan.
**
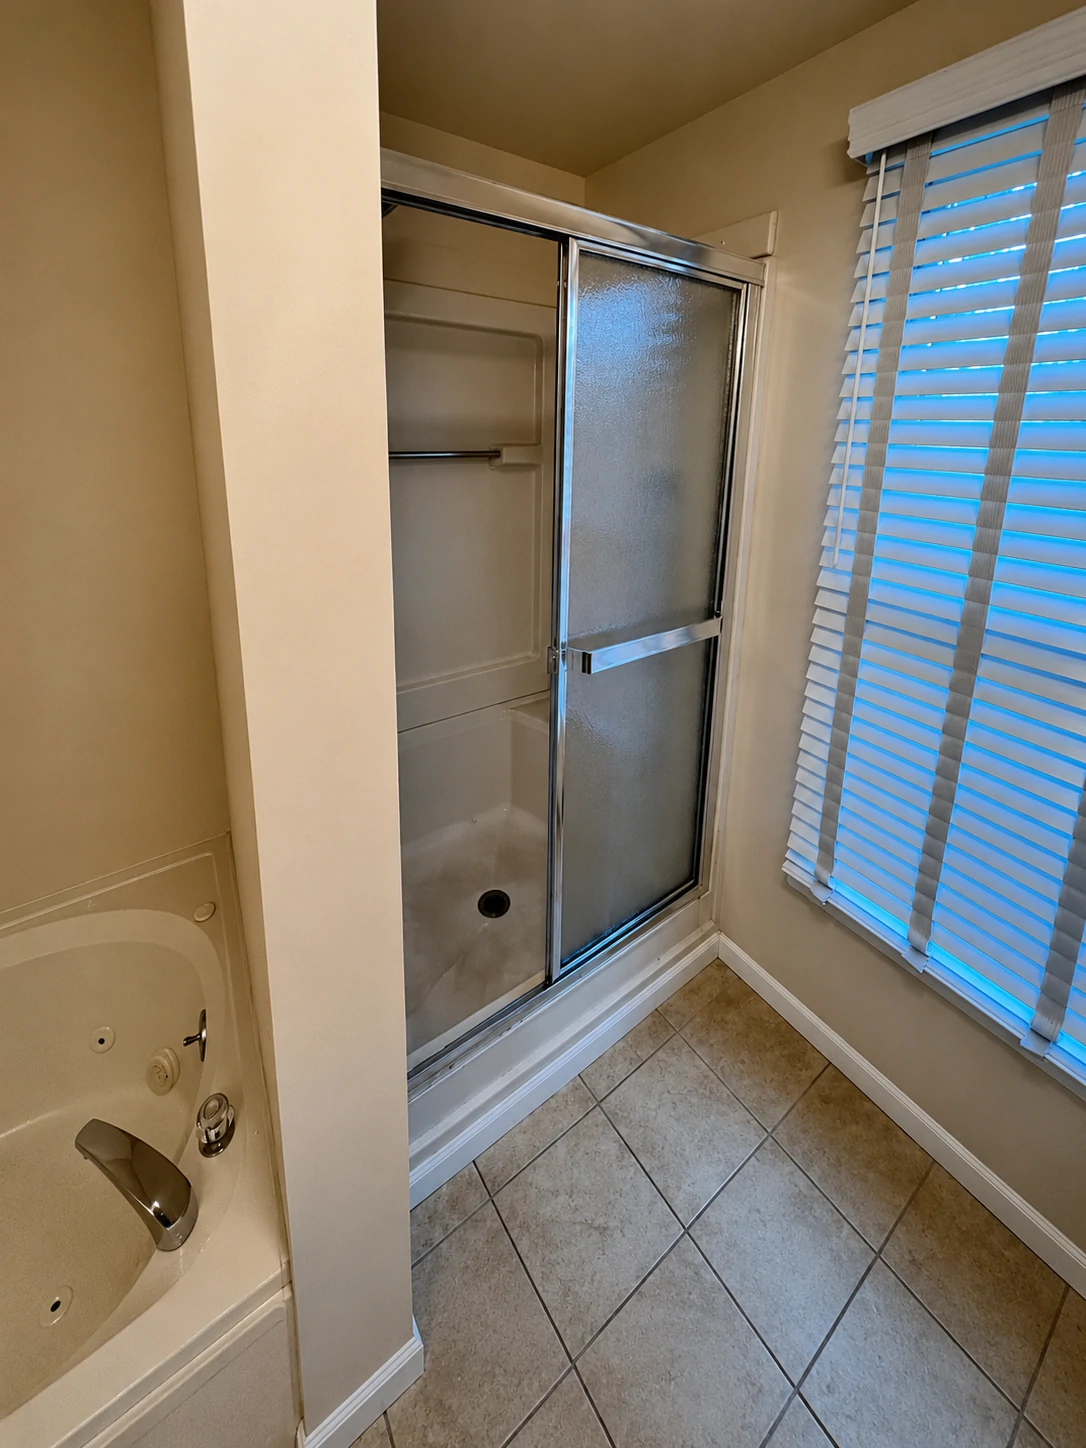
The before bathroom had a layout standard for its era: a jetted tub in a walled alcove on one side, a separate walk-in shower with a framed door tucked beside it, and a long double vanity running across the opposite wall. Nothing communicated with anything else. The tub alcove felt closed off. The shower felt like an afterthought squeezed into the corner.
Two paths are common in a renovation like this. One is combining the tub and shower into a single large walk-in shower, eliminating the tub entirely. The other — what happened here — is replacing the old alcove tub with a freestanding soaking tub in the same footprint while expanding the shower in the adjacent space. Both elements remain, but the relationship between them changes completely.
The practical benefit of staying close to the original plumbing layout: when supply lines don’t need to move, the plumbing scope and cost stays manageable. The tub swap here moved the supply lines within the same general zone rather than relocating them across the room. That distinction alone kept this from becoming a significantly more expensive project.
| Consideration | Keep Separate Tub + Shower | Freestanding Tub + Walk-In Shower | Remove Tub Entirely |
|---|---|---|---|
| Plumbing complexity | Existing stays in place | Rough-in adjustment within zone | Capping drain and supply lines |
| Resale appeal | Expected baseline | More current; stronger visual impact | Risk if only tub in the home |
| Accessibility | Garden tub has a high step-over | Freestanding also has step-over; curbless shower is better for aging-in-place | Curbless shower is optimal |
| Cleaning effort | Jetted tubs require jet-flushing; framed door tracks collect buildup | Freestanding exterior: simple. Frameless glass: no tracks | Simplest maintenance |
| Permit typically required | Minor swap: possibly not. Drain relocation: yes | Likely yes | Likely yes |
Resale note: If there’s only one full bathroom in the home, eliminating the tub entirely can limit buyer appeal in family-oriented markets. A freestanding soaking tub keeps a tub in the room while updating the look. That concern largely disappears when at least one other full bath in the home has a tub.
Walk-In Shower Ideas: What the Finished Photos Don’t Explain
**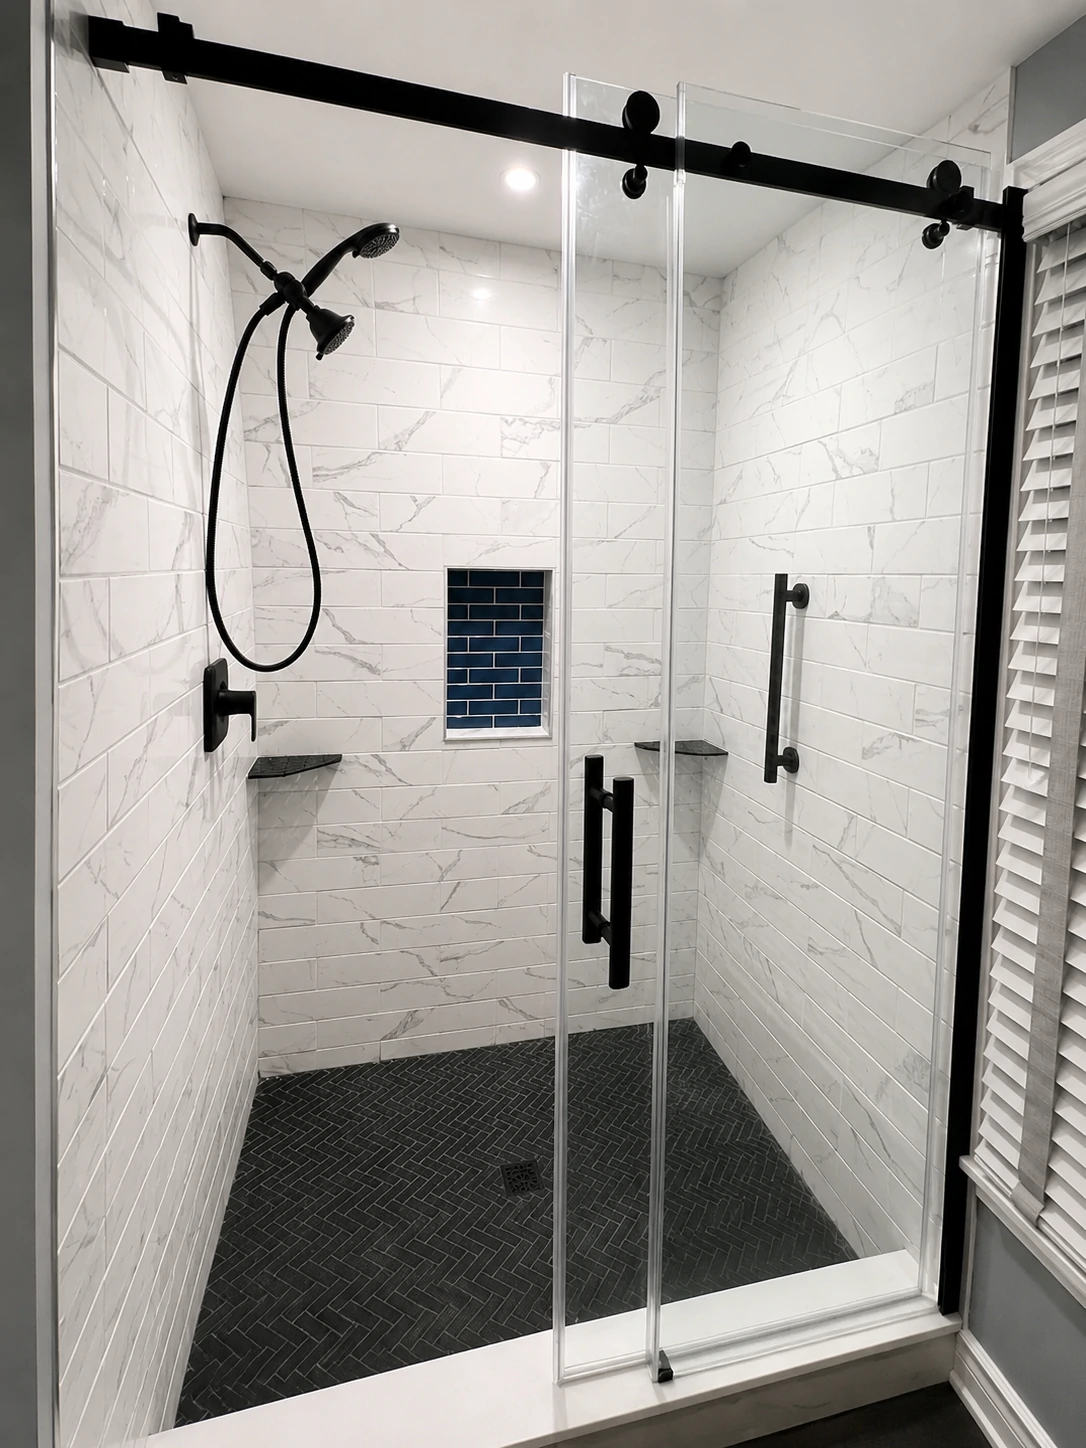
The shower transformation here is the most immediately striking change in the project. The cramped, frosted-glass framed slider became a generous walk-in with clear frameless barn-style sliding glass on a matte black rail. Large-format marble-look porcelain tile in a horizontal brick pattern covers three walls. A recessed niche is lined with contrasting navy subway tile. Dark herringbone mosaic tile runs across the floor.
Seeing that finished photo and planning your own, there are several things worth understanding before the tile quotes come in.
How the Barn-Style Slider Actually Works
A frameless bypass slider — two glass panels that slide past each other on a top rail — solves a specific problem: it provides the visual openness of frameless glass without requiring door-swing clearance. In a bathroom where the shower sits near a wall or a toilet, a hinged frameless door might swing into the way. The barn-style slider sidesteps that entirely.
The matte black rail and hardware aren’t just aesthetic. They’re structural — the rail carries the full weight of the glass panels, which at 3/8” to 1/2” thickness are significantly heavier than framed glass. That hardware has to be anchored into solid blocking in the wall above the opening, not just drywall.
Frameless vs. Framed vs. Sliding: What You’re Actually Paying For
| Feature | Framed / Semi-Framed | Frameless Hinged | Frameless Barn-Style Slider |
|---|---|---|---|
| Glass thickness | 3/16”–1/4” | 3/8”–1/2” | 3/8”–1/2” |
| What provides structure | Aluminum frame | Heavy hinges; wall mount | Top rail system; wall mount |
| Door clearance required | Yes (swing arc) | Yes (swing arc) | No — slides parallel to wall |
| Cleaning challenge | Tracks and frame collect soap scum | Hinges and edges collect buildup | No floor track; rail needs wiping |
| Typical installed cost | $300–$800 | $900–$2,500+ | $800–$2,200+ |
| Visual weight | Frame visible at all times | Near-invisible hardware | Hardware visible at top only |
The framed frosted slider in the before photos was inexpensive to maintain and functional. It also made the shower look roughly half its actual size. Removing it was one of the highest-impact changes in the renovation.
The Niche: One Detail, More Planning Than It Looks
The navy-tiled recessed niche photographs beautifully and requires planning before a single tile goes on the wall. A few things that catch homeowners off guard:
- A niche cut between standard studs (16” on center) yields an interior width of roughly 12–14 inches after backer board — not the wide shelf that photos suggest.
- Any niche cut into an exterior wall needs insulation consideration. A cold exterior wall behind a shower niche will condense moisture inside the cavity if not addressed.
- The niche must be waterproofed as completely as the shower pan. It’s a cavity open to wall framing — exactly the wrong place for moisture to collect.
- The contrasting tile (navy here) should be selected and ordered before installation begins so the installer has it ready when that section is tiled. Last-minute tile changes mid-project are expensive.
Curbless vs. Low-Threshold: The Structural Difference
The shower in this renovation has a low threshold — not a fully curbless (zero-threshold) installation. That distinction matters in terms of scope.
A true curbless shower requires modifying the subfloor so the entire wet floor slopes toward a linear drain at one edge. That typically means cutting into the subfloor, repositioning framing members, and running a continuous waterproofing membrane across the entire zone. A low-threshold shower with a standard pan is a different scope — less invasive, less expensive, and achievable within the existing subfloor depth in most bathrooms.
Freestanding Tub Ideas: What These Photos Don’t Show You
**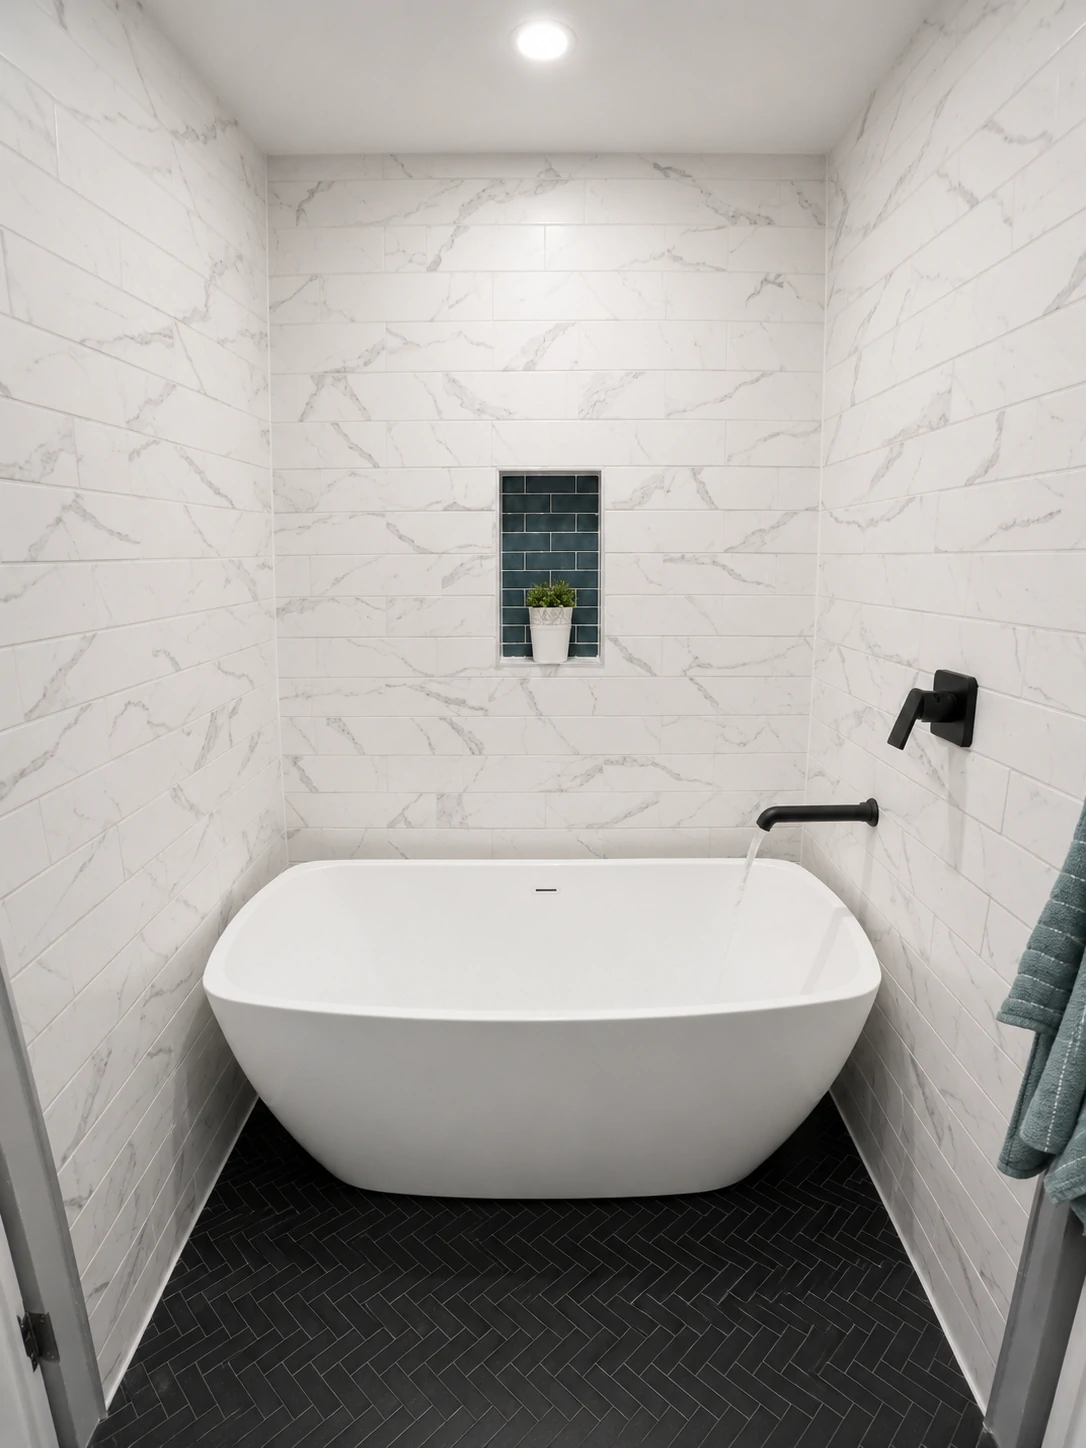
The freestanding soaking tub here is a modern rectangular-oval style in gloss white acrylic. It sits in the original jetted tub alcove, now tiled floor to ceiling in the same marble-look porcelain as the shower. A wall-mounted matte black tub filler feeds from the right wall. Dark herringbone tile runs underneath and around the entire base.
The visual is clean and deliberate. The planning behind it happened weeks before any tile was set.
The Rough-In Timing Issue Most People Miss
A wall-mounted tub filler requires supply lines to be roughed-in at a specific height and horizontal position before wall tile goes up. That position is permanent once tile is installed. Changing it afterward means cutting into finished tile — which is expensive and disruptive regardless of how carefully it’s done.
The decision between a floor-mounted filler and a wall-mounted filler must happen at the rough plumbing stage, not during the tile selection phase. It’s one of the most common mid-project conflicts when a homeowner sees the wall-mounted style in a photo and decides they want it after the rough-in is already done.
Floor Load: A Conversation That Doesn’t Always Happen
A filled freestanding soaking tub plus an occupant can exceed 500–700 lbs, concentrated over the tub’s own footprint rather than distributed along a wall ledge like an alcove tub. Most bathroom floors built to standard residential code handle this load without issue. But any existing signs of subfloor weakness — soft spots underfoot, unexpected bounce, unexplained squeaking — should be investigated before a heavy tub is placed on it.
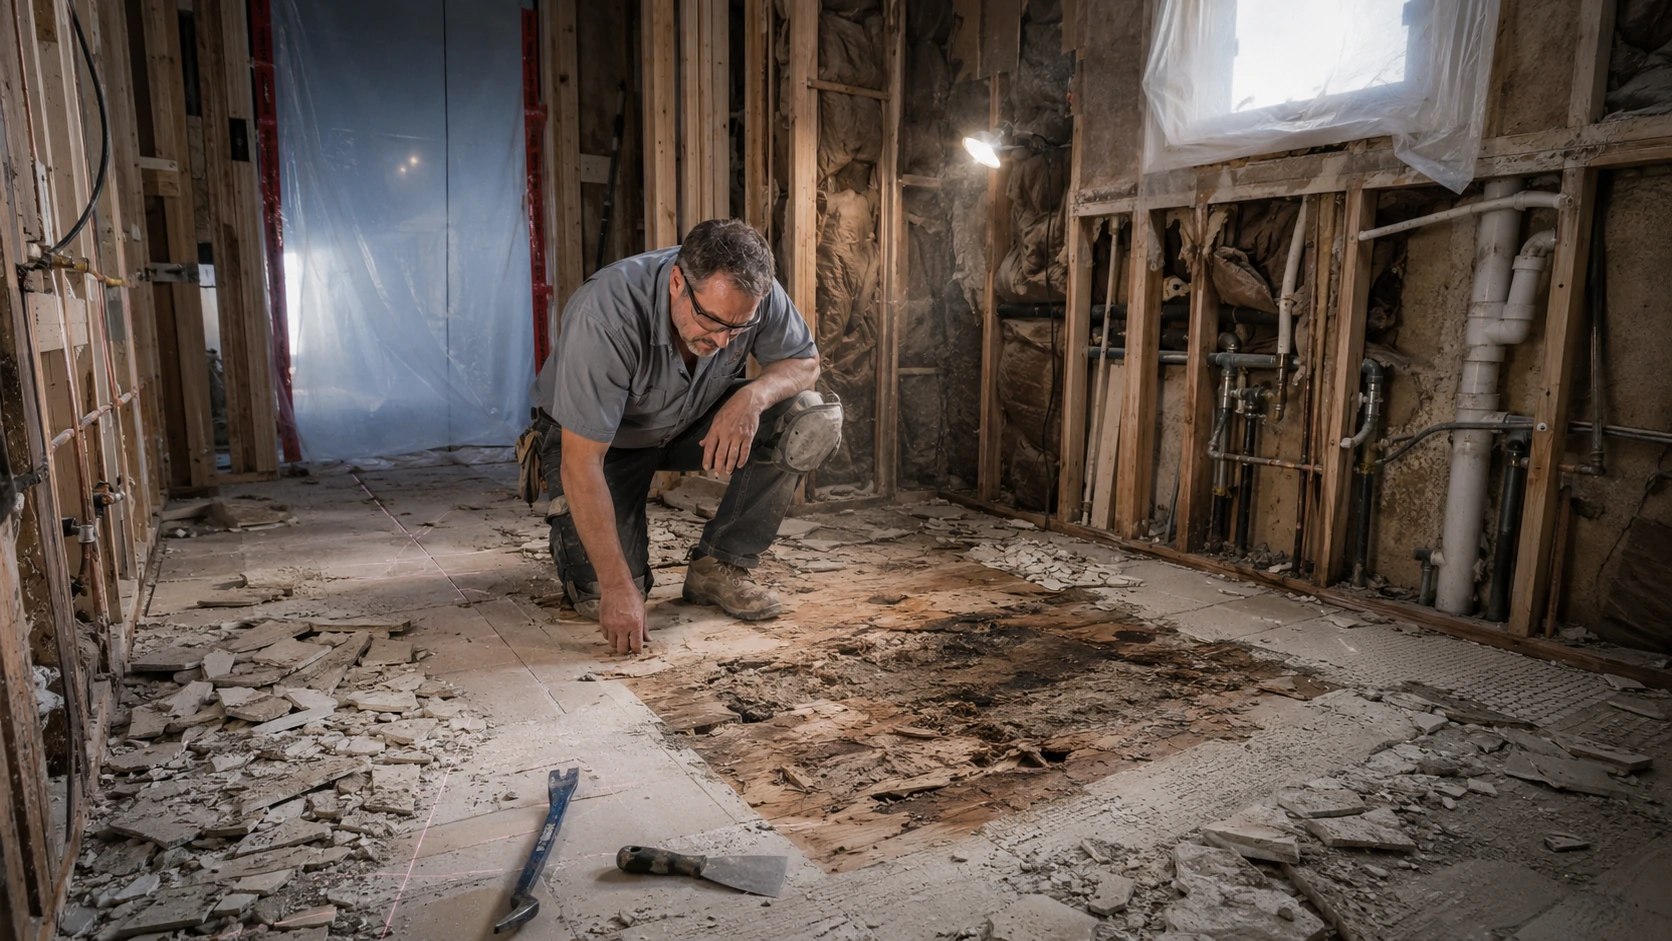
In this renovation, the cracked floor tile visible in the before photos (patched with plywood) covered a section of subfloor compromised by slow moisture intrusion from the original tub surround. Grout and caulk failures had allowed water to work its way in over years — with no visible exterior signs. That section of subfloor was replaced before new tile went down.
Finding it during demo was the better outcome by a significant margin.
Inspection reports often note this: Subfloor damage beneath a tub surround is one of the most common discoveries in master bathroom renovations. It’s not a sign of poor construction planning — it’s what happens when caulk and grout age around a tub over 15–25 years. Accounting for this possibility in the contingency budget is standard practice, not pessimism.
Freestanding Tub Styles: A Practical Comparison
| Style | Character | Practical Notes |
|---|---|---|
| Modern flat-bottom oval/rectangular (this project) | Contemporary; pairs with angular tile and matte finishes | Standard drain; easier to clean around base than clawfoot |
| Clawfoot | Traditional; visually dramatic | Often cast iron — significantly heavier; floor load concern is more acute |
| Slipper tub | Sloped back; made for reclining | Footprint is longer than it looks in photos |
| Japanese soaking tub | Deep soak in compact footprint | Standard US drain position usually requires adjustment |
Double Vanity Ideas: The Difference a Material Actually Makes
Same wall, same approximate width, same two sinks. Almost nothing else is the same.
The old setup: 1990s honey oak cabinets, a cultured marble one-piece countertop with molded-in oval bowls, two medicine cabinet mirrors in oak frames, and a globe-strip light above it all. Functional. Dated. Hard to update incrementally because the countertop and sink are a single piece.
The new setup: white shaker cabinets with a center drawer tower, a quartz countertop with undermount rectangular sinks, individual frameless mirrors, paired sconce lights at approximately face level, and matte black hardware on everything — faucets, pulls, and mirror frames.
Countertop Materials: The Trade-Offs That Matter
| Material | Durability | Stain Resistance | Maintenance | Relative Cost |
|---|---|---|---|---|
| Quartz (engineered) | Excellent | Excellent | Wipe clean; no sealing required | Mid to high |
| Granite | Excellent | Good (requires sealing) | Annual sealing; resists heat well | Mid to high |
| Marble (natural) | Moderate — scratches and etches | Poor; very porous | Frequent sealing; careful cleaning | High |
| Solid surface (Corian-type) | Good; scratches can be sanded | Good | No sealing; minor scratches repairable | Mid |
| Cultured marble | Moderate; yellows over time | Moderate | No sealing; difficult to repair chips | Low to mid |
For a primary bathroom used by two people daily, quartz is the material most contractors recommend. No annual sealing, no etching from everyday products, and it’s available in patterns that convincingly mimic marble without the upkeep of natural stone. One caveat: quartz is not particularly heat-resistant. Setting a hot styling tool directly on the surface will damage it. A small heat-safe mat near the vanity solves this.
The Storage Layout That Works Day to Day
The new vanity has a center section of stacked drawers flanked by door-and-shelf cabinets on each side. Drawer access for daily items — toiletries, charging cables, cotton rounds, hair tools — is more functional than reaching into a deep shelf through a door. Homeowners who’ve lived with both layouts consistently prefer drawers for high-frequency items.
When ordering a vanity, specifying full-extension soft-close drawer glides is worth doing upfront. It’s one of those features that rarely gets mentioned in cabinet specs but makes daily use noticeably better.
Flooring and Wall Tile Ideas: The Decisions That Drive the Budget
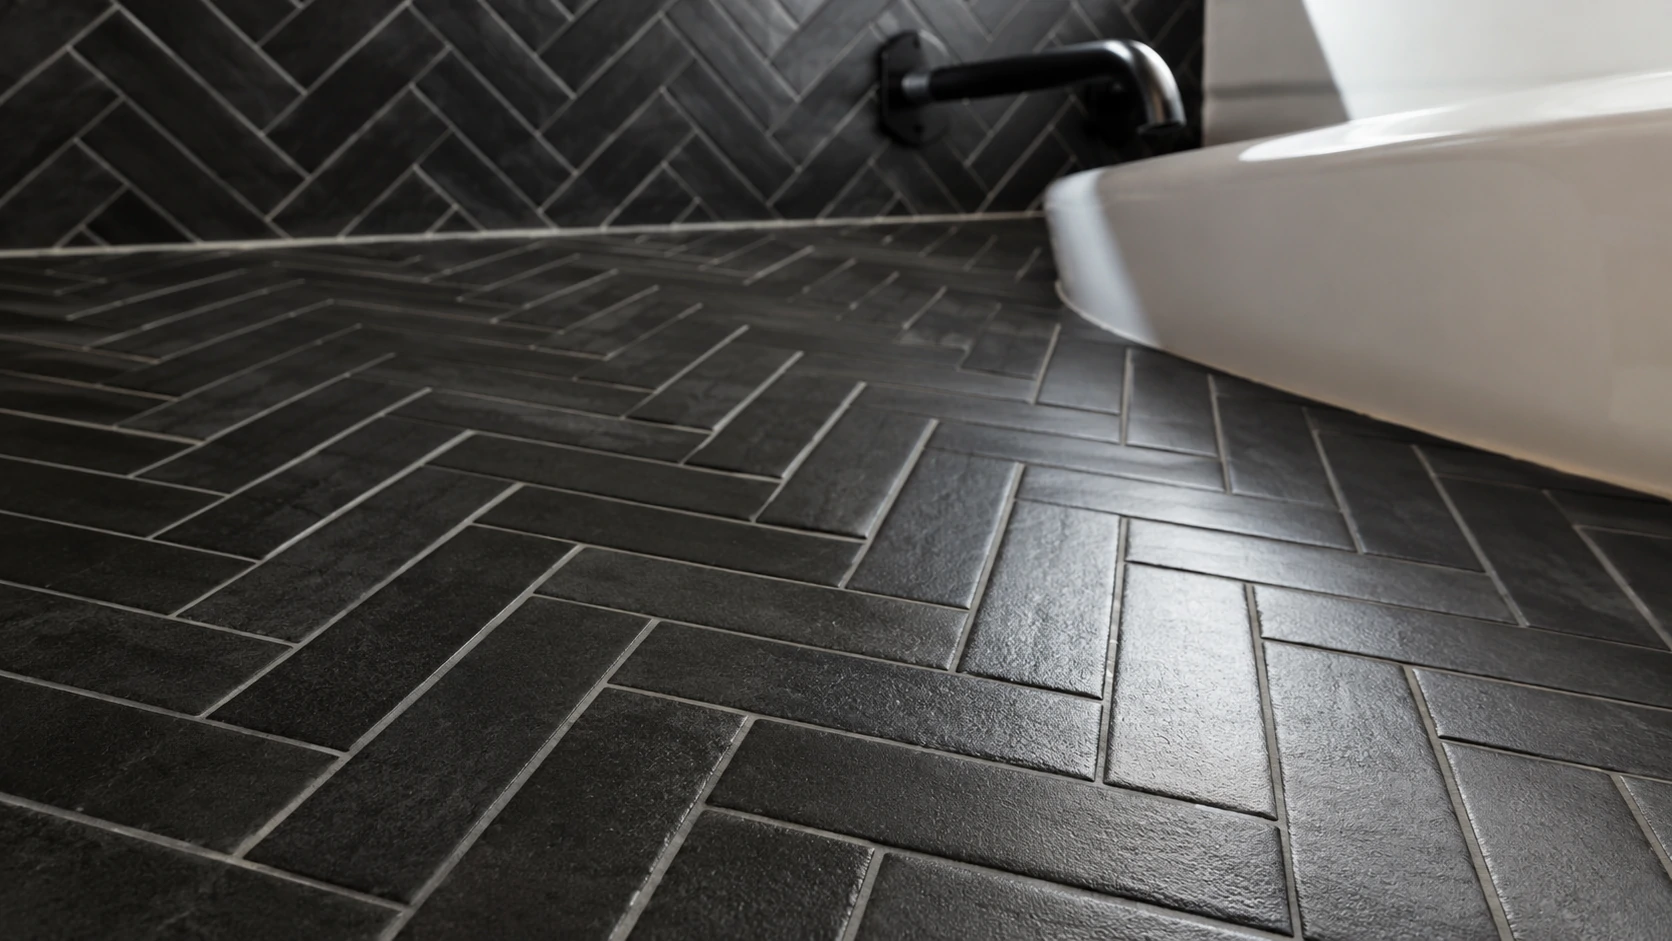
The dark black herringbone floor tile running wall to wall is the single boldest decision in this renovation. Against white marble-look wall tile and a white vanity, it reads as intentional and controlled rather than heavy. But it reflects real planning and real cost implications that shouldn’t be discovered mid-project.
What Herringbone Actually Adds to a Project
Every border tile in a herringbone pattern must be cut at an angle. The diagonal nature of the layout generates more offcut waste per square foot than a straight lay — angled cuts produce pieces that can’t be reused as easily as rectangular trims. Installation takes longer because the installer must maintain precise reference lines and make high-volume angle cuts throughout.
Many tile contractors estimate herringbone floor tile costs 20–35% more in labor than a straight-lay pattern in the same tile. That premium is entirely in installation time, not materials. If you’re comparing bids on a herringbone installation and one quote comes in significantly lower, asking whether the installer has experience with the pattern is a fair question.
Slip Resistance: What the DCOF Rating Means
Small mosaic tile in a herringbone format creates more grout lines per square foot than large-format tile. More grout lines mean more texture and surface grip, which generally improves slip resistance on wet bathroom floors.
When selecting floor tile for a bathroom, the Dynamic Coefficient of Friction (DCOF) rating is what actually measures wet-surface slip resistance. The ADA recommends a minimum DCOF of 0.42 for wet walking surfaces. Small-format mosaic tile tends to exceed this threshold due to grout-line texture. Large polished stone tiles often do not — which is worth knowing before selecting something that photographs beautifully but creates a slipping hazard.
One thing that surprises homeowners: Wall tile is not rated for floor use. Floor tile can generally go on walls. Many marble-look porcelain tiles sold for shower walls are not load-rated or slip-rated for bathroom floors. Confirm the DCOF rating on any tile before specifying it underfoot.
Grout Maintenance Reality by Pattern
| Pattern | Grout Lines Per Sq Ft | Sealing Interval | Cleaning Effort |
|---|---|---|---|
| Large format (12”x24”+, straight lay) | Very few | Every 2–3 years | Easiest |
| Standard subway (3”x6”, straight lay) | Moderate | Every 1–2 years | Moderate |
| Herringbone mosaic (2”x4”) | Many | Annually | More intensive |
| Penny tile / basketweave | Very many | Every 6–12 months | Most intensive |
The herringbone floor here will need annual grout sealing with standard cement-based grout. Epoxy grout eliminates the resealing requirement but is significantly harder to install and less forgiving of timing errors. It’s worth a direct conversation with the tile installer before the floor is set — not something to decide afterward.
The Wall Tile Choice in Context
The marble-look porcelain on the shower walls and tub alcove uses a horizontal brick pattern — not herringbone, not straight stack. This keeps the wall plane visually calm enough that the dark herringbone floor reads as the primary statement. Layering two aggressive tile patterns in the same bathroom tends to make both feel less deliberate.
The navy tile inside the shower niche picks up the slate blue accent wall color from the vanity side of the room — a thread that ties two distinct zones of the bathroom together without being obvious about it.
Fixture Finish and Lighting Ideas: Matte Black Done Consistently
Every metal element in the renovated bathroom is matte black: faucets, tub filler, showerheads, shower door rail and handles, vanity cabinet pulls, mirror hardware, and sconces. When a single finish carries through every element in a space, the result reads as designed. When matte black faucets share a room with chrome towel bars and a brushed nickel light fixture, the effect is unfinished — regardless of the quality of the individual pieces.
Maintaining PVD-Coated Matte Black Finishes
Matte black hardware is typically PVD-coated (Physical Vapor Deposition), which produces a durable and even surface. What damages it faster than most people expect:
- Bleach-based cleaners — even diluted bathroom sprays
- Abrasive scrubbing pads or brushes
- Hard water left to dry on the surface; calcium deposits appear chalky on matte finishes and are difficult to remove without the right approach
- Standard “disinfecting bathroom sprays” not rated for PVD surfaces
The consistent manufacturer recommendation across PVD-coated fixtures: mild dish soap, warm water, and a soft cloth. In hard-water areas, a quick wipe-down after use prevents buildup far more effectively than any reactive cleaning session.
Chrome fixtures hide water spots and soap residue better — part of why chrome has been the default finish for decades. Matte black is more visually dramatic but requires more disciplined daily habits to maintain.
The Lighting Setup and Why It Works
The before bathroom used a single globe-strip light above the medicine cabinet mirrors. This is the most common bathroom lighting mistake: a single overhead or above-mirror light source creates shadows under the chin, around the eyes, and along the jaw — exactly the areas that matter most for grooming tasks.
The after bathroom uses two separate sconces — one beside each individual mirror, mounted at approximately face height. Light coming from the side illuminates the face from two directions simultaneously. Shadows largely disappear. The difference in usability is immediately obvious once experienced.
Bathroom lighting by zone:
| Zone | Purpose | Notes |
|---|---|---|
| Vanity sconces at face level | Task lighting for grooming | Most important lighting decision; overhead-only is insufficient |
| Recessed ceiling fixtures | Ambient, general illumination | Supplement sconces; don’t replace them |
| Shower recessed fixtures | Wet-zone task lighting | Must be rated for wet locations — UL wet listing or IP44+ rating required |
The sconce style here — clear cylindrical glass shades with visible bulbs on matte black fixtures — reads as industrial without being harsh. Warm white LEDs at 2700K–3000K in clear glass shades create a softer and more flattering effect than cool white, particularly for a room that’s used first thing in the morning.
Color and Accent Wall Ideas
The vanity wall is painted a saturated slate blue — somewhere between a deep teal and an ocean blue. The surrounding walls are a light neutral gray. White tile in the wet zones, a white vanity, and white fixtures hold both colors in place without either one taking over.
This color relationship works for a specific reason: the accent wall sits directly behind the vanity mirrors, which means it’s also what you see reflected every time you look in them — doubling its visual presence without covering every surface.
A practical note on paint in bathrooms: Flat and matte paint absorbs moisture more readily, shows water marks, and is harder to wipe clean. In a bathroom — particularly a wall within splash range of a sink or near shower steam — use at minimum a satin finish. Semi-gloss is the more practical choice near direct water sources.
Deeply saturated colors like this blue also typically require an additional coat compared to lighter tones to achieve even coverage, especially over a prior light color. Worth accounting for in a timeline if painting is being handled as a DIY task.
Comfort Upgrades: Bidet Toilets and Heated Flooring
**
The toilet in the after photos appears to be a modern elongated model with an integrated bidet/washlet seat — identifiable by the elongated profile and side control panel. This is one of the fastest-growing bathroom upgrade categories right now, and it consistently produces one cost surprise that wasn’t in the original budget.
What a Bidet Seat Needs That a Standard Toilet Doesn’t
A bidet seat or integrated bidet toilet requires a grounded electrical outlet within approximately 4–6 feet of the toilet. In the US, that outlet must be GFCI-protected per the National Electrical Code. In most 1990s bathrooms, the toilet sits against a wall with no outlet nearby.
Adding that outlet is a separate electrical task. It involves running a circuit — sometimes from the panel — routing cable through the wall, and installing a GFCI outlet. Routine work for a licensed electrician, but an easy line item to overlook when budgeting for the toilet itself. Many homeowners discover the gap only when the toilet is being installed.
Heated Flooring: Now or Never
Radiant floor heating — a heating mat or cable system installed under tile — cannot be added after the floor is complete without removing the tile. This is a now-or-never decision, and it must happen before thinset and tile are laid.
Key points for anyone deciding mid-renovation:
- The heating element installs over the subfloor before thinset and tile — it adds minimal height to the assembly
- It requires a dedicated electrical circuit, typically 120V
- A programmable thermostat lets the floor reach temperature before you step on it
- Energy cost for an average master bathroom footprint runs a few dollars per month in typical use
Dark tile like the herringbone here is particularly cold underfoot in winter. The time to add in-floor heating is during the subfloor and rough electrical phase — not after the first tile is set.
Realistic Renovation Timeline: Why Six Months Isn’t a Red Flag
Most online bathroom renovation estimates suggest 3–6 weeks. The reality for a full gut renovation — involving permits, licensed trade sequencing, and specialty material lead times — is closer to 2–5 months of active work, and longer if the planning and ordering phase is included.
Here’s where the time actually goes:
| Phase | What Happens | Typical Duration | Where Delays Come From |
|---|---|---|---|
| Demo | Remove tile, fixtures, vanity, flooring | 2–5 days | Subfloor damage; hazardous materials discovered |
| Rough plumbing | Modify supply and drain lines | 2–5 days | Unexpected pipe condition; access challenges |
| Rough electrical | New circuits, outlet relocation, lighting rough-in | 1–3 days | Panel capacity; code compliance upgrades |
| Rough inspection | Municipal inspector approval | 1–7 days | Scheduling wait; corrections required |
| Waterproofing | Membrane application + cure time | 2–4 days | Cannot rush cure time; tile cannot begin before |
| Tile installation | Floor and wall tile set; grout; seal | 5–12 days | Herringbone + large-format + niche work = more time |
| Frameless glass fabrication | Glass custom-cut after tile is measured | 2–6 weeks off-site | No workaround; this adds weeks to the back end |
| Fixture installation | Vanity, sinks, faucets, toilet, lighting, mirrors | 2–4 days | Custom vanity lead times (6–12 weeks if ordered late) |
| Paint, trim, accessories | Accent wall, baseboards, towel bars | 1–3 days | Last task — dependent on everything else |
| Final inspection | Electrical and plumbing verified | 1–5 days | Scheduling; punch list items |
The frameless glass fabrication lead time catches many projects off guard. The glass installer measures the shower opening after tile is complete, then the glass is custom cut to those dimensions at a fabrication shop — typically a 2–6 week process. There’s no shortcut. A shower that’s otherwise finished but waiting on glass for three to four weeks at the end of a project is common, not a sign something went wrong.
Custom vanities create the same problem on the front end. Off-the-shelf vanities are immediately available. Custom or semi-custom cabinets can run 6–12 weeks from order to delivery. If the order is placed after demo rather than before, the project waits.
⚠️ Pre-1980s Homes: Before Demo Begins Homes built before 1980 may contain asbestos-containing materials in floor tile, vinyl flooring, drywall joint compound, or pipe insulation, and lead paint on walls and trim. Disturbing these materials without prior testing creates potential health exposure. Most jurisdictions require asbestos testing before issuing a demolition permit in older structures. Even where testing isn’t legally required, it’s the correct first step before any demolition work begins.
Master Bathroom Renovation Cost Breakdown
Most bathroom inspiration content avoids cost entirely. Below is an honest framework by scope, using current US contractor estimates as reference. Regional labor rates vary significantly — coastal metro markets commonly run 30–60% above the national median for the same work.
| Scope Tier | What’s Typically Included | Approximate US Cost Range | What Drives It Higher |
|---|---|---|---|
| Cosmetic refresh | Paint, hardware swaps, new light fixture, toilet, accessories — no tile or plumbing changes | $2,000–$7,000 | New electrical circuit; premium fixtures |
| Mid-range renovation | New vanity, countertop, tile in existing footprint, fixture finish change — plumbing stays in place | $10,000–$22,000 | Custom vanity; natural stone; frameless glass |
| Full gut renovation | Layout changes, walk-in shower, freestanding tub, full re-tile, new vanity, electrical update, permits | $25,000–$55,000+ | Plumbing relocation; subfloor repair; large square footage; radiant heating |
These are estimates only. Always get multiple contractor bids before proceeding with any scope above a cosmetic refresh.
Where the budget surprises actually come from:
- Labor typically represents 40–60% of a full renovation’s total cost. Tile installation labor for complex patterns frequently exceeds the material cost.
- Frameless glass is custom-fabricated for every installation. The cost reflects precision fabrication and heavy-duty hardware, not rare materials.
- Subfloor repairs aren’t visible until demo is complete. A contingency of 10–15% of the project budget is standard contractor advice.
- Permits and inspections add cost and scheduling time but are non-optional for electrical and plumbing changes. An unpermitted renovation can create complications with homeowner’s insurance and resale.
- Herringbone and pattern tile work costs meaningfully more in labor than straight-lay tile for the same material. If a contractor’s quote doesn’t reflect this, ask whether pattern work has been priced.
DIY vs. Professional: Task by Task
| Task | DIY Realistic? | Notes |
|---|---|---|
| Demolition (tile, vanity, fixtures) | Yes, with caution | Test for hazardous materials first in pre-1980 homes; contain dust to adjacent rooms |
| Painting (walls, trim, accent wall) | Yes | Significant cost savings; prep work determines quality |
| Mirror and accessory installation | Yes | Proper drywall anchors or wall blocking required |
| Like-for-like vanity swap | Intermediate | Requires shutoff valves, drain connection; any leak causes serious damage |
| Lighting fixture replacement (same location) | Intermediate | Turn off the breaker; GFCI protection must stay in circuit |
| Shower waterproofing | Not recommended | Errors don’t show for months; resulting damage is severe and expensive |
| Tile installation (shower walls and floor) | Not recommended for first-timers | Membrane application, slope-to-drain, and grout technique require real experience |
| Plumbing relocation | No | Requires permit + licensed plumber in most US jurisdictions |
| Electrical (new circuits, outlets) | No | Requires permit + licensed electrician in most US jurisdictions |
| Frameless glass installation | No | Heavy panels on a moving system; improper installation is a safety hazard |
| Subfloor repair (minor surface issues) | Intermediate | Structural framing issues require professional assessment |
A pattern that comes up repeatedly in home improvement forums: a homeowner tiles their own shower, it looks correct for 8–12 months, and then a soft spot appears in the floor or a wall shows moisture staining. The cause is almost always waterproofing that wasn’t applied correctly — a missed corner, an insufficient membrane thickness, or a seam that wasn’t properly lapped. The repair requires removing the finished tile to fix. The cost of getting waterproofing right the first time is reliably less than the cost of doing the tile work twice.
Common Master Bathroom Renovation Mistakes to Avoid
- Removing the only tub in a home with one full bathroom. A freestanding soaking tub satisfies the bathtub requirement while updating the look. The concern goes away when another full bath in the home retains a tub.
- Skipping a proper waterproofing membrane. Grout and caulk are not waterproofing. A certified membrane (Schluter Kerdi, RedGard, WEDI, or equivalent) must be applied and cured before tile is set.
- Choosing floor tile without checking the DCOF rating. Tile that looks appropriate may be a slip hazard on a wet bathroom floor. Confirm the rating before specifying.
- Quoting herringbone tile labor at straight-lay rates. The material cost is the same. The installation time is not.
- Not ordering frameless glass until tile is finished. Glass is custom-cut after tile is complete. If fabrication takes 4–6 weeks and nobody initiated it at demo, the project sits incomplete for over a month at the end.
- Deciding on a wall-mounted tub filler after rough plumbing is done. That position is permanent once the wall is tiled. The decision must happen before rough plumbing is completed.
- Using the old exhaust fan after expanding a bathroom’s wet area. A fan sized for the original room may be inadequate for a larger shower generating more steam. Size the fan by actual cubic footage of the space.
- Forgetting the GFCI outlet near the toilet for a bidet seat. It’s a separate electrical task that is easy to overlook at budgeting time.
- Ordering all materials before demo is complete. Some dimensions only become clear after the existing material is removed. A vanity that’s 1” too wide to clear the new plumbing configuration is an expensive problem.
- Not planning for matte black fixture maintenance before committing to the finish. PVD coatings require different products and habits than chrome — especially in hard-water areas.
- Placing a freestanding tub without addressing subfloor condition first. Any soft spot, bounce, or moisture damage under the existing surround should be investigated and repaired before a heavy tub is installed.
Maintaining a Newly Renovated Master Bathroom
| Component | Task | Frequency |
|---|---|---|
| Shower wall grout | Inspect and re-seal | Every 1–2 years |
| Herringbone floor grout | Inspect and re-seal | Annually (or specify epoxy grout at installation) |
| Shower caulk (corners, floor-wall transition, niche perimeter) | Inspect for cracking or discoloration; recaulk as needed | Every 12–18 months |
| Matte black PVD fixtures | Wipe with mild dish soap and soft cloth | After each use in hard-water areas; weekly minimum |
| Frameless glass panels | Clean with non-abrasive glass cleaner; apply hydrophobic coating | Weekly cleaning; hydrophobic coating every 3–6 months |
| Quartz countertop | Wipe with mild soap and water; avoid bleach-based cleaners | As needed; no sealing required |
| Freestanding acrylic tub | Clean with non-abrasive cleaner; avoid bleach and acetone-based products | Weekly |
| Bathroom exhaust fan | Vacuum cover and motor housing | Every 3–6 months |
| Shower niche tile and perimeter caulk | Clean surfaces; inspect caulk line | Inspect every 6 months |
One consistent finding among homeowners in the first year after a renovation: the 12–18 months immediately post-completion are when the most maintenance questions arise. Grout that wasn’t fully cured before heavy use may discolor faster than expected. Caulk at the tub-to-floor or wall-to-floor transition can develop small gaps as materials settle slightly — a normal occurrence in new construction, not a construction failure. Catching and recaulking small gaps early keeps moisture from working its way behind tile.
FAQs
How long does a full master bathroom renovation usually take from demo to finish?
Most full gut renovations take 2–4 months when permits, licensed trade sequencing, and standard material lead times are factored in. Cosmetic updates with no plumbing or electrical changes can be completed in 2–4 weeks. The two most common reasons the back half of a project stretches longer than expected: frameless glass fabrication lead times (typically 2–6 weeks) and custom vanity delivery times (6–12 weeks if the order is placed late).
Can a separate tub and shower be combined into one walk-in shower without moving the plumbing?
Often yes, if the shower expansion stays within the same general drain and supply zone. Any actual drain relocation requires a permit and a licensed plumber. A pre-demo plumbing assessment is worth scheduling before layouts are finalized — it confirms what’s possible without expensive changes.
Do you need a permit to remove a bathtub or relocate plumbing fixtures?
In most US jurisdictions: yes, if plumbing is being relocated or if electrical work is part of the project. A like-for-like tub swap in the same position may not require a permit in all jurisdictions. Requirements vary by municipality — confirm with your local building department before starting.
How much weight can a typical bathroom floor support for a freestanding tub?
Most residential bathroom floors are built to a 40 lbs per square foot live load, which is generally adequate for a filled soaking tub distributed across its footprint. Any existing softness, bounce, or squeaking underfoot should be investigated before placing a heavy tub. Subfloor moisture damage under an old tub surround is a common finding during demo — the reason the before photos in this project showed a patched floor tile — and should be fully repaired before a new tub is installed.
What’s the difference between a curbless shower and a standard shower pan?
A standard shower pan has a raised curb that contains water within the wet zone. A curbless (zero-threshold) shower has no curb — water is contained by the slope of the floor toward a drain, typically a linear drain at one wall edge. A curbless installation requires subfloor modification to create the proper slope and a continuous waterproofing membrane throughout. It’s a meaningfully different scope of work than swapping a standard pan.
Is herringbone tile significantly more expensive to install than straight-lay tile?
The tile material costs the same regardless of pattern. Labor is 20–35% higher for herringbone due to the volume of angle cuts and the time required to maintain pattern alignment throughout installation. That premium is entirely in installation time, not materials.
Do matte black bathroom fixtures require different cleaning products than chrome?
Yes. PVD-coated matte black finishes can be damaged by bleach-based cleaners, acidic cleaners, and abrasive scrubbing. Manufacturers consistently recommend mild dish soap and a soft cloth. Chrome is more tolerant of the range of household bathroom cleaners — which is part of why chrome has been the default finish for so long.
What electrical requirements does a bidet seat or integrated bidet toilet need?
A grounded, GFCI-protected electrical outlet within approximately 4–6 feet of the toilet. In most 1990s bathrooms, no outlet exists near the toilet. Adding one requires a licensed electrician and typically involves running a new circuit from the panel — a routine task, but an easy one to leave out of the initial budget.
Should a master bathroom keep a bathtub for resale value?
If the home has at least one other full bathroom with a tub, removing the tub from the master bathroom is not generally a resale concern in most markets. In homes with only one full bathroom, retaining at least one tub — which a freestanding soaking tub satisfies — is commonly recommended to maintain broad buyer appeal.
What is commonly found behind old tub or shower tile during a renovation?
Water damage is the most consistent finding. Grout and caulk failures around tubs and showers allow slow moisture infiltration over years, degrading backer board and wall framing without visible exterior signs. The cracked, patched floor tile in the before photos of this project covered a section of subfloor that had been compromised by long-term moisture intrusion from the original tub surround. Finding it during demo allowed proper repair before new tile was set.
How often should shower grout be resealed?
Shower wall grout: every 1–2 years with standard cement-based grout. Dense floor patterns like herringbone: annually. Epoxy grout eliminates the resealing requirement but requires more skill during installation and is less forgiving of timing errors. Worth discussing with the tile installer before the floor is set.
What exhaust fan size is needed for a master bathroom with a walk-in shower and soaking tub?
The Home Ventilating Institute recommends a minimum of 1 CFM per square foot of bathroom area. A 100–150 CFM fan covers most master bathrooms; larger or steam-heavy spaces may need 200 CFM or more. A humidity-sensing fan that activates automatically when moisture levels rise is a practical upgrade over a manual switch — particularly useful in a bathroom where a large shower generates significant steam.
Related Reading: