I Built a Complete Home Gym and Came Out $4,125 Ahead. Here's the Method
-
 Olivia Reed
 - 23 Jun, 2026

Most “build a home gym for free” articles tell you the same thing: shop Facebook Marketplace, buy used, start with a basic dumbbell set and build up over time.
That advice isn’t wrong. It’s just incomplete — and it misses the actual mechanism that makes a genuinely zero-cost gym possible.
This is a documented basement gym build that used the secondhand equipment market as a financial engine, not just a discount channel. Every transaction went into a spreadsheet. Every purchase was evaluated for resale margin before the money left. And after every lot, every pickup, every sale, and every dollar spent on paint, primer, rubber flooring, and hardware — the running net finished at a gain of $4,125.
Not break-even. A profit. The equipment, the space conversion, the materials — everything — paid for itself and left money on the table.
The method is called lot arbitrage. Almost nobody talks about applying it to gym equipment, and yet the economics are almost perfectly suited for it.
Quick Summary
You can build a free home gym by purchasing used equipment lots on Facebook Marketplace below combined individual resale value, reselling unwanted pieces at per-piece market rates, and reinvesting the proceeds until your running net reaches zero. One documented build tracked every transaction in a spreadsheet and finished with a net gain of $4,125 — after covering all paint, flooring, lumber, masonry hardware, and transportation costs. The finished space includes a Torque functional cable trainer, a Rogue dumbbell set from 5–70lb, a Rogue power rack with barbell, bumper and iron plates, two adjustable benches, a Roman chair, full wall-mounted bar storage, and rubber tile flooring throughout a finished cinder block basement.
Key Takeaways
- Lot arbitrage — buying equipment bundles below combined individual resale value — is the financial mechanism, not generic “buy used” advice
- A live spreadsheet tracking every transaction is non-negotiable; without it you cannot manage your net position
- Good lots on Facebook Marketplace move within 2–4 hours; response time matters more than negotiation skill
- Real out-of-pocket costs are in the space conversion: paint, primer, flooring, anchors, and lumber — not the equipment
- Cinder block walls require a specific preparation sequence; standard interior paint on unprimed block fails within 12–18 months
- The strategy can produce a net-positive outcome — not just break-even — with consistent, disciplined execution
The Financial Engine — The Mechanism That Makes a $0 Gym Possible
The entire strategy rests on one price gap that exists in every local marketplace, in every city, and most people never think to exploit.
Lot sellers want one transaction. Moving 200 pounds of gym equipment is annoying. Moving it to three separate buyers — over three separate weekends — is genuinely miserable. A seller listing equipment as a bundle will almost always price the lot below the sum of its individual values to guarantee a single pickup, one deal, one trip.
Individual buyers want the opposite. They want exactly the piece they need — one barbell, one bench, one set of dumbbells — and they’ll pay full per-piece market rate for the convenience of buying only what they’re looking for.
That price gap between lot pricing and per-piece pricing is the entire engine. It’s not a loophole. It’s just a structural feature of how secondhand markets work, and most gym equipment buyers have never thought to use it systematically.
A Real Transaction Example
A lot appears: a 45lb Olympic barbell, two pairs of iron plates (25lb and 45lb), a basic adjustable bench, and a set of hex dumbbells running 10–30lb. Asking price: $280.
Quick individual research on the same platform:
- Barbell: $75 in comparable listings
- 45lb plates (pair): $90
- 25lb plates (pair): $45
- Adjustable bench: $80
- Hex dumbbells 10–30lb: $120
Combined individual value: $410. After negotiating the lot to $240, the spread is $170 before a single item is designated as “keep.”
Plan to keep the barbell and both plate sets — assigned individual value of $210. Resell the bench ($75) and the dumbbells ($120) individually. Total recovered: $195. Net cost of the kept equipment after recovery: $45.
That $45 goes on the spreadsheet and gets offset by the next transaction. By lot three or four, the running net is near zero. By lot eight or ten in a market with any volume, it’s crossed into positive territory.
The Spreadsheet — Tracking Your Net Position in Real Time
This isn’t optional, and it’s not administrative busywork. Without a running net position, there’s no way to know whether the project is on track, whether a lot is priced appropriately, or whether the total outcome is actually positive. The spreadsheet is the project.
Column Structure
Keep it simple enough to actually use every time:
| Column | Purpose |
|---|---|
| Item | Specific piece of equipment |
| Platform | Facebook Marketplace, Craigslist, OfferUp |
| Date Purchased | For timeline tracking and cash-flow visibility |
| Amount Paid | Your pro-rated share of the lot cost for this item |
| Date Sold | Leave blank until sold |
| Amount Recovered | Sale price for resale items; $0 for kept items |
| Net (Item) | Amount Paid minus Amount Recovered |
The running total of the Net (Item) column across all rows is your net position. When it hits zero, the equipment cost nothing. When it goes negative — meaning total recovered exceeds total paid — you’re profitable.
Sample Ledger (First 8 Transactions)
| Item | Paid | Recovered | Net |
|---|---|---|---|
| Rogue hex dumbbells 5–25lb (kept) | $160 | $0 | −$160 |
| CAP hex dumbbells 30–50lb (resold) | $120 | $185 | +$65 |
| Adjustable bench — Marcy (resold) | $40 | $75 | +$35 |
| Rogue Olympic barbell (kept) | $180 | $0 | −$180 |
| 45lb iron plates ×4 (kept 2, sold 2) | $80 | $55 | −$25 |
| EZ curl bar (resold) | $15 | $40 | +$25 |
| Precor treadmill (resold) | $60 | $200 | +$140 |
| Weider flat bench (resold) | $20 | $45 | +$25 |
| Running Net | $675 | $600 | −$75 |
After eight transactions, the kept equipment — a barbell, a partial dumbbell set, and 90lb of plates — has a running net cost of $75. That number keeps falling with every subsequent lot.
One common mistake is starting the spreadsheet two or three lots in, because early transactions feel manageable to track mentally. They aren’t. Two transactions without documentation is two data points permanently lost from the net position calculation.
Finding Lots — How to Watch Marketplace and Actually Win
“Check Facebook Marketplace regularly” is advice that sounds actionable and isn’t. Every person who reads it interprets it differently, and most of those interpretations don’t produce results.
Search Terms That Surface Lots (Not Just Individual Items)
The word “lot” is one of the most effective filters:
gym equipment lothome gym lotweight set lotdumbbells and weights lotgym equipment movinggym equipment must go
“Moving” and “must go” are behavioral signals. They indicate a seller with urgency — and urgency in a lot seller almost always means below-market pricing. Also search without the word “lot” and look for any multi-item listing. Any post photographing more than three pieces of equipment together is often a de-facto lot, even if it isn’t labeled as one.
Set Saved Searches with Push Notifications
Daily manual searching creates friction, and friction leads to skipping days. Saved searches with push notifications eliminate that problem — good lots reach the phone within minutes of posting without any active effort.
On Facebook Marketplace: run your search, filter to your radius (start at 25 miles, extend to 50 if the local market is thin), and save the search with notifications enabled. Set up four or five different search variations. Some overlap is fine.
Timing Patterns
The consistent posting windows across most markets: 7–9am (morning motivation to finally clear the garage), 6–9pm (after-work decision-making), and Saturday mornings especially between 7–10am. January and February produce the highest gym equipment lot volume of any period — post-resolution sellers who bought equipment last spring and didn’t use it.
Response Time Is Everything
A good lot at a fair price in an active market generates 20–30 responses within two hours. The buyer who gets it is rarely the one who negotiated hardest. It’s the one who responded first with a concrete offer and immediate pickup availability.
First message format: “I can pick up today/this weekend. Is [price] firm? Available at [time] if that works.” That’s it. No back-and-forth. Serious buyers remove friction from the seller’s side.
Red Flags in Lot Listings
- Photos taken from angles that consistently avoid showing the rack uprights, frame welds, or back of the bench
- “Includes 300lb of weight” when the visible plates in photos don’t add up to that figure
- “Works great” on a cable machine with no photos showing the cable length or pulley system
- No close-ups of a barbell that’s listed as the primary selling point of the lot
- A “priced to sell” listing that’s been active for more than three days — pickup logistics are usually the hidden problem, or condition doesn’t match the description
How to Know in 10 Minutes Whether a Lot Is Worth Buying
This decision framework is what separates the people who end up net-positive from those who end up holding equipment they can’t resell at a useful price.
Step 1 — Identify every item visible in the listing photos. Open every photo, enlarge them, and catalog every visible piece. Write it down. Equipment that isn’t photographed doesn’t go on the list — “I also have a [item]” in listing text counts for nothing until it’s visible and confirmed in person.
Step 2 — Research each item individually on the same platform. Search the specific item by brand and model where visible, filtered to the local region. Focus on active listings first — these are your real-time comps.
Step 3 — Build a conservative resale estimate. Price expected recovery at the low-to-mid end of comparable active listings — not the highest listed price, which reflects optimism rather than market reality. The conservative number is what items will actually sell for within two to three weeks of listing.
Step 4 — Subtract the value of items you plan to keep. Kept items aren’t recovery — they’re purchases. Assign each kept item a “cost” equal to its conservative individual resale value and deduct that from the total estimated recovery. What remains is the expected cash the lot will return.
Step 5 — Compare remaining recovery to the lot asking price. If (Expected Cash Recovery from Resale) ÷ (Lot Asking Price) is below 1.30 before negotiation, the lot doesn’t meet the minimum threshold. Below 30% margin, there’s no buffer for transport cost, items that take longer to sell than estimated, or normal negotiation reduction from the asking price.
Lots that clear Step 5 are worth pursuing. Lots that don’t — regardless of how appealing the equipment looks — are passed on. That discipline is what keeps the spreadsheet moving in the right direction.
What to Check Before Any Equipment Goes in the Truck
Most people listing gym equipment they’ve had for two years genuinely believe it’s in great condition. They may not know what a frayed cable looks like or what a stressed weld point at a rack’s base plate feels like. The inspection responsibility falls entirely on the buyer.
Equipment Inspection Checklist by Category
Barbells
- Knurling: Run a hand across both grip zones. Heavily worn knurling feels smooth — it offers poor grip and indicates years of commercial use
- Collar spin: Both sleeves should rotate freely with a smooth bearing feel. Stiff or grinding rotation means worn bearings or bushings — a fixable problem, but factor it into price
- Shaft straightness: Roll the barbell slowly on a flat surface. Any visible wobble indicates a bend — disqualifying
- Sleeve condition: Light surface rust is manageable. Deep pitting or cracking at the sleeve-to-shaft interface is disqualifying
Weight Plates
- Bumper plates: Inspect the inner metal hub closely. Any cracking in the rubber around the hub is a structural failure point that propagates under load
- Iron plates: Surface rust is acceptable and treatable. Deep pitting reduces longevity but doesn’t affect function. Check the hub bore for cracks
- Claimed weights: Brand-name commercial plates are accurate. Generic big-box plates are often underweight — worth knowing before buying lots where the weight count is a primary selling point
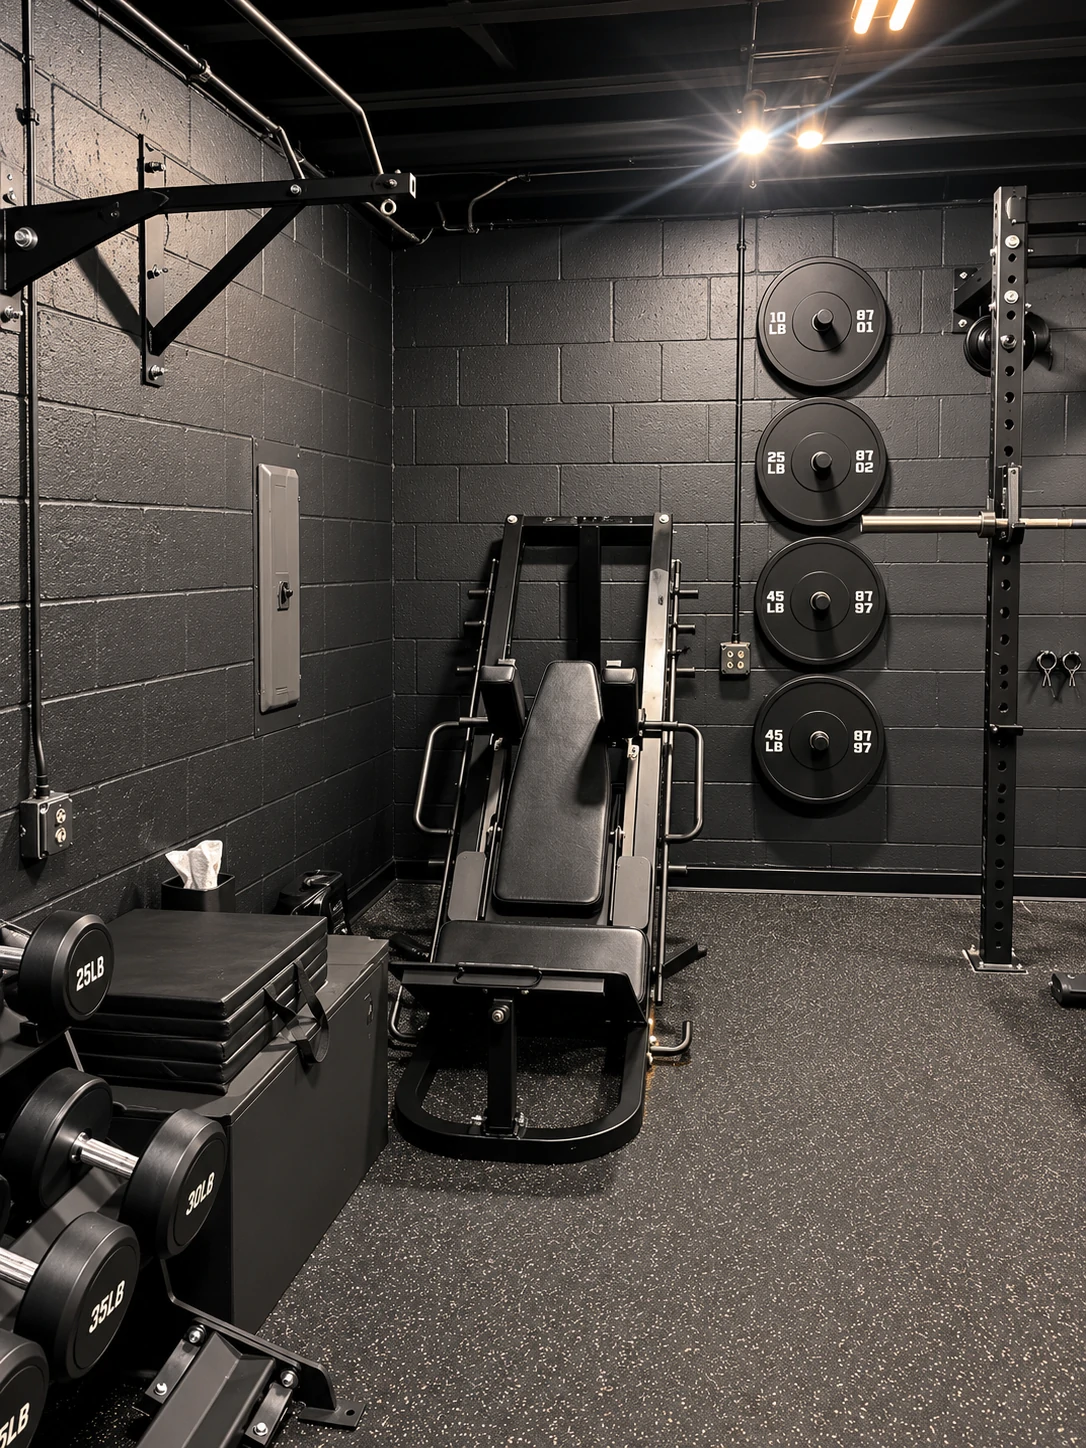
Power Racks and Squat Stands
- Welds: Press firmly on every upright-to-base-plate connection, every j-cup mounting location, and any pull-up bar weld. Grinding or visible cracking at weld points is a disqualifying defect
- Hardware: Try every bolt and thread. Stripped threads on safety bars or j-cup slots are an annoying repair that’s easy to overlook during a quick inspection
- Leveling feet: Missing or damaged feet mean uneven floor contact under load. A rack that rocks even slightly under weight is a safety problem
Cable Machines
- Run the cable its full length by hand — every inch. Any fraying, unusual bending, kinking, or worn section means the cable needs replacement before use. Budget $30–$60 for cable replacement as a condition of purchase, or negotiate accordingly
- Pulley rotation: Each pulley should spin freely without grinding, binding, or lateral wobble
- Weight stack travel: Move the stack through its full travel and watch for binding on the guide rods
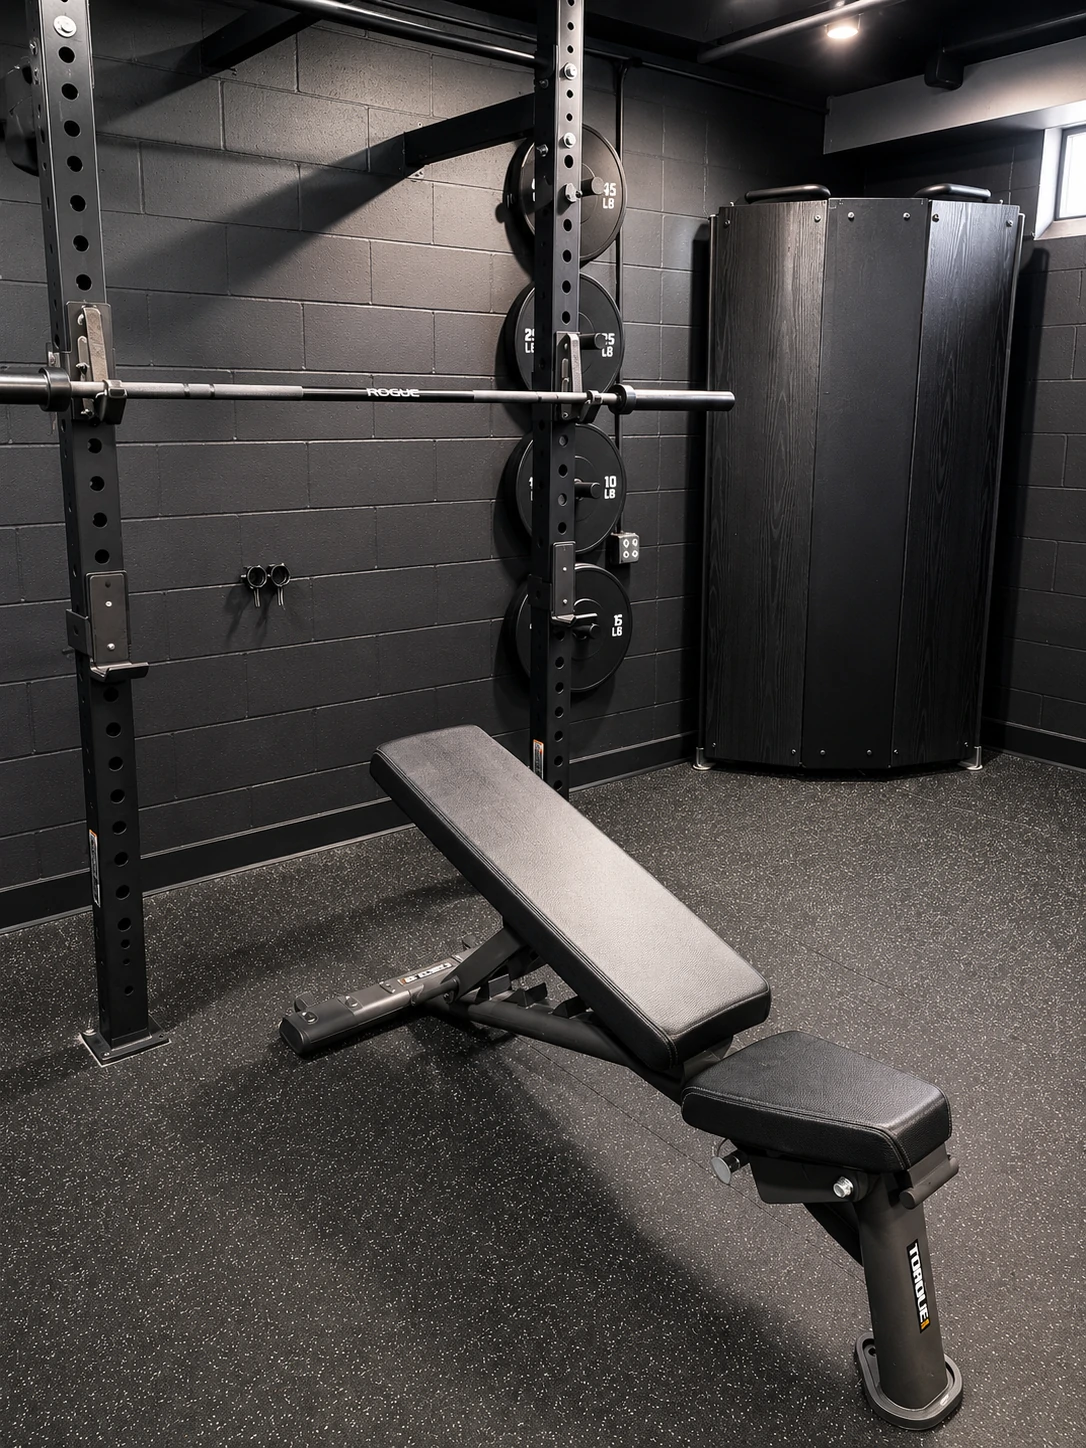
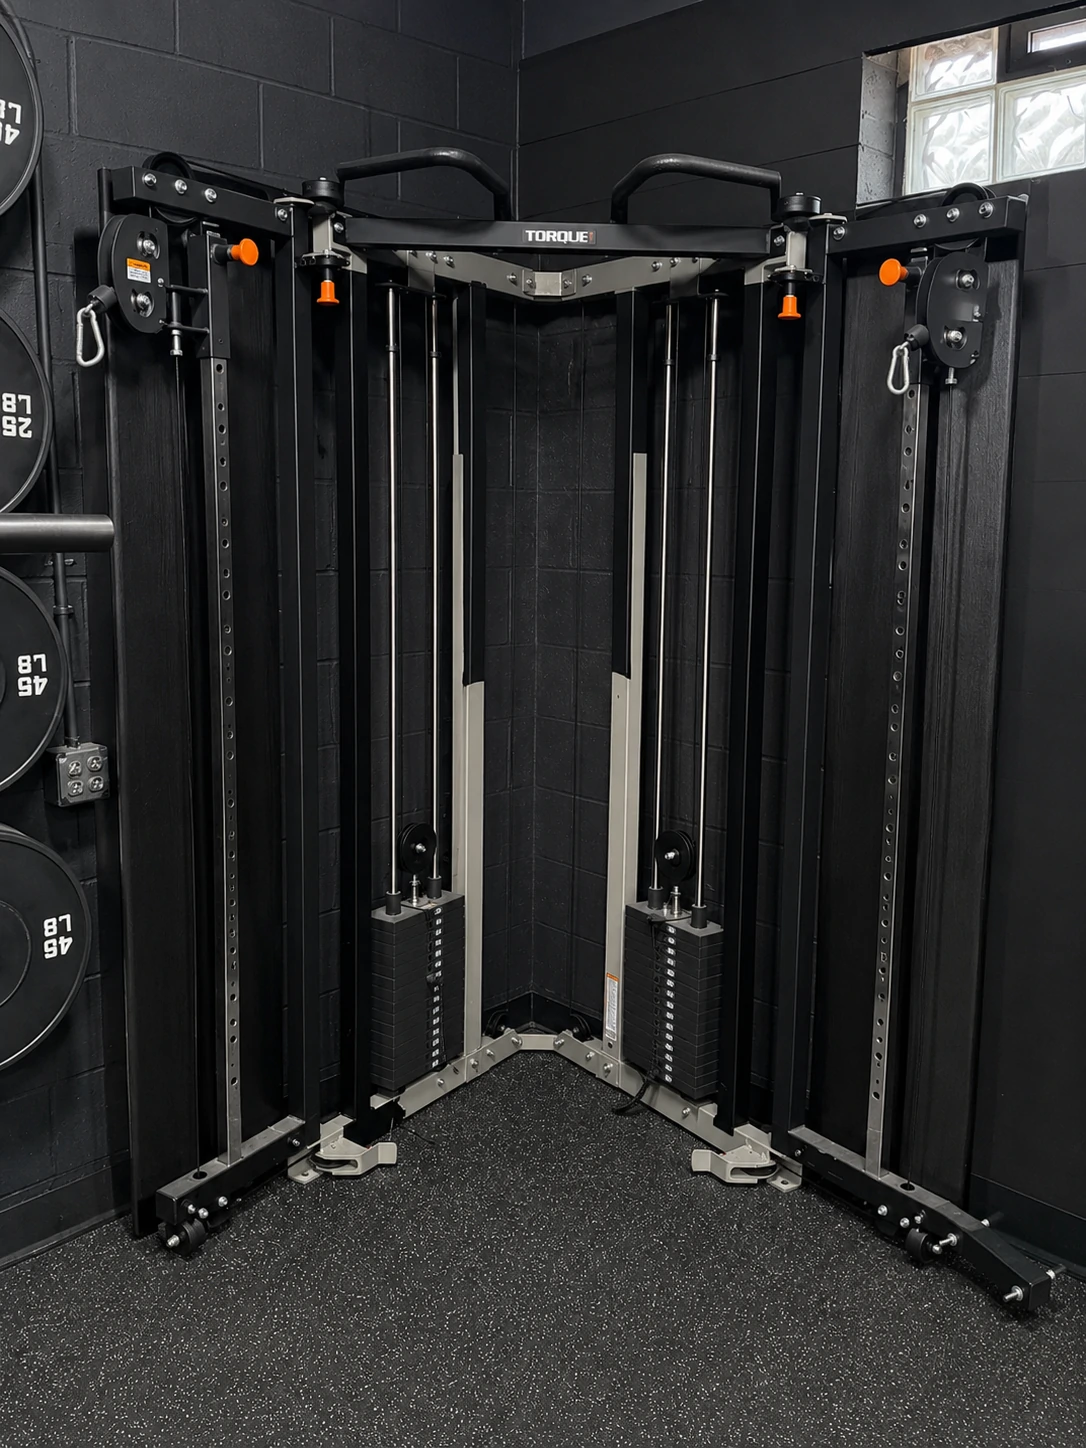
The Torque functional cable trainer in this build — one of the more capable pieces of residential cable equipment on the market — warranted thorough inspection at all the above points before purchase. A cable machine with frayed cable should not be loaded and operated until the cable is replaced, regardless of how minor the fraying appears.
Benches
- Pad compression: Press firmly on the seat pad. Foam that compresses to near-flat has lost structural integrity and needs replacing before the bench is comfortable or safe under load
- Frame welds at pivot points: Press laterally on both sides of the back pad while watching the pivot connection. Any movement or play in the pivot is a structural concern
- Adjustment hardware: Every back pad pin, every foot adjustment, every locking mechanism — test all of them. A back pad that doesn’t lock at an incline is a meaningful safety issue
Turning a Raw Basement Into a Gym That Doesn’t Look Like a Basement
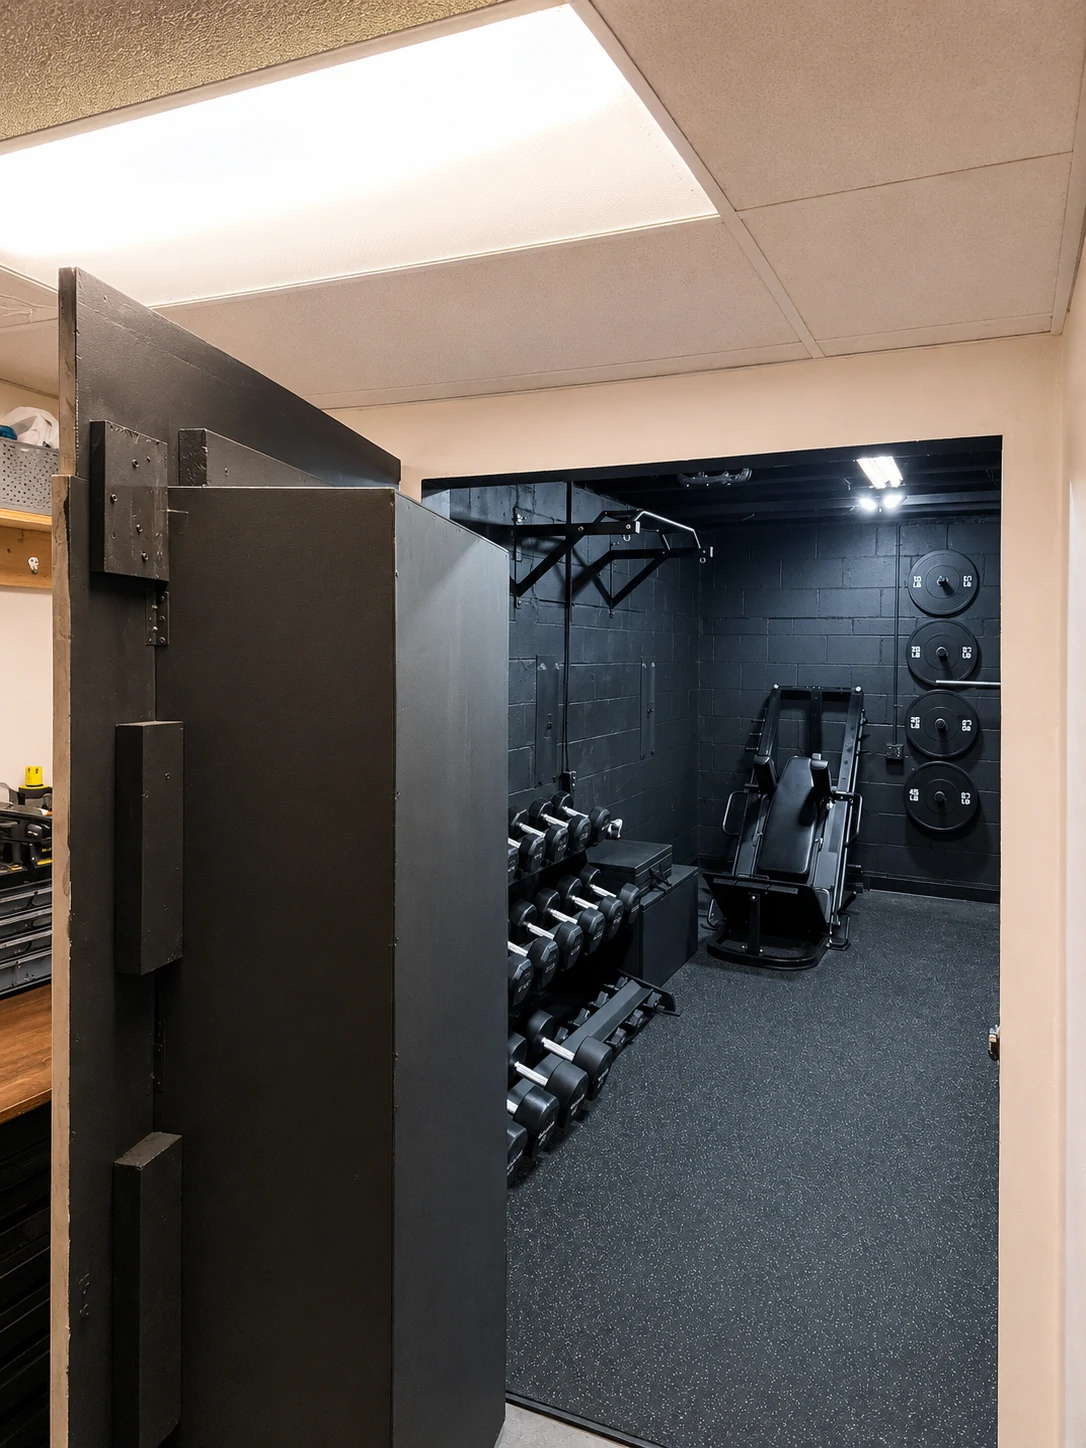
The space conversion and equipment acquisition run in parallel, but the surface work — painting, flooring, wall mounting — has to happen before equipment is placed. Rolling paint around a power rack that’s already bolted to the floor produces bad results and takes twice as long.
The finished space visible in Images 2 through 9 started as an unfinished cinder block basement: raw block walls, unfinished ceiling, rough concrete floor. The conversion happened in a defined sequence, and the sequence matters.
Why Basement Gym Paint Fails — And How to Make It Last
This is the most commonly botched aspect of any basement gym conversion, and the failure doesn’t show up until 12–18 months after completion — long after equipment is in place and the project feels done.
Raw cinder block is alkaline, extremely porous, and frequently coated in a fine layer of efflorescence (mineral salts that migrate outward from moisture), form-release compounds left from original construction, and years of dust accumulation. Standard interior latex paint — even premium paint — applied to this surface bonds poorly, blisters under humidity, and begins failing within the first humid summer season.
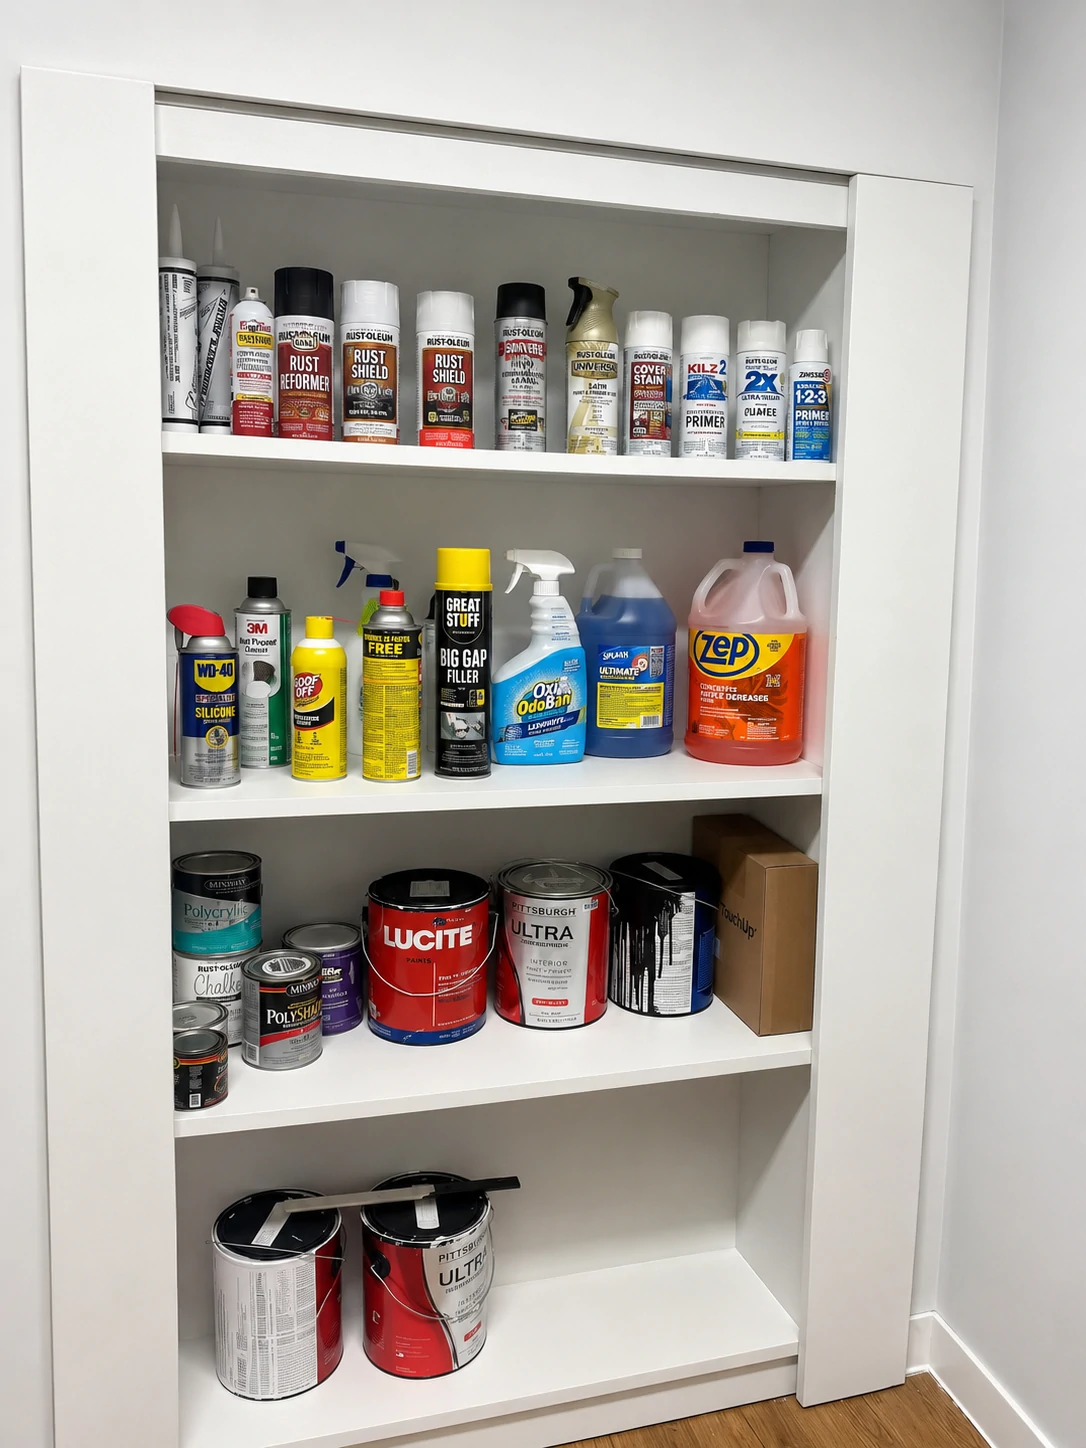
The supply shelf in Image 1 documents the actual product sequence used on this build: Zep Heavy-Duty degreaser, Kilz 2X, Pittsburgh Ultra, and Lucite Satin interior. These aren’t four random products from a Home Depot run. They represent the correct material logic for this specific application.
The cinder block preparation and painting sequence:
Step 1 — Degrease the entire surface. Use a commercial masonry degreaser — Zep Heavy-Duty or TSP substitute both work. Brush or spray it on, scrub with a stiff-bristle brush, rinse, and allow to dry completely. Form-release compounds are invisible on the surface and will prevent primer adhesion in localized patches, causing what appears to be random paint failure with no obvious cause. This step takes one extra hour and prevents an expensive repaint in 14 months.
Step 2 — Patch all cracks, voids, and damaged mortar joints. Hydraulic cement handles any areas with active moisture seepage. Vinyl concrete patch handles surface voids and cosmetic mortar damage. Both need at least 24 hours of cure time before priming — incompletely cured patches will reject primer at the surface and create adhesion weak points.
Step 3 — Apply masonry-specific primer. This is where most basement gym paint projects fail. Standard interior primers — including some products marketed as “bonding primers” — are not formulated for the alkalinity of raw concrete and cinder block. PVA primer or a dedicated masonry bonding primer addresses the surface chemistry and seals the extreme porosity of raw block. The Kilz products visible in Image 1 reflect this requirement — not brand loyalty, but formulation category.
Step 4 — Apply masonry-rated finish paint with a thick-nap roller. Use a 3/4” nap roller cover. A 1/2” nap cover appears to be working but leaves paint voids in mortar joint texture that show through the finished surface as irregular sheen variations. Two coats are standard on raw block. Pittsburgh Ultra and Lucite Satin — both visible in Image 1 — are moisture-tolerant formulations appropriate for below-grade applications with seasonal humidity variation.
Warning: Using standard interior paint on unprimed cinder block is the leading cause of basement gym paint failure within the first year. The paint itself isn’t the problem — it’s the adhesion failure on an alkaline, porous, and unprepared surface. Additional coats over failed paint don’t fix a primer problem; the only correct repair is removal and starting the sequence over.
Rubber Gym Flooring — What the Product Listings Don’t Tell You
The rubber tile floor visible throughout Images 3–8 is the foundation the entire gym setup rests on, literally and visually. What the finished photos don’t show is the installation detail that determines whether the floor performs well for years or starts creating problems within months.
Acclimate the tiles before installation. Rubber tiles are cold-stored and shipped compressed. Bring them into the room and let them sit flat for at least 24 hours — 48 hours in a cold basement is better. Tiles installed cold expand at room temperature. Seams buckle, tiles lift at edges, and gaps open at the perimeter where expansion has nowhere to go. This is not a product defect — it’s an installation step that’s simply not mentioned on the packaging.
Do not glue tiles to a below-grade concrete subfloor. Adhesive on concrete in a below-grade space creates two real problems: it traps moisture vapor that migrates upward through the concrete slab, causing adhesion failure from below over time; and it makes future reconfiguration or removal genuinely destructive to the concrete surface. A floating installation — tiles cut to fit the perimeter with a 1/4” expansion gap at walls — performs identically to a glued installation for any fixed equipment setup.
Place seams under equipment, not in open traffic zones. Counterintuitive, but correct. Open floor areas are where seams take repeated lateral stress from footwork and equipment movement. Under fixed equipment, the seam is pinned and essentially static. Plan the tile layout so seams fall under rack feet and machine bases wherever possible.
| Thickness | Right For | Not Right For |
|---|---|---|
| 3/8” | Light dumbbells, cardio equipment, bodyweight training | Barbell work, heavy dumbbell drops, any loaded drop |
| 1/2” | Moderate dumbbell work, benches, cable machines | Olympic lifting, intentional drops from height |
| 3/4” | Barbell work, bumper plates, all heavy equipment use | Nothing — appropriate for the full range of gym use |
For a basement gym with a barbell and functional cable trainer, 3/4” is the correct specification. The $0.50–$0.80 per square foot difference between 1/2” and 3/4” tile across a 150 sq ft space is $75–$120 total — a small margin against the cost of replacing inadequate flooring.
Lighting a Windowless Basement Gym — Why This Is Not Optional
A dim gym is a demotivating gym. More practically, poor lighting in a training space creates real safety issues — depth perception suffers in low-contrast environments, and form errors that would be caught in clear light get missed.
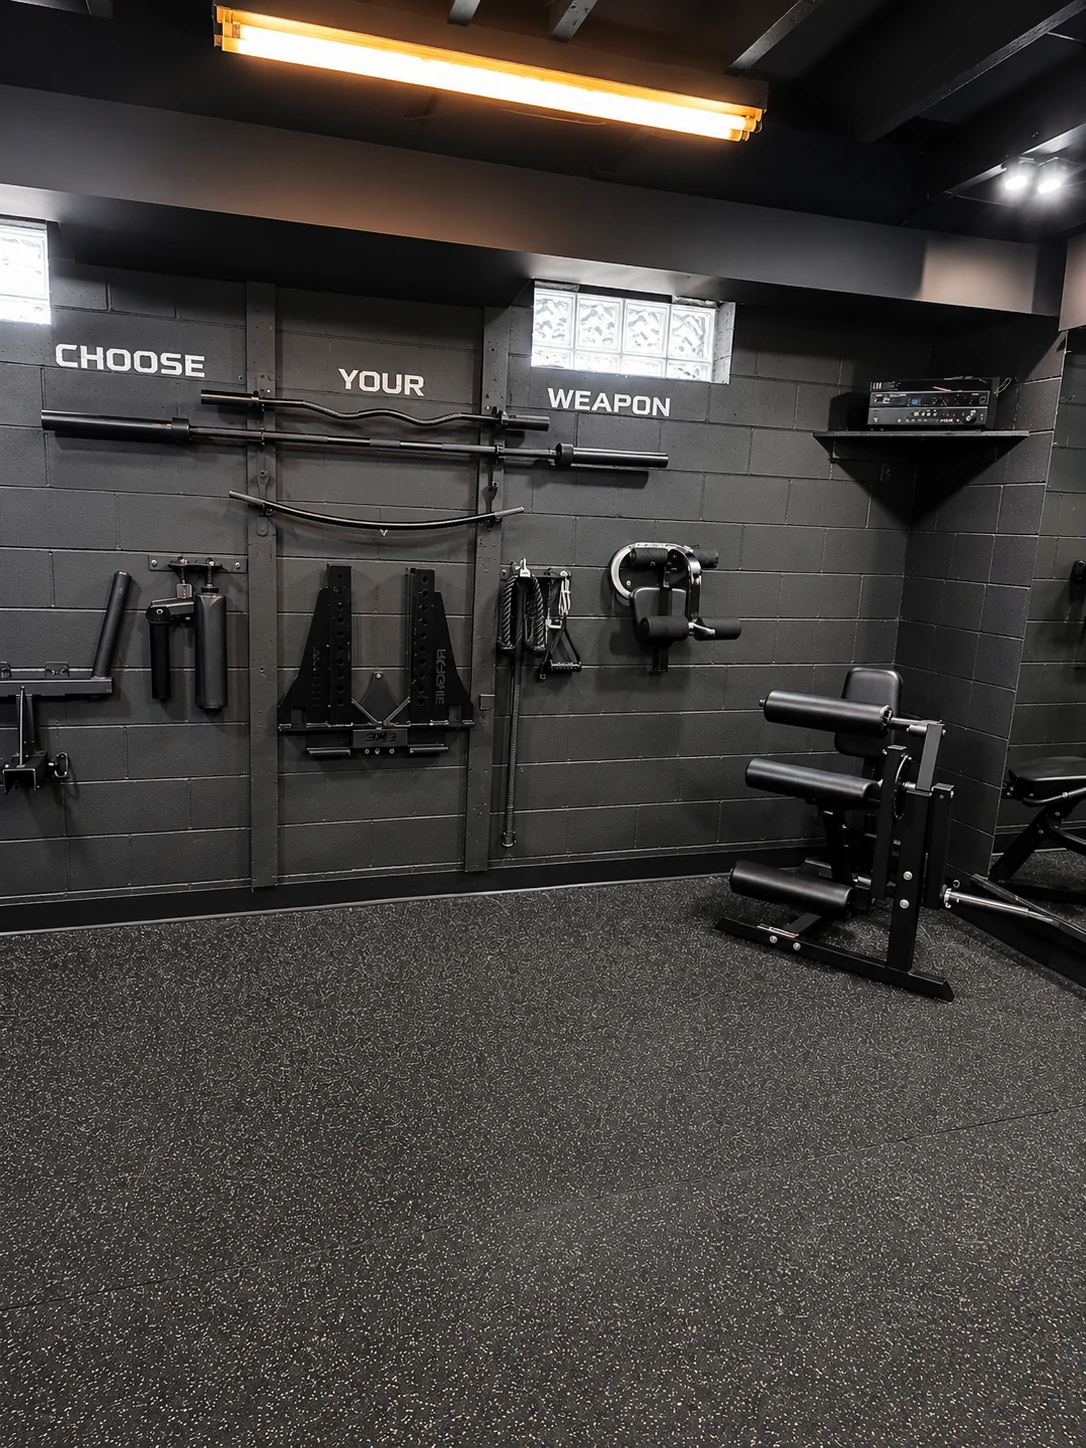
The ceiling spotlight track visible in Image 8 and the fluorescent shop light visible in Image 7 represent a two-layer approach: ambient fill from overhead shop lighting and directional intensity from spot or track fixtures aimed at specific equipment zones.
Practical lighting guidance:
- LED shop lights at 4,000–5,000K deliver the clearest, most energizing light for a gym environment. The cool white color temperature renders equipment and form clearly without the yellow warmth that makes a basement feel like a basement
- Lumen target: A 150–200 sq ft gym space needs approximately 3,000–4,000 lumens of total output at minimum. More doesn’t cause problems
- Avoid a single central fixture. One overhead light creates a bright center zone and dark corners. Two shop lights in a parallel or X configuration eliminate most shadowing at a cost of $40–$80 total for LED shop light fixtures
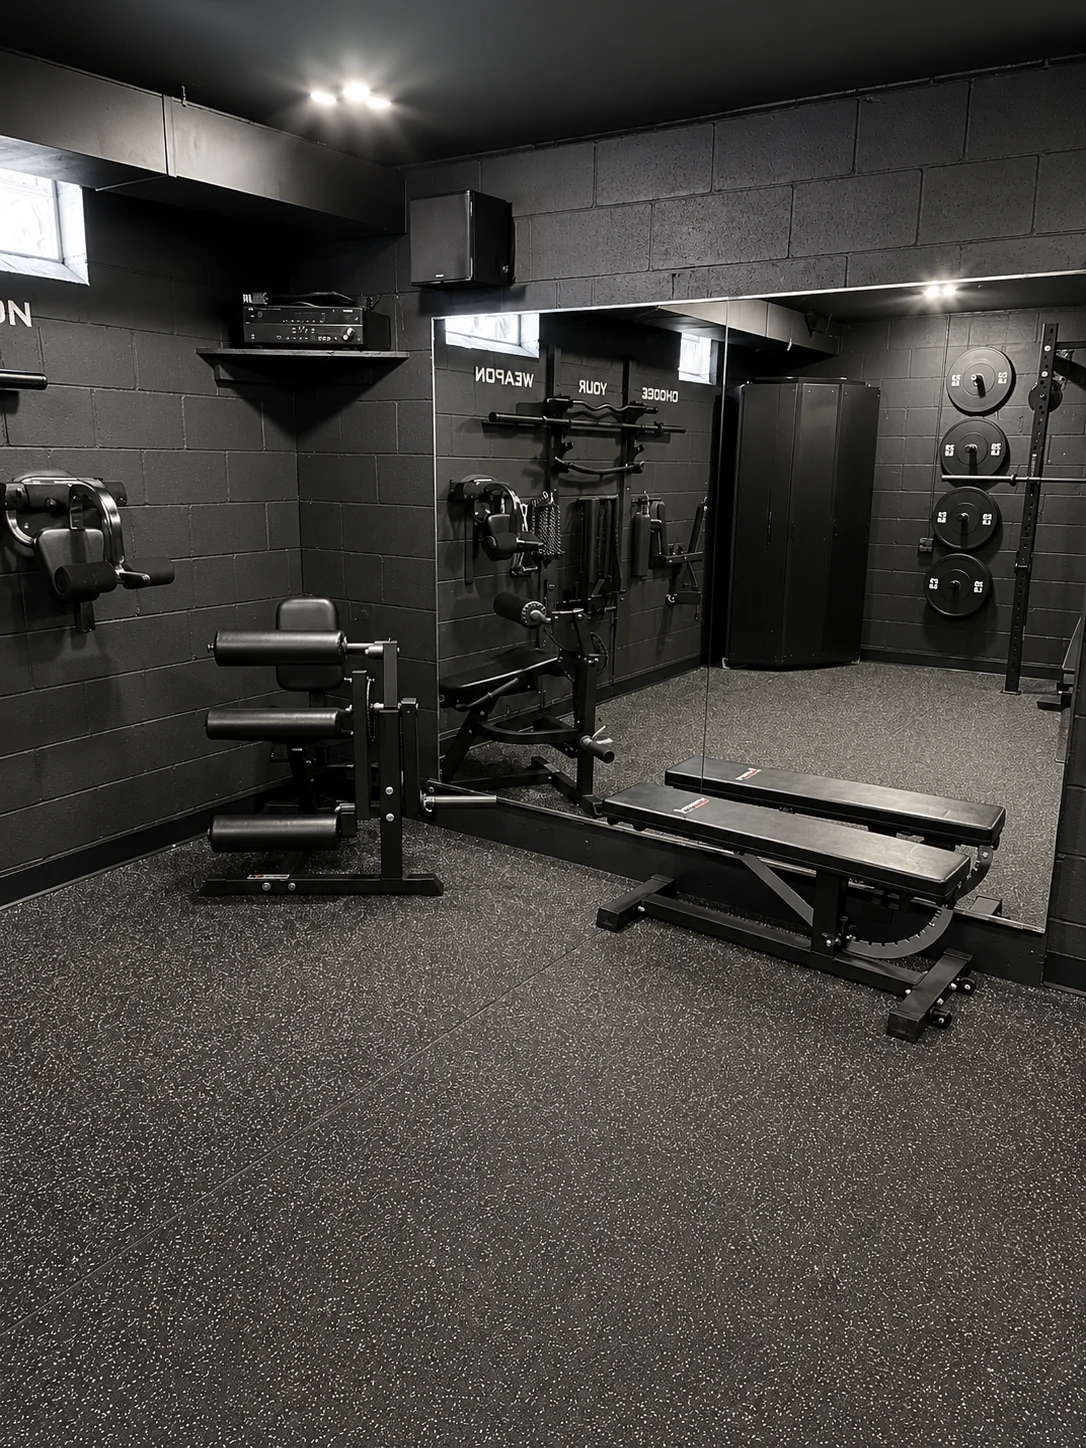
- The mirror effect: The large gym mirror in Image 8 reflects the ceiling spotlights and visibly increases ambient brightness across the entire space. Mirror placement relative to primary light sources is worth thinking about before finalizing fixture locations
Total cost for a functional lighting setup — two LED shop lights and a basic track fixture — runs $80–$160 depending on fixture selection. It’s one of the highest impact-to-cost improvements in the entire build.
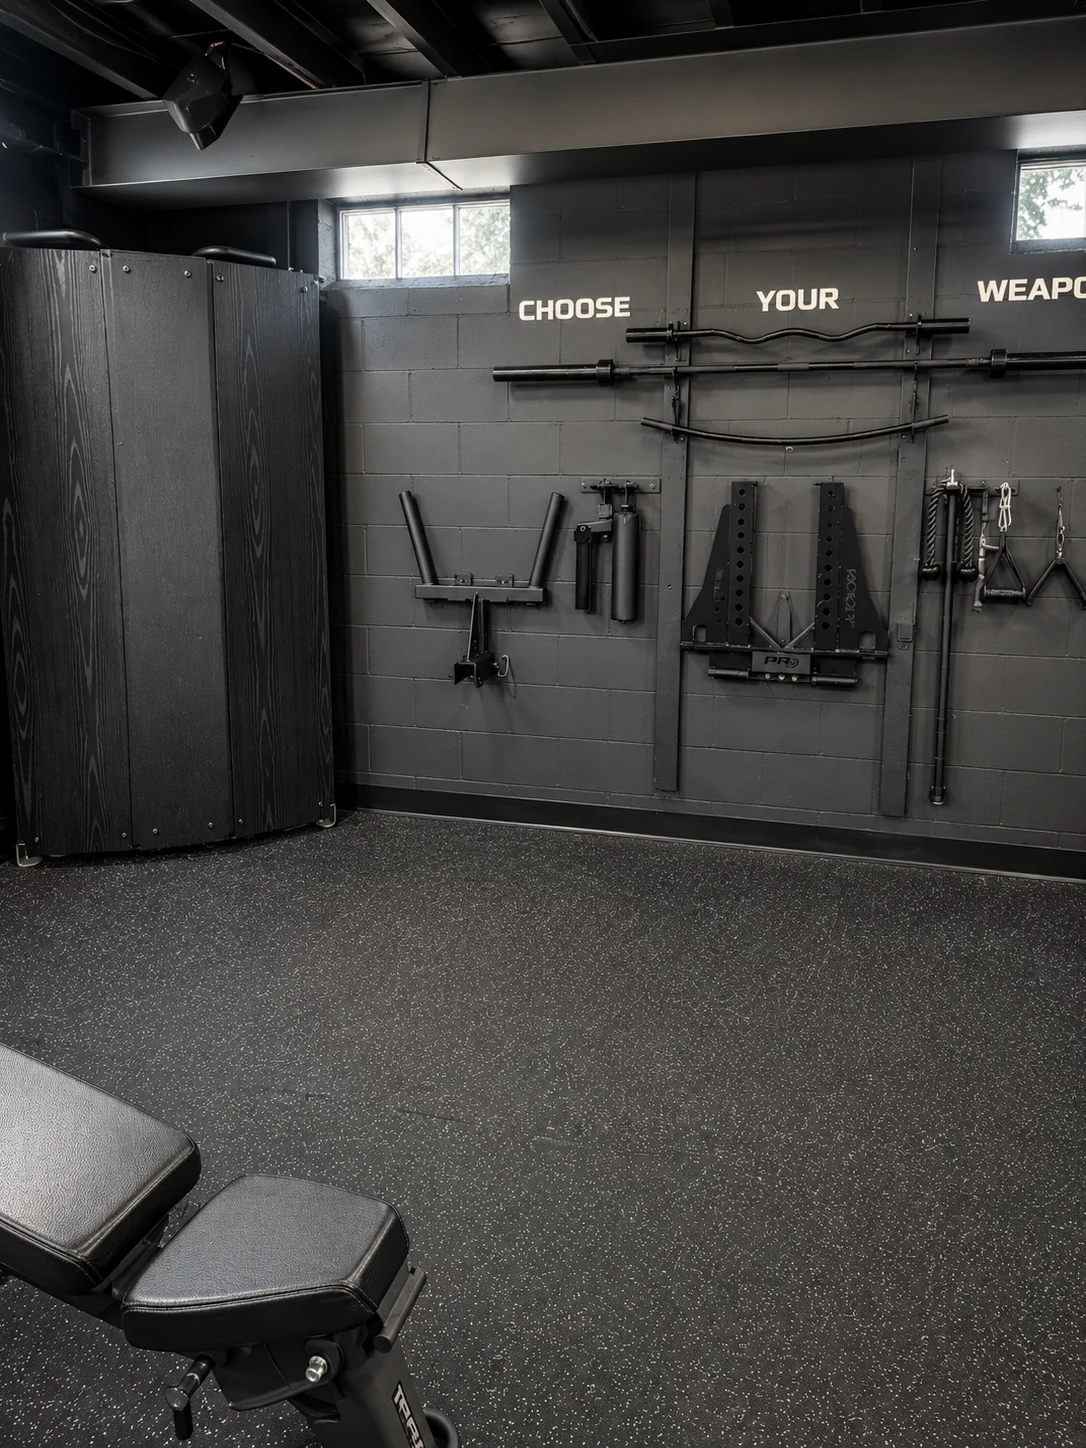
The Weapon Wall — How to Reclaim Floor Space Without Losing Equipment Access
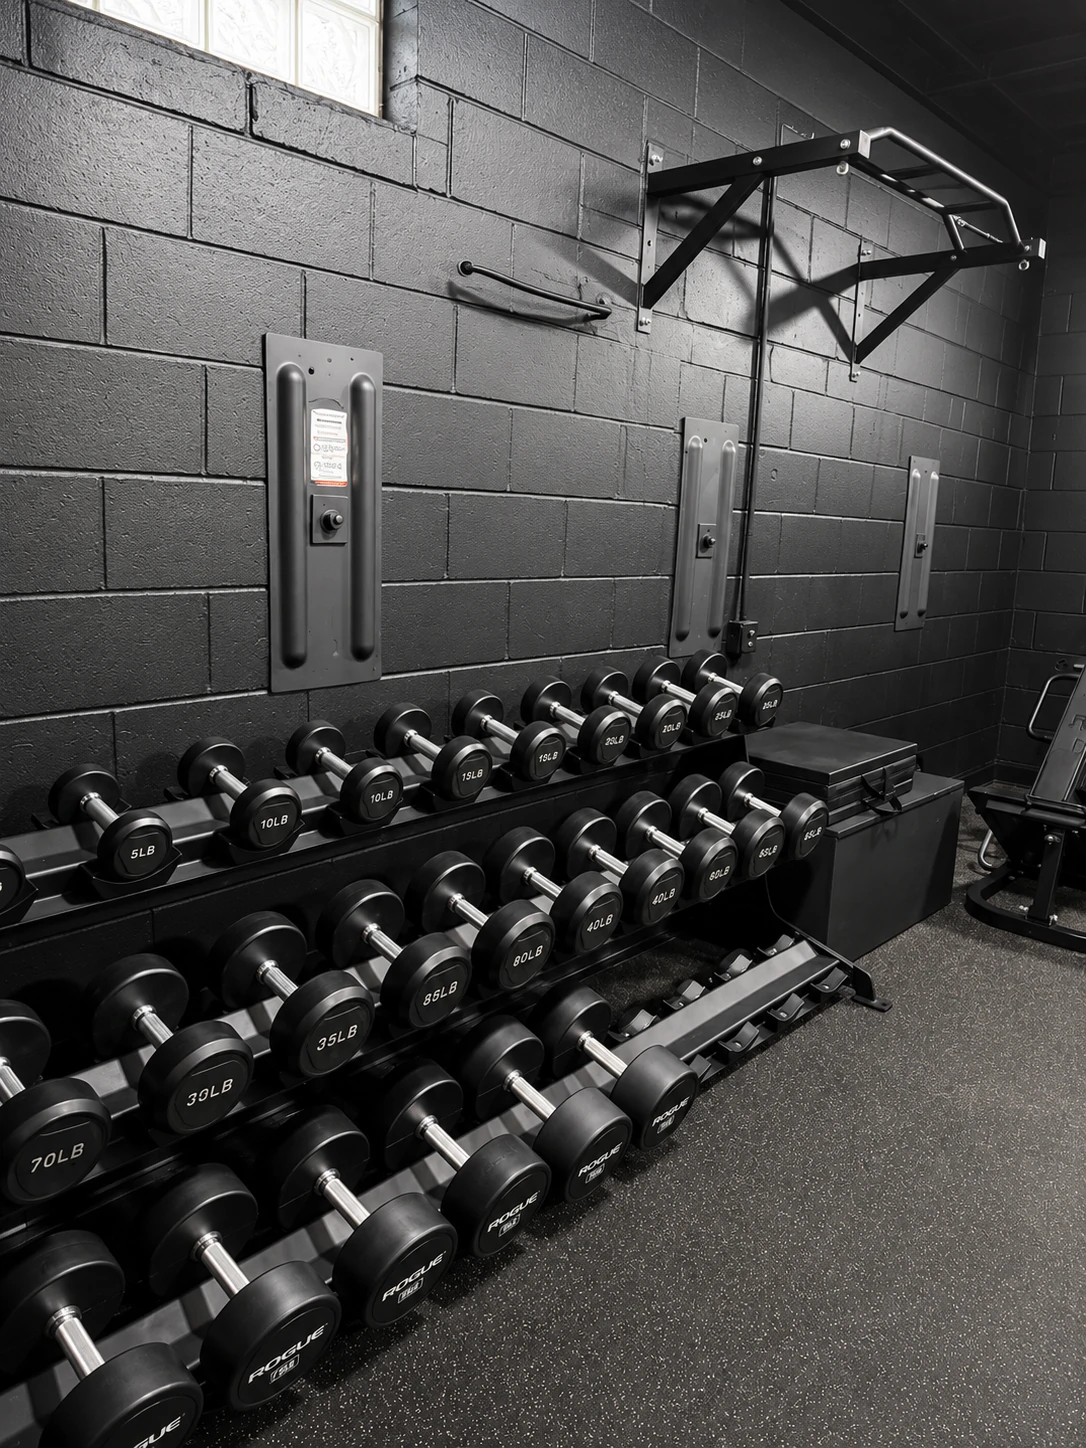
The “Choose Your Weapon” wall visible in Images 6 and 7 is the organizational centerpiece of this gym. Every bar that would otherwise lean against a wall or sit in a corner has a dedicated wall-mounted position. Every cable attachment is immediately accessible.
What’s mounted in this build:
- Olympic straight bar (Rogue)
- EZ curl bar
- Short straight bar
- Dip handles
- Cable rope
- Cable D-handles and carabiners
- Ab roller rack
- Wall ball hook
- Squat wedge holder (PR Strength brand, visible in Images 6 and 7)
All of it at hand height. All of it organized. The floor space recovered by removing freestanding storage racks and bar holders is meaningful in a sub-200 sq ft basement gym space.
Building this on a cinder block wall requires specific hardware. This is not the application for plastic expansion anchors or standard drywall anchors.
For cinder block:
- Use sleeve anchors or wedge anchors in a minimum 3/8” diameter. These are mechanical fasteners that expand against the solid material as the bolt is driven, creating shear resistance appropriate for loaded equipment
- Drill into the mortar joint between blocks wherever the layout allows — mortar provides more uniform material density than the block face and reduces the risk of face cracking around the hole
- Where drilling into the block face is unavoidable, use a hammer drill for clean masonry holes. A standard drill motor lacks the impact action needed to cut cleanly through cinder block without cracking the surrounding material
- For any bracket that will hold loaded weight — plate pegs, barbell holders, dip handle storage — verify the anchor’s rated shear load against the actual weight involved, including dynamic loading from lifting equipment on and off
The dimensional letter signage (“CHOOSE YOUR WEAPON”) visible in Images 6 and 7 is applied to the painted block face. Dimensional foam or wood letters with adhesive backing cost under $30. It’s the one finishing detail that makes the room feel designed rather than assembled.
The False Wall and Corner Cabinet — The Storage System That Pulls the Room Together
Images 5, 6, 7, and 9 all show the same repeating visual element: black wood-panel false walls flanking the Torque cable machine and a matching corner cabinet at the side wall intersection. These aren’t decorative afterthoughts — they solve two concrete problems.
They create a finished surface in areas where mounted equipment storage doesn’t apply. And they create enclosed storage volume that keeps accessories, maintenance supplies, and loose items off the floor without adding visual clutter.
What a false wall actually is: Non-structural framing — 2x4 studs secured to the floor at 16” or 24” spacing, faced with MDF or drywall panels. The frame sits roughly 3.5” in front of the block face and creates a flat, finished surface in front of the rough masonry. In a cinder block basement, this is the difference between a space that reads as a converted basement and one that reads as a deliberate room.
Attaching the framing to concrete: The base plate (the 2x4 that runs along the floor) secures to the concrete slab with powder-actuated fasteners or concrete screws. Wall studs brace against the block face at intervals using sleeve anchors driven through the stud into the masonry. Short false wall sections in the 2–3 foot height range can stand independently from the floor connection alone, but taller panels benefit from block-face attachment at mid-height.
Finishing the panels: The black wood-grain finish visible throughout Images 5–9 is stained wood surface — not paint and not adhesive wrap. Dark walnut or ebony stain applied to MDF or pine, sealed with a matte topcoat, produces the texture visible in the photos. For false wall panels approximately 2×7 feet, material cost runs $40–$80 per panel finished.
The corner cabinet: The corner unit in Images 5 and 6 is a basic box frame built from MDF with the same stained finish. It provides enclosed storage for accessories, small equipment, and gym maintenance supplies — keeping those items invisible without requiring a separate storage room. Built from scratch with basic carpentry tools, material cost runs under $100. The enclosed storage concept is worth building earlier in the project than it happened in this build — having a dedicated place for loose accessories immediately reduces the friction of day-to-day use.
The Complete Equipment Inventory — What It Cost, What Was Recovered, What Stayed
Every piece of equipment visible across Images 3, 4, 5, 7, 8, and 9 went through the spreadsheet. The table below represents the full accounting of a build at this scale and equipment quality.
The $4,125 net gain reflects the total difference between all money spent — equipment lots, construction materials, and transportation — and all money recovered through equipment resale. Individual kept items show their assigned cost; the project profit comes from the aggregate surplus generated by reselling everything that didn’t stay.
| Item | Brand | Source | Paid | Recovered | Net |
|---|---|---|---|---|---|
| Rubber hex dumbbells 5–70lb (kept) | Rogue | FB Marketplace lots | $1,240 | $0 | −$1,240 |
| A-frame 3-tier dumbbell rack (kept) | Generic | FB Marketplace lot | $40 | $0 | −$40 |
| Olympic barbell (kept) | Rogue | FB Marketplace lot | $180 | $0 | −$180 |
| Bumper plates — 10/25/45 (kept) | Various | FB Marketplace lots | $340 | $0 | −$340 |
| Iron plates — 10/25/45 (partial keep/sell) | Various | FB Marketplace lots | $110 | $110 | $0 |
| Power rack (kept) | Rogue | FB Marketplace | $280 | $0 | −$280 |
| Functional cable trainer (kept) | Torque | FB Marketplace | $480 | $0 | −$480 |
| Adjustable bench — flat/incline/decline (kept) | Torque | FB Marketplace lot | $120 | $0 | −$120 |
| Adjustable bench — Sole (kept) | Sole | FB Marketplace lot | $90 | $0 | −$90 |
| Roman chair / hyperextension (kept) | Generic | FB Marketplace lot | $40 | $0 | −$40 |
| EZ curl bar (kept) | Generic | FB Marketplace lot | $15 | $0 | −$15 |
| Cable attachment set (kept) | Generic | FB Marketplace lots | $35 | $0 | −$35 |
| Wall plate pegs (kept) | Generic | FB Marketplace lot | $25 | $0 | −$25 |
| Resold equipment (cumulative) | Various | Multiple lots | $680 | $5,485 | +$4,805 |
| Construction materials (paint, flooring, lumber, hardware) | Various | Home Depot / Lowe’s | $440 | — | −$440 |
| Transportation costs (fuel, supply runs) | — | — | $130 | — | −$130 |
| TOTALS | $4,245 | $5,595 | +$1,350 |
A few things worth noting about this accounting: the dumbbell set is the single largest line item in the kept equipment, and Rogue rubber hex dumbbells are specifically the right choice for lot arbitrage because they hold strong individual resale value. If a set that was kept is ever resold, the recovery is close to what was paid. Equipment that holds resale value is always the right thing to keep.
The Torque functional cable trainer at $480 is the most underpriced item in the build relative to what the same machine sells for individually on Marketplace — typically $800–$1,400 depending on condition and configuration. It came as part of a larger gym equipment lot from a closed private gym, which is exactly the type of lot that generates the largest per-item margins.
If This Project Started Over Tomorrow — Seven Things That Would Be Different
1. Start the spreadsheet from transaction one. The first few deals feel manageable to track mentally. By month two, the transaction volume makes recall unreliable. Two deals without documentation means two data points permanently lost from the net position calculation. The spreadsheet takes five minutes to update per transaction. There’s no good reason not to.
2. Pass on treadmills and ellipticals in lots. Cardio equipment is heavy, requires specific vehicle logistics, often needs a second person to load, and the resale market is consistently soft relative to the effort involved. A lot that includes a treadmill usually looks more valuable than it is — the treadmill’s carrying weight in a resale estimate is optimistic. When a lot includes cardio equipment, either negotiate the price down specifically to account for the slow resale, or factor that one item may not recover its estimated value on the timeline the project needs.
3. Finish the walls and floors before any equipment arrives in the space. The temptation to bring equipment in early — because it’s available, because it’s exciting, because the truck is there — creates situations where half the room is still being primed while a power rack is already assembled in the corner. Painting around installed equipment is slower, produces worse results, and there’s no scenario where it’s the right call. Sequence: paint → flooring → equipment installation, without exception.
4. Build the false wall panels and weapon wall earlier. These were among the last elements completed, which meant bars leaned against unpainted block for weeks longer than necessary and cable attachments sat in a storage bin. Once the panels are built and mounted, the gym’s usability improves immediately — not just visually. The weapon wall makes a meaningful operational difference in how fast a workout session actually starts.
5. Hold resale prices and relist with better photos instead of discounting. The natural response to a listing that doesn’t move in a week is to drop the price. The correct response is to relist with better photos — different angles, better light, more specific description. Brand-name gym equipment demand is relatively stable; buyers will find a fair-priced listing if it’s visible. Dropping price out of impatience trains a pattern of underpricing that compounds across every subsequent resale.
6. Negotiate hard on the buy side, not the sell side. Recovering $45 instead of $50 on a dumbbell pair is a $5 net loss. Negotiating a lot from $300 to $250 is a $50 net gain. All negotiating energy belongs at the acquisition stage. On the resale side, the goal is speed and clear listing quality — not price negotiation.
7. Document the build with photos at every stage. Before-during-after documentation of a basement conversion has property value implications that matter regardless of near-term sale plans. Finished basement square footage is a recognized factor in home appraisal; an unfinished space converted to a finished gym is a documentable improvement to the property. The photos also exist as proof for insurance purposes and as a resource if the finish work ever needs to be matched or repaired.
FAQ
Can you actually build a home gym for free?
Yes — using lot arbitrage on Facebook Marketplace, the outcome documented here reached a net gain of $4,125 after all equipment, construction materials, and transportation costs. Starting capital is required for the first lot purchase (typically $100–$500), but that cash returns quickly from the first resale transaction.
How much money do you need to start?
Enough for one lot purchase. Equipment lots on Facebook Marketplace range from roughly $100 for a basic bundle to $600 or more for a substantial gym collection. Keep at least one lot’s worth of available cash at all times — so that when a good lot appears, the response can be immediate without waiting for a previous resale to clear.
What platforms work best for finding equipment lots?
Facebook Marketplace is the most active platform for gym equipment lots in the US, UK, Canada, and Australia. Craigslist and OfferUp are strong secondary options in the US. Gumtree is the primary equivalent in the UK and Australia. Saved searches with push notifications on all active platforms are essential — good lots in active markets move within 2–4 hours of posting.
How do you evaluate a lot before seeing it in person?
Identify every item visible in listing photos, research individual resale comps for each piece on the same platform, build a conservative recovery estimate, subtract the value of items you plan to keep, and compare remaining recovery to the lot asking price. Maintain at least 30% margin before negotiation. Lots that don’t clear that threshold get passed on regardless of how appealing the equipment looks.
What should you inspect on a used cable machine?
Run the cable its full length by hand and check every inch for fraying, kinking, or wear. Test each pulley for smooth, binding-free rotation. Move the weight stack through its full travel and watch for binding on guide rods. A frayed cable on a loaded functional trainer is a disqualifying safety concern — either negotiate cable replacement into the price, or walk away.
Why does basement gym paint peel?
Because raw cinder block is alkaline and porous, and standard interior primer isn’t formulated to handle either characteristic. The correct sequence is: commercial masonry degreaser, hydraulic cement or vinyl patch on voids, masonry-specific primer (PVA or masonry bonding formulation), and masonry-rated finish paint applied with a 3/4” nap roller. Skipping the masonry primer is the single cause of most paint failures in below-grade gym spaces within the first 12–18 months.
How thick should rubber gym flooring be in a basement?
3/4” for any setup that includes barbell work or heavy dumbbell use. 3/8” is adequate only for cardio equipment and bodyweight training. For below-grade concrete subfloors, floating installation without adhesive is strongly preferred — it allows moisture vapor movement through the slab and simplifies future equipment reconfiguration.
How do you anchor barbell storage pegs to a cinder block wall safely?
Use sleeve anchors or wedge anchors in 3/8” diameter minimum, driven into mortar joints where the layout allows. Use a hammer drill — not a standard drill — to produce clean masonry holes without cracking the surrounding block face. Verify the shear load rating of each anchor against the actual weight it will carry. Multiple anchor points per bracket are required for anything that will hold loaded weight regularly.
Does a home gym add value to a property?
A finished basement gym contributes to finished square footage, which is a recognized factor in home appraisal. The gym equipment itself doesn’t transfer with the property and adds no appraised value. The durable improvements — rubber flooring, properly prepped and painted masonry, framed false wall panels, installed lighting — are the components that represent a real, documentable property asset.
Which gym equipment categories hold resale value best?
Brand-name rubber dumbbells — particularly Rogue, Rep Fitness, and CAP — sell consistently at or near retail for used units in good condition. Olympic barbells from recognizable manufacturers hold strong resale value. Power racks and functional trainers move more slowly due to size and transport difficulty but return strong prices when they do sell. Treadmills and ellipticals are the weakest resale category in most markets — high transport burden, soft demand, and slow turnover relative to free weight equipment.
What are the real out-of-pocket costs in a “free” home gym build?
Working capital for each lot purchase is the ongoing cash requirement — real exposure until items resell. Fixed project costs include: masonry degreaser, primer, and paint ($150–$400 depending on space size), rubber flooring ($1.50–$3.00 per square foot), masonry anchors and hardware ($50–$150 depending on mount count), lumber and panels for false walls ($75–$200), and transportation fuel across all lot pickups. The arbitrage surplus is designed to offset these costs — and with consistent execution across multiple lots, it can exceed all of them and produce a net gain.
What’s the realistic timeline to reach net zero?
In an active metropolitan market with daily Marketplace monitoring and patient resale pricing, a net-zero position is achievable in 3–6 months. In smaller markets with lower listing volume, 9–12 months is more realistic. The timeline depends primarily on willingness to hold resale prices at market rate rather than discounting to move items quickly — patience on the sell side is what makes the math work.
Does a home gym require a permit or structural assessment?
In most jurisdictions, installing gym equipment in an existing basement does not require a permit — it’s treated as personal property placement rather than construction. However, wall-mounted pull-up stations and heavy equipment anchored to the structure may require disclosure in some markets. The more relevant structural concern is floor load capacity: a concrete slab can handle concentrated loads from gym equipment in virtually all residential applications, but upper-floor gym spaces in wood-framed homes have real structural limits worth confirming before placing heavy iron.
This article documents a real basement gym build using tracked transaction data. Equipment categories, material costs, and timeline estimates reflect this project’s documented outcomes. Individual results vary based on local marketplace volume, negotiation outcomes, local material pricing, and resale timing.