(2).webp)
Quick answer: A small bathroom remodel on a budget usually means keeping the existing footprint where possible, doing demolition and cleanup yourself if you’re able, choosing a durable but reasonably priced subfloor and tile combination, and reserving licensed trades for plumbing, waterproofing, and electrical work. Costs for a small bathroom typically fall in the low-to-mid thousands for a cosmetic refresh, rising quickly once plumbing is relocated or a full gut renovation is involved.
Quick takeaways:
- Waterproofing and tiling are usually the largest combined line item in a small bathroom, not the fixtures themselves
- Moving a drain or shower head adds real cost, but it can unlock a layout — like a wall-hung toilet or floating vanity — that a fixed layout can’t
- DIY demolition and rubbish removal are realistic, low-risk ways to save money
- A mismatch between a toilet pan and an in-wall cistern is one of the most common — and most avoidable — reordering mistakes
- Small footprint does not mean small timeline; sequencing between trades still takes weeks
%20(6).webp)
What a Small Bathroom Remodel Actually Costs in 2026
Homeowners searching for a “budget” bathroom remodel often expect a number that turns out to be optimistic once quotes come in. Part of the reason is that a lot of the cost in a small bathroom is fixed — waterproofing, plumbing rough-in, and demolition cost close to the same whether the room is 3 square meters or 8. A bigger room spreads that fixed cost over more floor area; a smaller one doesn’t.
The table below reflects typical 2026 ranges for a small bathroom (roughly 3–5 square meters, or about 30–50 square feet) that keeps most of the existing layout. These are general averages, not quotes — costs shift by region, contractor demand, and material choice, so treat them as a planning baseline rather than a fixed budget.
| Country | Typical Small Bathroom Remodel Range | National/Regional Average | Notes |
|---|---|---|---|
| United States | $2,000 – $18,000 | ~$6,500 | Cosmetic refresh at the low end; full remodel with new plumbing pushes toward the top |
| United Kingdom | £2,200 – £9,000 | ~£4,500–£7,500 | London and the South East typically run 15–30% above the national figure |
| Canada | CA$5,000 – CA$18,000 | ~CA$13,000–CA$14,500 | Toronto and Vancouver commonly run 25–35% above national average |
| Australia | AU$8,000 – AU$18,000+ | ~AU$26,000 (mid-range, broader market) | Small footprint can raise the cost per square meter even though the total is lower |
A few patterns hold across all four markets:
- Labor is the dominant cost, typically 40–60% of the total, because a bathroom is one of the most hand-installed rooms in a home
- Relocating plumbing — moving a drain, shower head, or toilet — commonly adds a few hundred to several thousand dollars/pounds, depending on how far pipework has to travel and whether it’s a slab floor or a suspended timber floor
- Waterproofing (sometimes called “tanking”) is non-negotiable in a wet area and is one of the few line items where cutting corners creates expensive, hidden damage later
%20(8).webp)
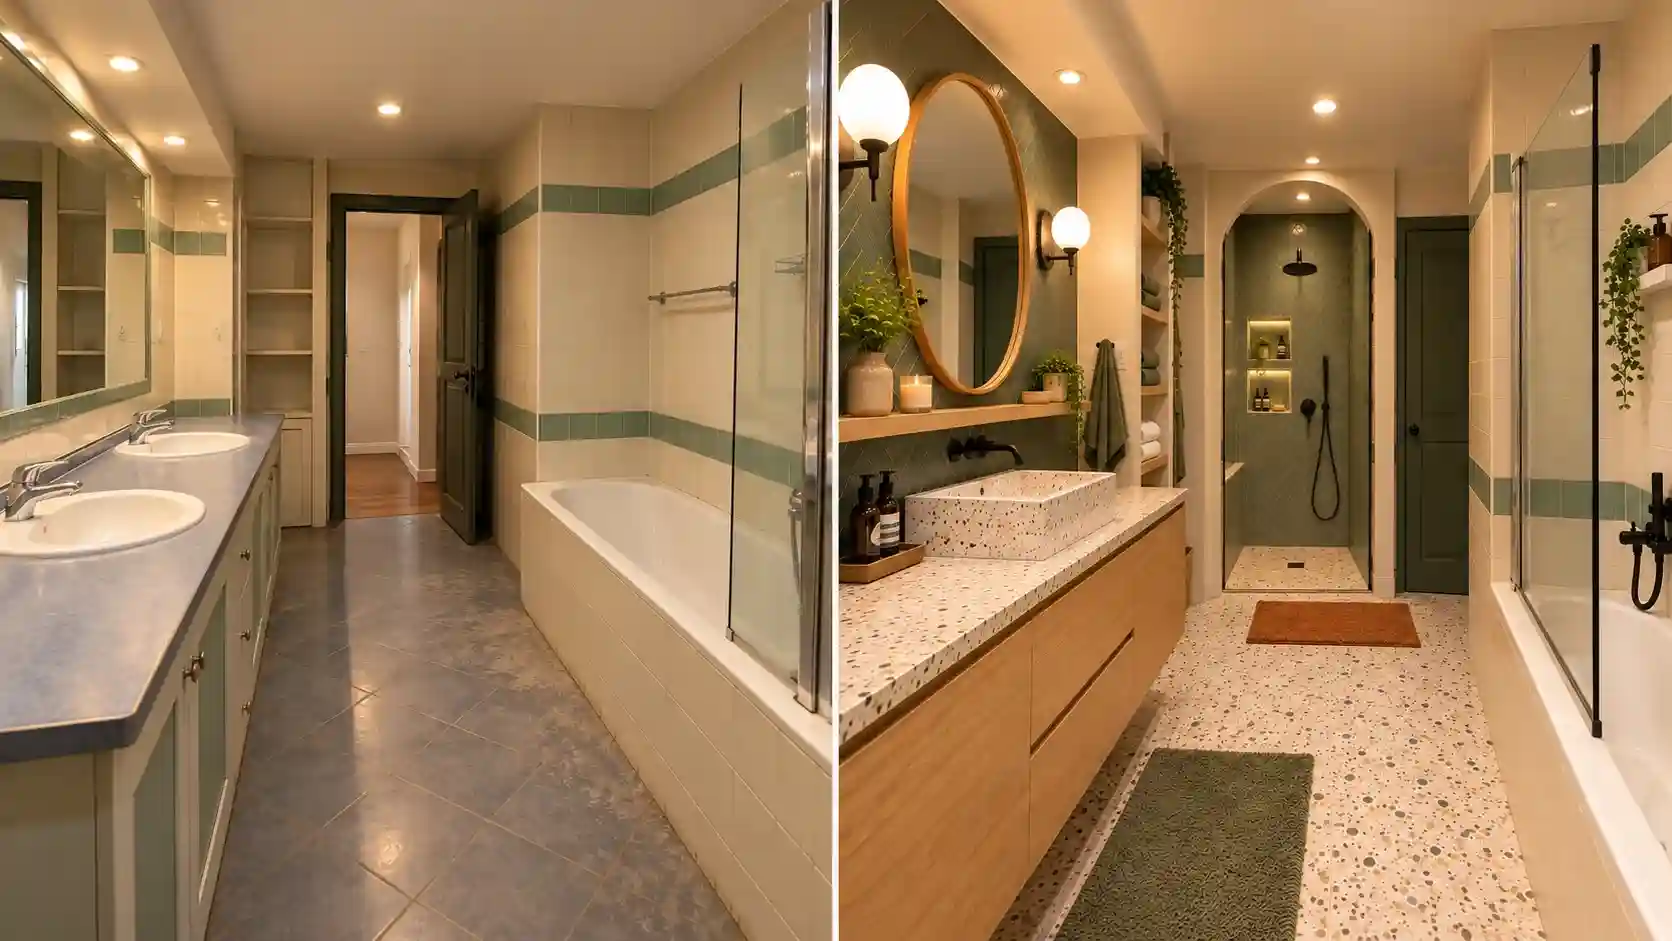
Before and After: A Real-World Small Bathroom Transformation
Case examples are useful because they show where a budget actually goes, not just where a guide suggests it should go. The pattern below reflects a common, well-executed small bathroom transformation — the kind homeowners regularly report when they plan carefully and sequence trades well.
Starting point. The bathroom was a compact, dated wet area — roughly 2.4 by 1.5 meters, with a 2.7-meter ceiling. A framed glass shower enclosure with a subway-tiled surround sat opposite a floor-mounted toilet and a pedestal-style vanity. The finishes were functional but visibly tired, and the layout hadn’t been touched in decades.
Motivating trigger. The push to renovate wasn’t cosmetic alone — the existing layout wasted space around the vanity, and the owners wanted a wall-hung toilet and a floating vanity, both of which meant relocating plumbing rather than simply refinishing what was there.
Renovation decisions. The room was stripped back to the framing. The floor drain was relocated from its original position to a wall-mounted connection to support the floating vanity, and the shower head was moved to the opposite wall to improve the shower’s usable footprint. Rather than tearing out the existing subfloor entirely, the team overlaid it with a 6mm fiber cement sheet — a lower-cost alternative to replacing the subfloor with a dedicated wet-area flooring product. Tile was sourced through a secondhand marketplace rather than bought new.
Execution reality. The project ran close to eight weeks from strip-out to completion — long for a room that size, but typical once you account for trade sequencing (see the timeline section below). Demolition and rubbish removal were handled by the homeowners themselves, which meaningfully reduced the total spend. When the trade costs are looked at as a share of the total budget rather than a specific currency figure, the breakdown looked roughly like this:
| Cost Category | Approximate Share of Total Budget |
|---|---|
| Materials (tile, fixtures, hardware) | ~31% |
| Tiling and waterproofing labor | ~27% |
| Plumbing labor | ~21% |
| Shower screen | ~9% |
| Electrical | ~7% |
| Carpentry | ~4% |
| Plastering | Billed separately — final cost wasn’t confirmed until after other trades finished |
| Demolition and rubbish removal | $0 (self-performed) |
Result. The finished bathroom featured a frameless sliding shower screen, vertically stacked tile in a soft sage tone, a wall-hung toilet paired with a concealed in-wall cistern, and a floating timber vanity with a stone-look benchtop and above-counter basin — a layout only possible because the plumbing had been moved.
Key takeaway for readers planning something similar: the project wasn’t free of friction. One notable snag was ordering a toilet pan that turned out to be roughly a centimeter too tall to properly seat against the in-wall cistern it was meant to pair with — a mismatch that isn’t obvious from a product listing and forced a reorder mid-project. That single detail is common enough, and avoidable enough, that it gets its own section below.
%20(9).webp)
Planning Your Layout: When Moving Plumbing Is Worth the Cost
Keeping the existing drain, toilet, and shower positions is almost always the cheaper path. But there are a few scenarios where paying to relocate plumbing pays for itself in usability:
- You want a floating (wall-hung) vanity. These typically need the drain moved from the floor to the wall, which means opening the wall cavity and rerouting waste and supply lines.
- The current layout blocks the door or wastes corner space. In very small bathrooms, a few centimeters of relocated plumbing can be the difference between a cramped vanity and one that actually fits.
- You’re installing a wall-hung toilet with a concealed cistern. This almost always requires new framing to house the cistern unit, plus careful coordination between the plumber and carpenter before any plasterboard goes up.
Decision framework:
| If your goal is… | Consider moving plumbing when… | Keep the existing layout when… |
|---|---|---|
| Lower total cost | The current layout already works reasonably well | Budget is the primary constraint |
| A floating vanity or wall-hung toilet | You’re comfortable with a longer timeline and higher plumbing cost | You’d rather have a floor-mounted toilet and standard vanity at lower cost |
| Better use of a cramped footprint | The layout is the main source of frustration, not just the finishes | The finishes are dated but the layout itself is functional |
A note on permits: in most jurisdictions across the US, UK, Canada, and Australia, relocating a drain, shower, or toilet waste line requires either a permit, a notification to the local building authority, or sign-off from a licensed plumber — sometimes all three. Requirements vary by state, province, and council, so it’s worth confirming locally before demolition starts, not after.
Trade-by-Trade: What Each Contractor Actually Does
A common source of frustration in small bathroom projects is not knowing why trades have to happen in a specific order — or why a delay in one trade pushes back everyone after it.
Typical sequence:
- Demolition — strip-out of old fixtures, tile, and sometimes subfloor. Often DIY-friendly if there’s no asbestos risk (common in homes built before the 1990s — have this checked first in older properties).
- Plumbing rough-in — drain relocation, supply line changes, and installation of any in-wall cistern frame. This has to happen before the walls are closed up.
- Electrical rough-in — wiring for lighting, exhaust fans, and any heated mirror or underfloor heating, also completed before plasterboard goes up.
- Carpentry/framing — building out stud walls for concealed cisterns, niches, or new partitions.
- Plastering/wall lining — closing up the walls once plumbing and electrical are confirmed complete.
- Waterproofing (“tanking”) — a membrane applied to the shower and often the whole floor, critical to preventing water damage in the structure behind the tile.
- Tiling — usually the same trade as waterproofing, or closely coordinated with them.
- Fixture installation and finishing — toilet, vanity, shower screen, tapware, mirror, and final electrical connections.
Skipping steps out of order — for example, ordering a shower screen before final tiling dimensions are confirmed — is one of the more common causes of delay and reorder cost.
Subfloor and Tile Choices That Make or Break Your Budget
Subfloor: cement sheet vs. a dedicated wet-area flooring product
| Option | Moisture Resistance | Relative Cost | Installation Complexity |
|---|---|---|---|
| Fiber cement sheet overlay on existing subfloor | Good, when paired with proper waterproofing membrane | Lower | Lower — can often go over sound existing flooring |
| Full subfloor replacement with a branded wet-area flooring system | Very good, purpose-built for wet areas | Higher | Higher — requires removing existing flooring entirely |
| Standard plywood or particleboard (not moisture-rated) | Poor in a wet area | Lowest | Not recommended for shower zones |
Overlaying a sound existing subfloor with a fiber cement sheet is a legitimate budget strategy, provided the original subfloor is structurally sound and free of rot — something worth confirming with a moisture meter before covering it up. Skipping that check to save time is a common regret reported after the fact, once tiles are already down.
Buying tile secondhand or through a marketplace: a checklist
Sourcing tile secondhand can meaningfully cut material costs, but it carries risks a full-price purchase doesn’t:
- Confirm the total quantity available covers your square footage plus at least 10% overage for cuts and breakage
- Ask whether all pieces are from the same production batch — dye-lot variation between batches can be visible once installed
- Inspect for chips, warping, or hairline cracks before purchase, not after installation
- Confirm the tile is rated for wet-area/floor use if it’s going in a shower or on the floor, not just wall-rated
- Understand there’s typically no manufacturer warranty on secondhand stock
DIY vs. Professional: Where You Can Safely Cut Costs
| Task | DIY-Friendly? | Why |
|---|---|---|
| Demolition (non-structural, no asbestos) | Yes | Physically demanding but low technical risk |
| Rubbish removal | Yes | Time cost rather than skill cost |
| Painting, caulking touch-ups | Yes | Low risk, easily redone if imperfect |
| Tile selection and sourcing | Yes | Research-heavy, not trade-specific |
| Plumbing (drain relocation, supply lines) | No | Code compliance, leak risk, insurance implications |
| Electrical (wiring, fan/light circuits) | No | Safety risk, usually requires licensed sign-off |
| Waterproofing/tanking | No | Errors are invisible until they cause structural water damage |
| Tiling | Sometimes | Skill-dependent; a poor tiling job is highly visible and hard to fix invisibly |
A general rule that holds across all four markets: if a mistake would be hidden behind a finished wall or under tile, it belongs to a licensed trade. If a mistake would just mean redoing a visible surface, it’s a reasonable DIY candidate for a confident homeowner.
%20(1).webp)
%20(3).webp)
%20(7).webp)
%20(10).webp)
Common Small Bathroom Remodel Mistakes to Avoid
Warning: fixture compatibility isn’t guaranteed by category. A pattern that shows up repeatedly when a floor-mounted toilet is replaced with a wall-hung unit and a concealed (in-wall) cistern: the toilet pan and the cistern are often sold as separate products that look interchangeable but aren’t. Pan height, outlet position, and the cistern’s specific rough-in dimensions all have to line up. When they don’t — as happens more often than product listings suggest — the pan has to be returned and reordered, which stalls the plumber’s schedule and adds both cost and time to the project.
Other frequent mistakes:
- Ordering fixtures before final measurements are locked in. Confirm tile thickness and wall build-up before ordering anything that has to fit a specific gap.
- Skipping a moisture check before covering an old subfloor. A subfloor that looks fine can still be compromised underneath.
- Underestimating demolition and rubbish removal time, especially in homes without easy waste access — this alone has stretched some projects by weeks.
- Assuming a small footprint means a short timeline. Trade sequencing takes the same number of steps regardless of room size.
- Leaving plastering costs unconfirmed until late in the project. Get an itemized quote for every trade before work starts, not just the trades you assume will be expensive.
Realistic Timeline for a Small Bathroom Renovation
A small bathroom with a layout change (drain relocation, wall-hung toilet, or similar) commonly takes 6–8 weeks from strip-out to completion — longer than most homeowners expect for the square footage involved. A cosmetic refresh that keeps the existing layout can often be completed in 1–3 weeks.
The reason a small room doesn’t move faster: waterproofing needs to cure before tiling starts, tiling needs to set before grouting, and grout needs to cure before fixtures go back in. None of that compresses just because the room is small.
Maintaining Your New Bathroom After the Renovation
A finished remodel is not the end of the story — waterproofing and finishes degrade faster without basic upkeep.
| Task | Frequency | Why It Matters |
|---|---|---|
| Check silicone joints around the shower base and tub for cracking | Every 6 months | Cracked silicone is often the first sign of a failing waterproofing seal |
| Run the exhaust fan during and after showers | Every use | Reduces humidity that drives mold growth and can shorten paint and grout life |
| Re-seal grout lines (if using porous tile/grout) | Every 1–2 years | Prevents moisture penetration behind tile |
| Clean and inspect the shower drain | Every 3 months | Slow drainage can indicate a developing blockage or a fall (slope) issue |
| Check for soft spots in flooring near the shower | Annually | Early sign of a subfloor moisture problem, often before visible damage appears |
A few smaller upgrades pay off long-term without adding much to the budget: a humidity-sensing exhaust fan that runs itself down after a shower, water-efficient tapware and dual-flush toilets (look for WaterSense or WELS ratings depending on your country), and an LED mirror with a built-in demister, which reduces the moisture load on painted walls from wiping condensation by hand.
%20(4).webp)
%20(5).webp)
Frequently Asked Questions
How much does it cost to remodel a small bathroom on a budget? Costs vary by country and scope, but a cosmetic refresh that keeps the existing layout typically lands at the lower end of national ranges, while relocating plumbing or fully gutting the room pushes costs toward the middle or top of the range shown in the cost table above.
Is it cheaper to keep the existing bathroom layout instead of moving plumbing? Yes, in almost every case. Moving a drain, toilet, or shower head adds labor and sometimes structural work that a like-for-like layout avoids entirely.
Why would a toilet pan not fit an in-wall cistern? Toilet pans and concealed cisterns are frequently sold as separate products. Pan height and outlet position must match the specific cistern’s rough-in dimensions — compatibility isn’t guaranteed just because both are marketed for wall-hung installations.
Can I install a floating vanity without moving the drain? Sometimes, if the existing drain position happens to align with where you want the vanity. In most cases, though, a floating vanity requires relocating the drain from the floor to the wall.
Do I need a permit to relocate a shower head or floor drain? Likely yes, though requirements vary by country, state or province, and local council. Confirm with your local building authority before demolition begins.
Is cement sheet a good subfloor for a small bathroom, or should I use a dedicated flooring product? Fiber cement sheet over a sound existing subfloor is a reasonable budget option when combined with proper waterproofing. A full subfloor replacement with a purpose-built wet-area product costs more but may be necessary if the existing subfloor shows moisture damage.
Is it safe to buy tile secondhand from a marketplace? It can work well if you confirm quantity, batch consistency, and condition before purchase — see the checklist above.
How long should a small bathroom renovation realistically take? A layout change typically takes 6–8 weeks; a cosmetic refresh with no plumbing changes can often be done in 1–3 weeks.
 (1).webp)

 (3).webp)
.webp)
_12_11zon.webp)