 (1).webp)
Quick Answer
Grout color can almost always be adjusted after a bathroom remodel is finished, usually with a penetrating epoxy grout colorant applied directly over the existing lines — no tile removal required. Uneven gaps between tiles are a different problem entirely. That’s a spacing and installation issue, not a color issue, and a colorant won’t fix it. If the tile joints themselves are inconsistent, the honest fix usually involves resetting the affected tiles, which is a bigger job than most homeowners expect.
Quick takeaways:
- A grout color you regret is one of the more fixable mistakes in a finished bathroom
- Wide or uneven gaps between tiles point to a spacing problem during installation, not something a stain can hide
- Grout looks different once it’s fully cured and sealed than it does on a wet sample chip
- A vanity swap is typically the least disruptive correction available, since it doesn’t touch tile or waterproofing
- Feeling unsure about parts of a finished remodel, even one you mostly like, is common — it doesn’t mean the whole project failed
%20(6).webp)
Is Your Reaction Normal?
A remodel rarely lands as one clean verdict. Homeowners tend to expect a single “love it” or “hate it” moment once the crew packs up, but most transformations are more mixed than that. One element clicks immediately — new tile, better layout, more light — while another sits wrong, and it’s usually something small: a grout line, a hardware finish, a vanity that looked right in a showroom photo but feels out of place against the actual wall color.
That mixed reaction isn’t a sign of poor decision-making. It’s closer to a normal part of living with a big purchase before the eye adjusts to it. What matters more is figuring out, calmly, which parts of the reaction point to an actual installation problem and which parts are simply taste settling in over the following weeks.
A Real-World Transformation: From Dated Pink to Deep Green
A useful way to see how these regrets play out is to look at a full gut renovation, start to finish.
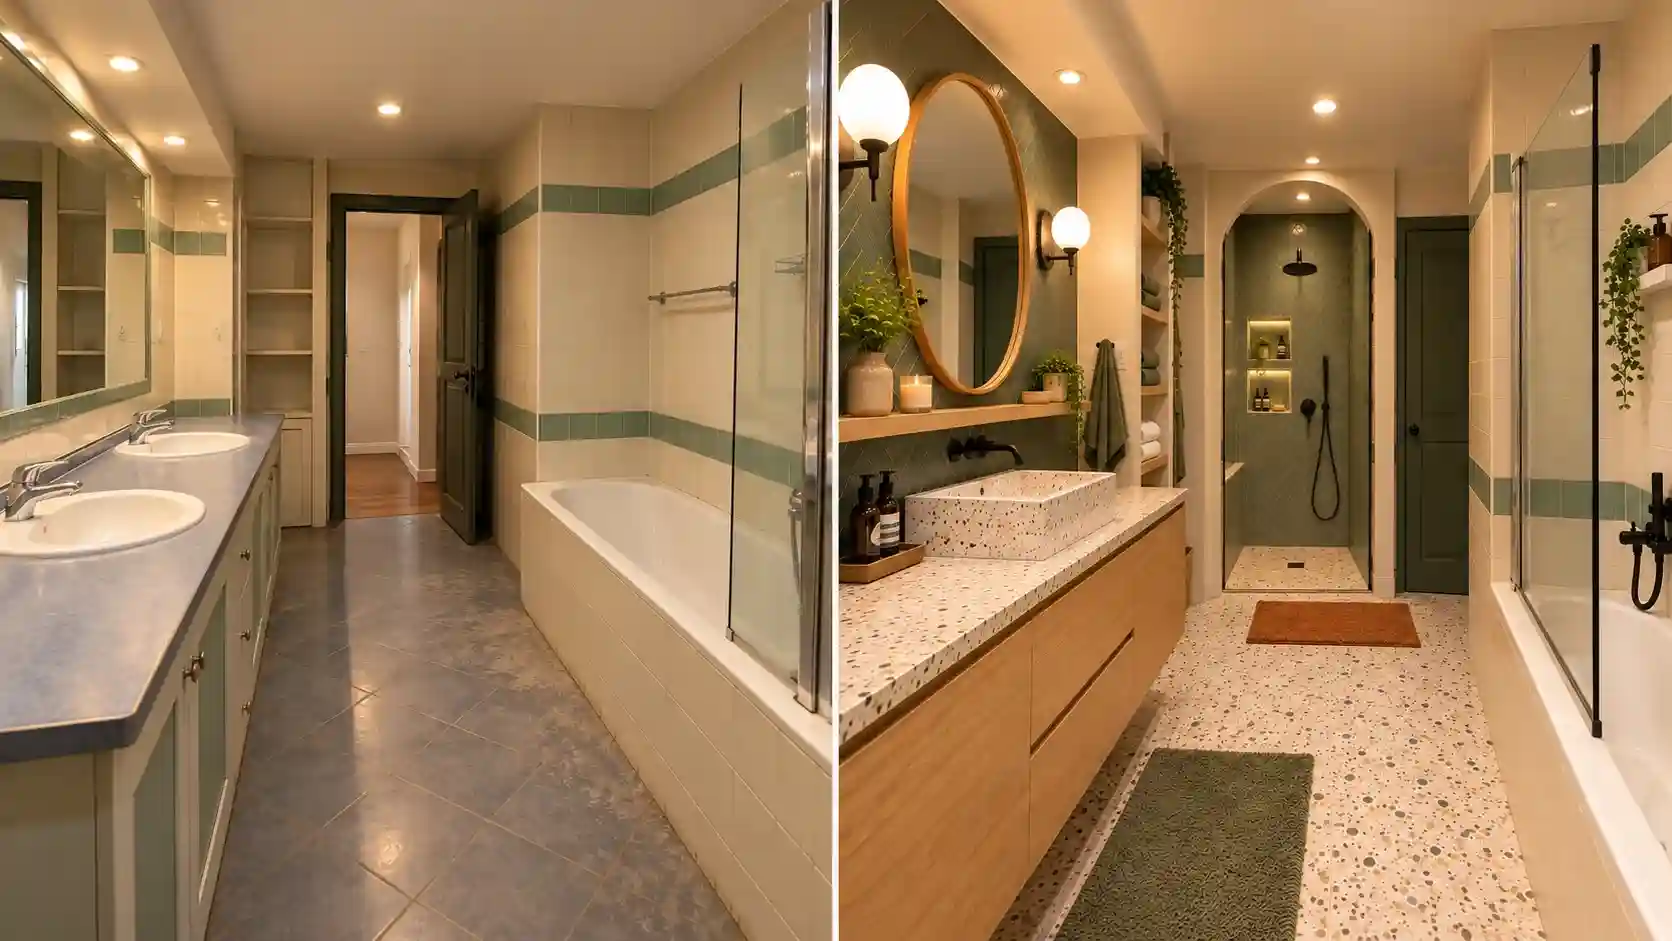
Starting Point. The bathroom began as a fairly typical mid-century layout: pale pink four-inch tile running halfway up the walls, a matching pink tile countertop on a boxy white vanity, stained-glass windows, and a dated glass-paneled shower stall crowded into the corner. The tub sat along one wall with a small step-up lip, and the floor was a plain grey ceramic tile that had clearly seen decades of use. Nothing was broken exactly — it was simply worn and stylistically stuck in another era.
Motivating Trigger. For most homeowners in this position, the trigger isn’t damage — it’s the sense that a functional room has become a liability for resale value, combined with wanting a bathroom that actually feels current. Vintage pink tile has a devoted fan base among some renovation purists, but plenty of buyers see it as a room they’d need to redo immediately.
Renovation Decisions. In this case, the plan called for a full tear-out: replacing the pink four-inch tile with a deep, glossy green field tile carried up the walls and into a curbless-style shower and tub surround, swapping the porcelain floor for a large-format stone-look porcelain slab, and installing a mid-century-inspired dark wood vanity with a white stone top to contrast against the green. The layout stayed largely the same — tub and shower combo in the same footprint, toilet and vanity roughly where they were — which kept plumbing changes to a minimum.
Execution Reality. This is where full gut remodels tend to surprise people. Tile-heavy bathrooms with a tub/shower combo commonly run several weeks longer than a simple refresh once demolition reveals the state of the substrate behind old tile. Waterproofing membrane work, cement board replacement, and re-routing for a new shower valve are common hidden costs that don’t show up in an initial estimate. In this project, the shower converted from a framed glass stall to a more open, glass-panel design, which required reworking the curb and drainage slope — a detail that’s easy to underestimate from a mood board.
Result. The finished room reads dramatically different from where it started: dark, saturated green tile against white walls, a furniture-style vanity, and a large-format stone floor that reads more like a spa than a 1960s tract-home bathroom. It’s the kind of transformation that photographs well and clearly solves the “outdated” problem.
Key Takeaway. Even in a remodel this successful, the two most common sources of regret are the ones that show up here too — grout color reading differently once the tile is grouted and sealed, and questions about how consistent the tile joints are, especially on darker, glossier tile where every line is easy to see. The vanity, meanwhile, is usually the easiest of the bunch to revisit if it doesn’t feel right, since it’s not structurally tied to the shower or plumbing rough-in.
Why Grout Color Looks Different Than You Expected
This is the single most common complaint tied to finished tile work, and it has a straightforward explanation.
Grout samples are almost always shown as small, dry chips or thin painted swatches. Once grout is mixed, packed into joints, and sealed, several things change:
- Cured color shift. Cementitious grout often dries several shades lighter or more muted than the wet mix looked during installation.
- Sealer darkening. Penetrating sealers — especially on darker grout — can deepen the tone slightly, which sometimes surprises homeowners who picked a lighter shade expecting it to stay light.
- Contrast effect. A grout color that looked neutral next to a small tile sample can look far more prominent once it’s framing dozens of tiles across an entire wall. Grout lines add up visually in a way a single sample never demonstrates.
- Lighting shift. Bathroom lighting — especially warm vanity bulbs versus daylight from a window — changes how both tile and grout read throughout the day.
The reassuring part: this is one of the more correctable mistakes in a finished bathroom.
Grout Colorant vs. Re-Grout vs. Tile Reset
| Fix | What It Actually Solves | Tile Removal Needed | Typical Disruption | Best For |
|---|---|---|---|---|
| Epoxy grout colorant/stain | Changes grout color only | No | Low — a few hours per section, some dry time | Grout color you dislike, but joints are even and grout is sound |
| Full re-grout | Replaces grout entirely; can change color and repair damaged/cracked grout | No (grout removed, tile stays) | Moderate — grout removal, repacking, cure time | Cracked, crumbling, or badly stained grout, or a bigger color change than a colorant allows |
| Tile reset | Corrects uneven spacing, tile lippage, or poor tile placement | Yes, on affected tiles | High — may involve waterproofing repair | Genuinely inconsistent gaps or tiles that were never set correctly |
The mistake homeowners often make is reaching for the most invasive fix (tile reset) when the real complaint is only about color — or the opposite, applying a colorant over what is actually a structural spacing problem that a color change can never resolve.
%20(7).webp)
Uneven Grout Lines and Tile Gaps: Workmanship Issue or Design Choice?
This is a separate question from color, and it deserves a more careful look before assuming anything is wrong.
Some gap variation is normal — especially on certain tile types. Handmade and zellige-style glazed tile, including many deep, saturated glaze finishes, is intentionally made with slight size and edge variation. A tile setter working with this kind of material has to plan for that variance, and small differences in joint width are part of the material’s character rather than a mistake.
But there’s a difference between intentional character and inconsistent installation. A pattern worth flagging to a contractor looks more like this:
- Gaps that widen or narrow noticeably across a single wall, rather than a subtle, evenly distributed variation
- Grout lines that visibly wander instead of running straight
- Tiles sitting proud of their neighbors (lippage) that catch on a hand or a towel
- Corners or transitions where tile edges don’t align at all
Quick Self-Check Before Calling It a Defect
- Step back and view the wall from several feet away — some unevenness disappears at normal viewing distance
- Check whether the tile itself is a handmade or artisanal style with natural size variation
- Run a hand flat across the tile surface to feel for lippage, not just look for gap width
- Compare gap width in multiple spots — small, even variation is different from one section clearly wider than the rest
- Photograph problem areas in daylight, not just under bathroom vanity lighting
If the issue holds up after this check, it’s reasonable to raise it as a workmanship concern rather than a matter of taste.
%20(8).webp)
DIY Grout Colorant: What It Can and Can’t Fix
For homeowners whose complaint is purely about color, an epoxy grout colorant is often a realistic weekend project — with real limitations worth understanding first.
What it does well:
- Recolors cured, structurally sound grout without removing tile
- Adds a protective, water-resistant layer over the grout line
- Comes in a wide range of shades, including options to go lighter or darker than the original
Where it runs into trouble:
- It needs a genuinely clean, degreased surface — soap scum or sealant residue left behind causes uneven absorption and patchy results
- Application in an active, high-humidity shower area needs adequate cure time before the space is used again, which is easy to underestimate
- It won’t hide physical gap inconsistencies — a colorant follows the existing joint shape exactly
- Over-application can leave a filmy residue on the tile face itself, which then needs to be buffed off before it hardens
Caution: Applying grout colorant in a shower that’s still in daily use, without allowing full manufacturer-recommended cure time, is one of the more common reasons homeowners end up redoing the job a second time. Ventilation matters here too — these products carry noticeable fumes in an enclosed bathroom.
Cost Comparison: Grout Colorant vs. Re-Grout vs. Tile Reset
Figures below are general US-based estimates for a standard tub/shower combo surround, and can vary meaningfully in the UK, Canada, and Australia based on labor rates, product availability, and regional contractor pricing.
| Fix | Typical Cost Range (US) | Primary Cost Driver |
|---|---|---|
| Epoxy grout colorant (DIY) | $30–$80 in materials | Product cost only, if done yourself |
| Epoxy grout colorant (professional) | $150–$400 | Labor for prep and application |
| Full re-grout (professional) | $400–$1,200 | Grout removal labor, square footage, grout type |
| Partial tile reset | $500–$2,000+ | Tile removal, potential waterproofing repair, tile replacement/matching |
Tile reset costs climb quickly if the original tile is discontinued and needs to be sourced or substituted, or if waterproofing membrane has to be repaired behind the removed tiles — both common surprises once a contractor opens up a small section of wall.
When to Involve Your Contractor Before Final Sign-Off
Timing matters more than most homeowners realize. Concerns raised before final payment are typically far easier and less expensive to resolve than the same concerns raised weeks later.
Before signing off or making final payment:
- Walk every wall in daylight, not just under bathroom lighting
- Run a hand across tile surfaces to check for lippage
- Compare grout color in multiple spots against the sample originally approved
- Confirm grout joint width matches what was discussed or contracted, if that was specified
- Note any punch-list items in writing before the final invoice is paid
- Ask directly whether a workmanship warranty covers grout or tile issues discovered shortly after completion
A written punch list, even a short one, is the strongest leverage a homeowner has. Once final payment clears and the crew has moved to the next job, a “please come fix this” request becomes a favor rather than a contractual obligation.
Vanity Regret: Why It’s the Easiest Fix in the Room
Of all the common post-remodel regrets, a vanity that doesn’t feel right is usually the least stressful to correct.
Unlike grout or tile, a vanity is a standalone component. Swapping it typically involves:
- Disconnecting and reconnecting supply lines and drain — routine plumbing work, not a structural change
- No impact on waterproofing or tile work, assuming the new vanity fits the existing footprint or plumbing rough-in
- The option to keep the same countertop and simply change the cabinet base, or vice versa, depending on what specifically feels off
The bigger cost driver is footprint and plumbing location. A like-for-like swap — same width, same plumbing position — is a modest job. Moving a sink several feet, or changing from a single to a double vanity, brings plumbing relocation into the picture and raises both cost and complexity.
How to Avoid This Next Time: Choosing Grout and Tile Layout Before Installation
The single biggest information gap in most bathroom planning is treating grout choice as an afterthought to tile choice. A few habits close that gap:
- Request a full-size mockup panel — several tiles grouted together — rather than judging from a paint chip–style grout sample
- View the mockup in the actual bathroom, under the actual lighting, at different times of day
- Ask the tile setter directly what grout joint width they plan to use, and put it in writing
- For handmade or artisanal tile, ask specifically how the installer plans to handle natural size variation
- Choose grout one shade lighter or darker than what feels perfect on the sample, accounting for the color shift that happens after curing and sealing
- Confirm in writing whether epoxy or cementitious grout will be used, since the two behave differently over time and stain resistance differs significantly
None of this eliminates the possibility of regret entirely — taste evolves, and no sample fully replicates a finished room. But it meaningfully narrows the gap between what’s approved on paper and what actually gets lived with.
%20(2).webp)
%20(3).webp)
%20(5).webp)
Frequently Asked Questions
Can you change grout color after it’s already installed and cured? Yes. An epoxy grout colorant applied over fully cured, structurally sound grout is the standard method, and it doesn’t require removing any tile.
Does grout colorant work in a shower, or only in dry areas? Most epoxy colorants are formulated for wet-use areas, but they need full cure time before the shower is used again — rushing this step is a common cause of early failure.
Why do grout lines look uneven even though the tile itself is level? Uneven grout lines usually trace back to spacer use and layout planning during installation, not to the tile itself being out of level. Some handmade tile styles also have natural size variation that affects joint consistency.
Is uneven tile spacing a workmanship defect or normal for handmade tile? It can be either. Subtle, evenly distributed variation is expected with handmade tile. Gaps that clearly widen in one section or wander out of line are more consistent with an installation issue.
How long does grout colorant last in a high-moisture shower? Manufacturer guidance varies, but most epoxy colorants are marketed as long-lasting when applied to properly prepped, fully cured grout — though heavy daily shower use will test that durability over years, not months.
What’s the cost difference between grout colorant, re-grouting, and resetting tile? Colorant is the least expensive option by a wide margin, a full re-grout sits in the middle, and resetting tile is the most expensive because it can involve waterproofing repair and tile sourcing.
Can a contractor be asked to fix grout color or spacing before final payment? Yes, and this is the ideal time to raise it. A written punch list before final sign-off carries far more leverage than a request made after the invoice is settled.
_22_11zon.webp)
.webp)

.webp)
_15_11zon.webp)