Top 10 Most Common Renovation Mistakes (And What They Actually Cost You)
-
 Olivia Reed
 - 11 Jun, 2026

Quick Answer: The most common renovation mistakes include skipping building permits, removing walls without confirming load paths, underestimating total project costs, choosing finishes before final measurements are locked in, booking tradespeople out of sequence, neglecting moisture barriers, skipping surface prep, ignoring manufacturer installation requirements, making design changes mid-project, and disturbing hazardous materials without proper testing. Each one can trigger expensive rework, failed inspections, or damage that compounds silently for years.
Quick Takeaways
- Unpermitted work attaches to the property, not the owner — it becomes your problem at resale
- Budget at least 15–20% above your base estimate; older homes (pre-1980) warrant the full 20%
- Always confirm load-bearing status before demolition — visual checks are a starting point, not a verdict
- Trade sequence is non-negotiable: rough-in before insulation, insulation before drywall, tile before fixtures
- Moisture errors don’t announce themselves — they show up years later as mold, rot, and tile failure
- A mid-project design change can cost 3–5× more than the same change made on paper before work begins
Why Renovation Mistakes Cost More to Fix Than to Prevent
There’s a version of renovation planning that feels productive — scrolling through tile options, saving kitchen layouts, comparing countertop finishes. And then there’s the version that actually protects your budget: checking structural drawings, pulling permits, sequencing trades correctly.
Most homeowners spend most of their time on the first version.
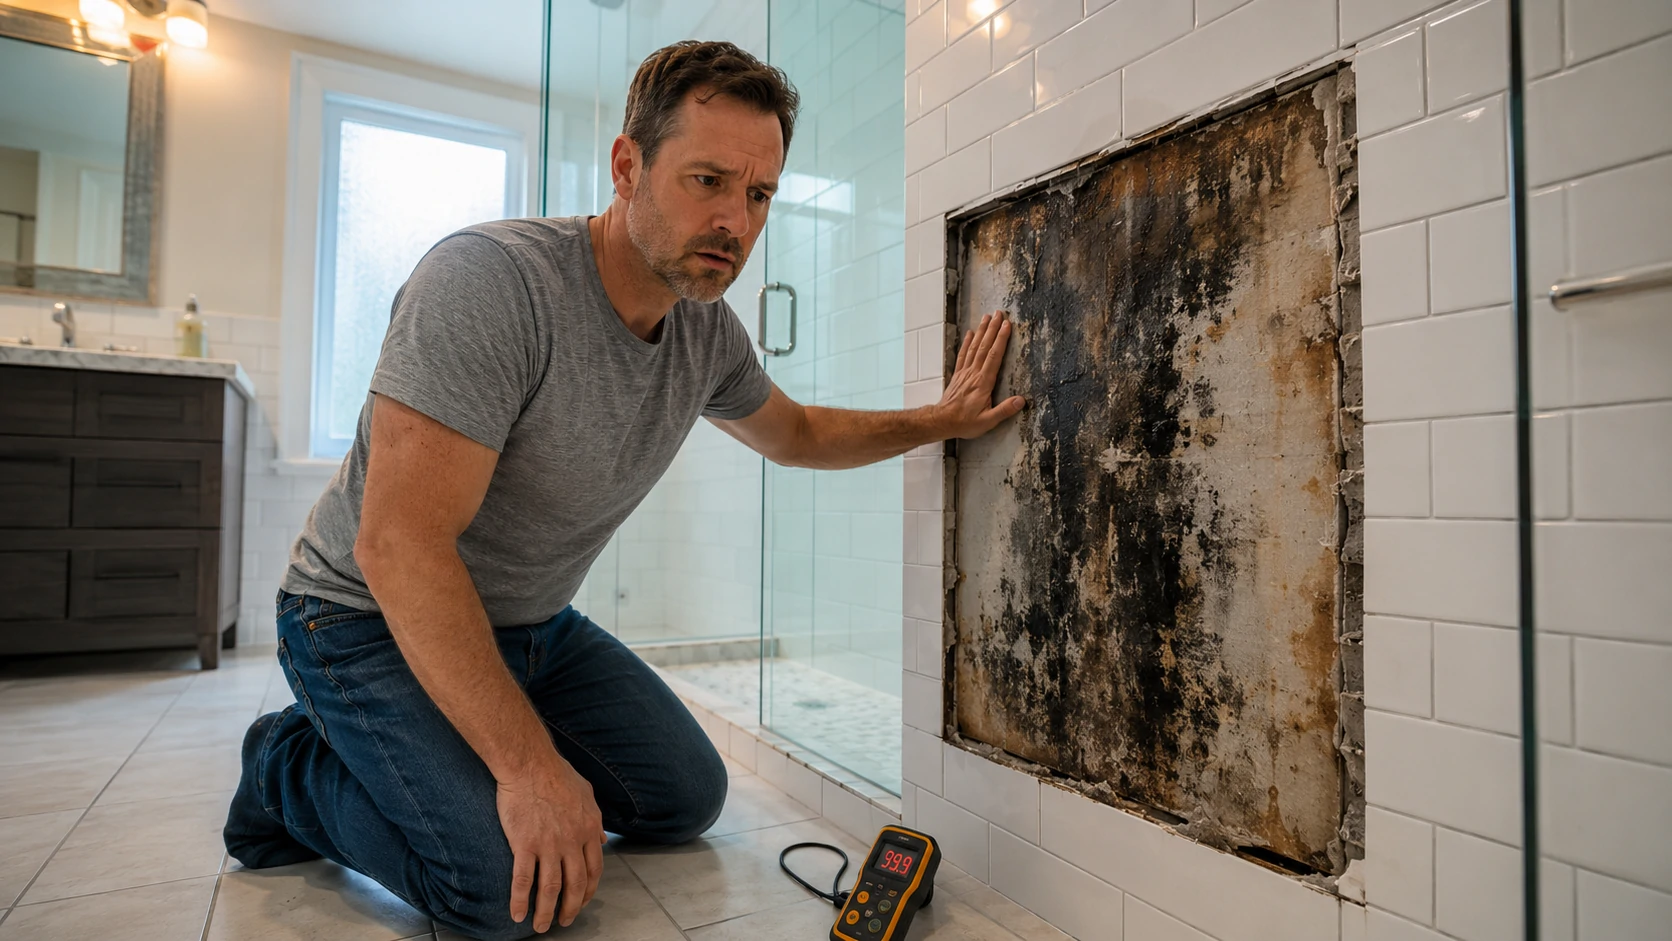
The frustrating reality is that renovation mistakes rarely announce themselves. A skipped waterproof membrane behind shower tile doesn’t fail during the first month. It fails 18 months later, when the grout starts cracking at the base and you pull a tile to find black mold eating into the cement board behind it. At that point, you’re not fixing a caulking gap. You’re gutting a shower.
The math is unforgiving. Catching a moisture problem before tile installation costs almost nothing — some RedGard membrane and an afternoon. Catching it after means full demolition, disposal, substrate replacement, new tile, new waterproofing, and the labor to do all of it twice. Industry data from the Joint Center for Housing Studies consistently shows homeowners underestimate total renovation costs by 20–30%, and that gap isn’t random. It’s almost always driven by preventable mistakes compounding through every subsequent phase.
The sections below cover the 12 mistakes that drive the most rework, the highest remediation costs, and the most frustration. Not surface-level warnings — real mechanisms, real cost consequences, and the specific thresholds that separate a minor correction from a full tear-out.
1. Skipping Building Permits (And Why It Follows the Property, Not Just the Owner)
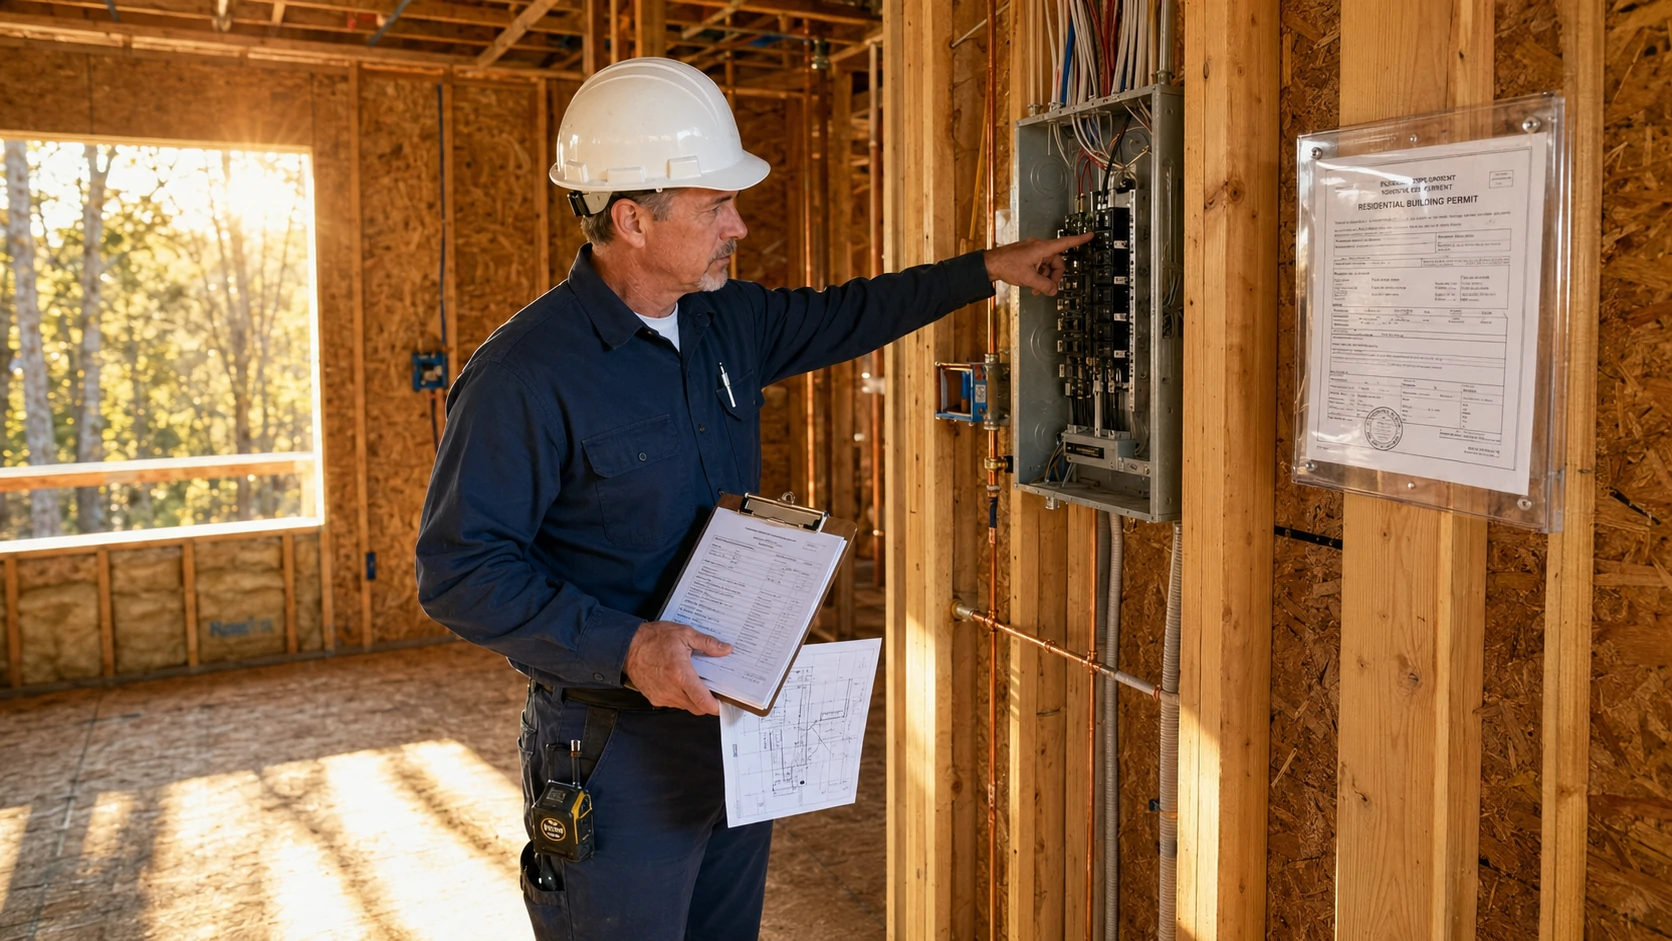
This is the one mistake that genuinely keeps coming up at the worst possible time — not during the renovation, but years later, when you’re trying to sell.
Most homeowners who skip permits aren’t acting recklessly. They’re trying to avoid delays, reduce costs, or sidestep what feels like unnecessary bureaucracy. The problem is that unpermitted work doesn’t disappear when the drywall goes up. It attaches to the property and surfaces in title searches, insurance claims, and mortgage appraisals.
What Actually Happens at Resale
In most US states, sellers are legally required to disclose known unpermitted work. Buyers’ lenders and insurers will flag it. Depending on the jurisdiction, you may be required to retroactively permit the work (which means opening walls for inspection), demolish non-compliant structures, or accept a heavily discounted sale. The cost to retroactively permit and bring work up to code is almost always higher than the original permit would have been.
Jurisdiction-Specific Risks
| Country | Key Risk | What Can Happen |
|---|---|---|
| United States | Varies by state; most require disclosure at point of sale | Retroactive permitting, buyer demands price reduction, lender refusal |
| United Kingdom | Building Regulations enforcement by Local Authority Building Control (LABC) | Enforcement notice, Regularisation Certificate required, inability to sell without sign-off |
| Canada (ON/BC/AB) | Municipal bylaw enforcement varies; stricter in metro areas | Work order, forced demolition of non-compliant additions, disclosure obligation |
| Australia | CDC vs. Development Application pathways; PCA sign-off required | Stop-work orders, NCAT disputes, inability to obtain occupation certificate |
What Typically Requires a Permit
- Any structural work (wall removal, additions, deck construction)
- Electrical panel upgrades, new circuits, service changes
- Plumbing drain or supply modifications
- HVAC system changes or new installations
- Waterproofing in wet areas (in some jurisdictions)
- Window and door rough opening enlargements
The shortcut logic doesn’t hold. Permit fees for a bathroom remodel in most US cities range from $150–$500. The cost to retroactively permit and repair non-compliant work discovered at resale routinely exceeds $10,000 — and that’s before any price negotiation with buyers.
2. Removing Walls Without Confirming Load Path
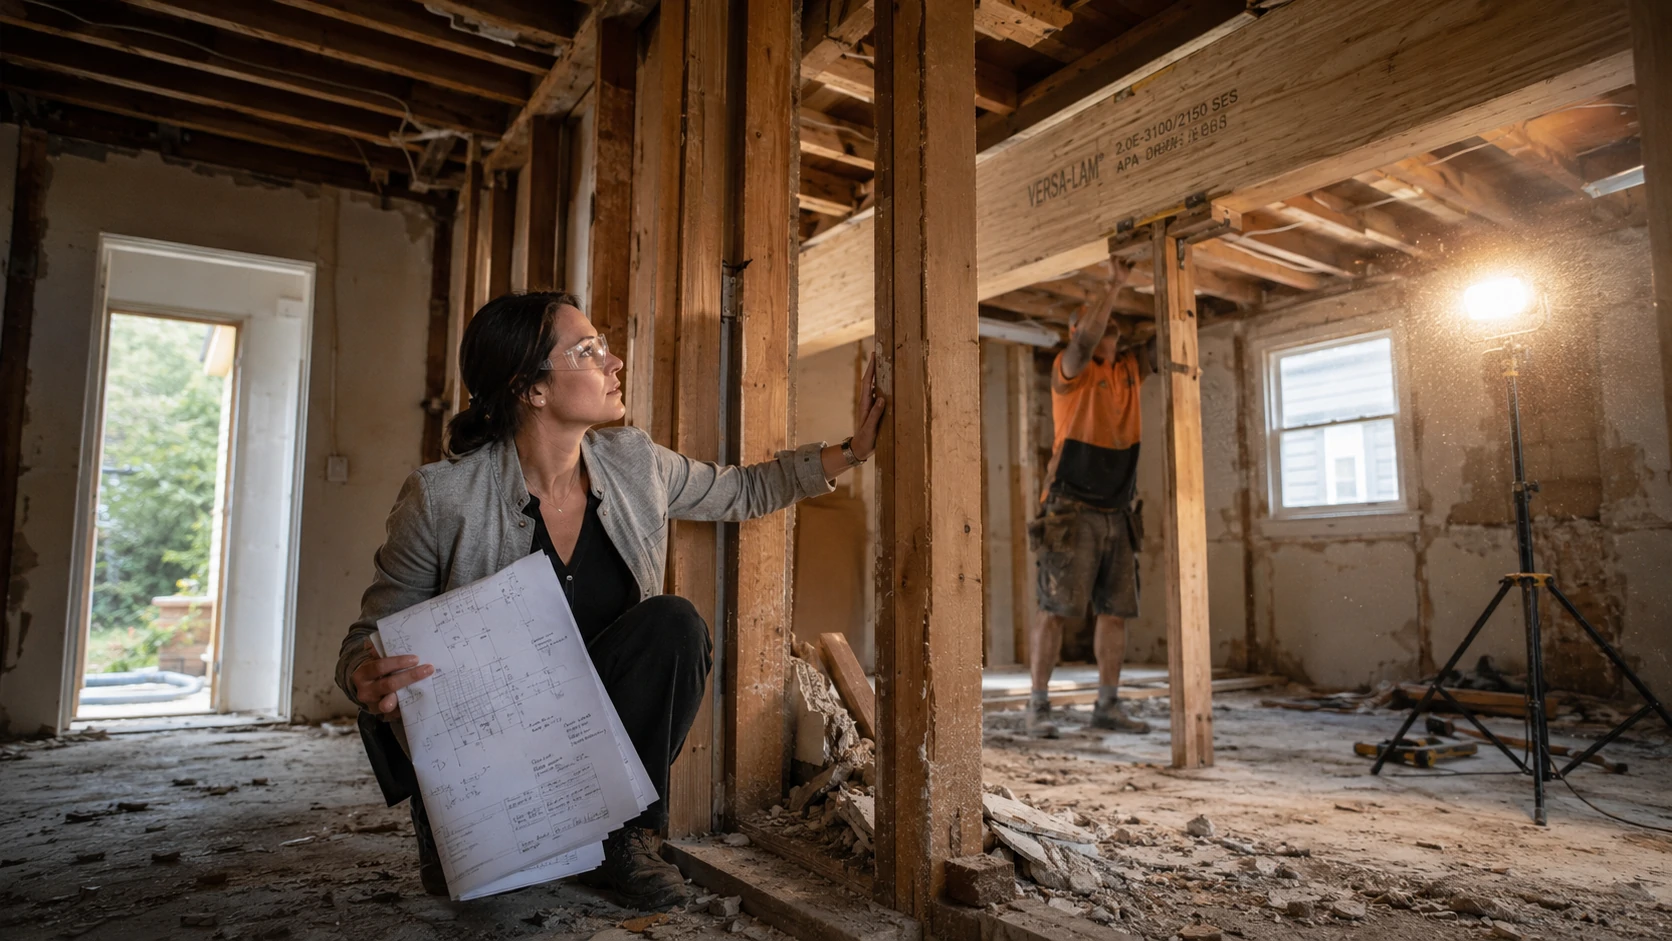
Open-plan layouts are consistently popular. And removing interior walls is one of the most satisfying moments in any renovation — until the ceiling sags three months later.
The consequences of removing a load-bearing wall without proper structural support aren’t always immediate. Sometimes the failure mode is dramatic (sagging rafters, cracked ceiling propagating outward from the opening). More often, it’s slow: floor settlement, sticking doors, diagonal cracks appearing at window corners over the following year.
How to Spot a Potentially Load-Bearing Wall (Preliminary Check Only)
These are indicators — not conclusions:
- Wall runs perpendicular to floor joists — joists typically span the short dimension, and load-bearing walls run across them
- Wall sits directly above a basement beam — load paths transfer vertically through the structure
- Wall runs through the center of the house — center ridge walls and mid-span supports are almost always structural
- Wall has a doubled-up header above door openings — cosmetic partition walls don’t need engineered headers
None of these checks replaces a structural engineer’s assessment. What a structural engineer actually does is trace the full load path from roof to foundation, determine what transfer beam is required to replace the wall’s function, specify the bearing points, and sign off on the design. For a standard load-bearing wall removal with a steel or LVL beam installation, expect to pay $500–$1,500 for the engineering assessment alone — before any construction.
That fee is non-negotiable. No permit authority will approve the work without stamped structural drawings for anything beyond minor partition removal.
Warning: Contractors who offer to remove walls without mentioning a structural engineer are a red flag. Either they’ve already assessed it as non-structural (ask them to show their work), or they’re proceeding without verifying — which exposes you to the full liability.
3. Budgeting for the Renovation You Expect, Not the One You’ll Find
Here’s what almost never appears in a contractor’s initial quote: the subfloor rot behind the bathroom tile, the knob-and-tube wiring inside the wall you’re opening, the cast-iron drain stack that’s partially collapsed inside the floor cavity. These aren’t edge cases in older homes — they’re routine discoveries.
Initial quotes are priced against visible conditions. Once demolition begins and hidden conditions are revealed, the scope changes. This isn’t contractor dishonesty (usually). It’s the nature of working inside walls, under floors, and behind surfaces that no one has touched in decades.
Recommended Contingency by Home Age and Project Type
| Project Type | Post-2000 Home | 1980–2000 Home | Pre-1980 Home |
|---|---|---|---|
| Bathroom remodel | 10% | 15% | 20% |
| Kitchen remodel | 10% | 15–20% | 20% |
| Basement finishing | 10–15% | 15–20% | 20–25% |
| Full home renovation | 15% | 20% | 20–25% |
| Room addition | 10% | 15% | 20% |
Why pre-1980 homes warrant the higher end:
- Asbestos in floor tiles, ceiling tiles, pipe insulation, textured coatings
- Knob-and-tube or aluminum wiring requiring full replacement
- Cast-iron drain plumbing with partial corrosion or collapse
- Structural surprises — headers undersized by modern code, notched joists, non-standard framing dimensions
- Lead paint on all painted surfaces requiring encapsulation or removal
A 10% contingency sounds responsible. On a pre-1980 kitchen remodel, it’s often gone before the cabinets are ordered. Budget for the home you have, not the one the listing photos suggested.
4. Selecting Materials Before You Know Your Real Numbers
It’s easy to understand why this happens. The inspiration phase is genuinely exciting. Homeowners spend weeks selecting tiles, hardware, and countertop slabs — sometimes before a contractor has measured the space, before permits are confirmed, and well before a realistic budget has been established.
The problems that follow are predictable.
Over-ordering and under-ordering. Material estimates based on approximate room sizes rather than confirmed measurements can be off by 10–15%. That sounds like a rounding error until you realize you’ve ordered 200 sq ft of a discontinued porcelain tile and need 240. Finding matching stock six months into a renovation is often impossible.
Discontinued products. Renovation timelines slip. Lead times extend. A tile selected four months before installation may be out of stock or discontinued by the time the substrate is ready. Material selection should happen close to the order date, not at the beginning of the planning process.
Budget creep at the wrong stage. Selecting high-end finishes before a confirmed budget is set creates a psychological anchor that’s hard to walk back. Once a homeowner has decided on a specific stone countertop, substituting a laminate alternative mid-project feels like a failure rather than a rational decision.
The correct sequence: Confirm final measurements → Establish confirmed budget → Get contractor quotes → Select materials within confirmed budget → Order with confirmed delivery timeline.
Reversing steps one and two — which most homeowners do — is how renovation budgets quietly double before construction begins.
5. Booking Tradespeople Out of Order
This is the sequencing mistake that creates the most visible chaos on a job site. Tradespeople arrive in the wrong order, work gets undone, and delays compound through every subsequent phase.
The standard renovation sequence exists for good reason. Each phase creates the conditions that make the next phase possible. When steps are reordered, you don’t save time — you create rework.
Standard Trade Sequence for a Full Renovation
- Demolition — remove existing finishes, expose structure
- Structural work — beam installation, wall framing, joist repairs
- Rough-in plumbing — drain, waste, vent stack modifications
- Rough-in electrical — panel, new circuits, rough wiring
- HVAC rough-in — ductwork, mechanical penetrations
- Rough-in inspections — all rough trades must pass before proceeding
- Insulation — only after rough-ins are approved
- Drywall — boarding, taping, finishing
- Tile and waterproofing — wet areas only
- Cabinetry installation — kitchen and bathroom
- Trim and millwork — doors, baseboards, casing
- Painting
- Flooring — after painting to avoid finish damage
- Fixtures and appliances — plumbing fixtures, lighting, hardware
- Punch list — final corrections and touch-ups
The Three Most Commonly Disordered Trades
HVAC before insulation. This one gets skipped constantly. Insulation installed before ductwork and electrical rough-in is inspected either needs to be removed or conceals uninspected work. Both outcomes cost money.
Flooring before painting. Paint splatter on new hardwood or LVT is not a minor inconvenience. It requires refinishing or replacement in the affected areas. Flooring goes in last, after all overhead work is complete.
Cabinetry before appliance specs are confirmed. Cabinet openings cut to standard appliance dimensions are fine — until the client upgrades to a non-standard range or refrigerator with a different cutout. This error alone triggers cabinet replacement or custom filler panels that cost several hundred dollars per unit.
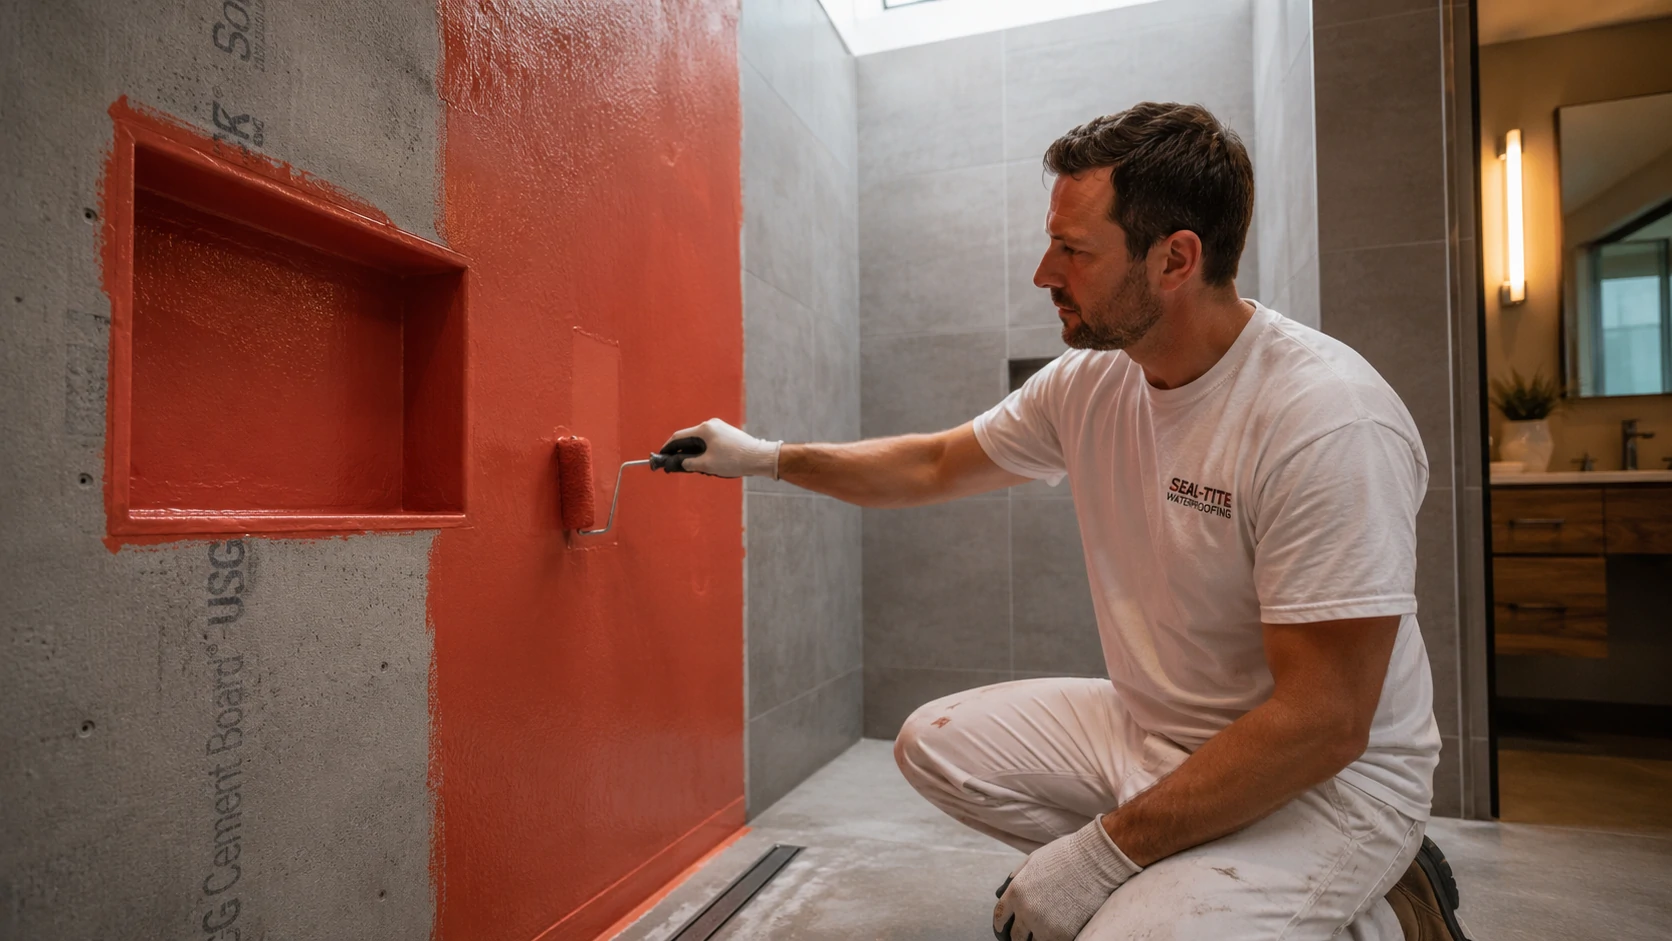
6. Moisture Control Errors That Hide Behind Walls for Years
Ask any experienced tile setter about the worst jobs they’ve walked into, and moisture failure will come up every time. Not because homeowners are careless — but because moisture problems are invisible right up until the moment they’re catastrophic.
The mechanism is consistent: inadequate waterproofing allows water to pass through tile grout and penetrate the substrate. In shower enclosures, that substrate is typically cement board — which, despite its name, will absorb moisture and deteriorate over time without a proper membrane. The moisture reaches the wall framing. The framing stays wet. Mold grows. The tile begins to flex, grout cracks, and eventually tiles debond.
By that point, the repair is a full shower demolition.
Wet Area Moisture Control Checklist
Shower enclosures:
- Waterproof membrane applied to all walls (Schluter Kerdi, RedGard, or equivalent)
- Membrane extends minimum 6” beyond wet zone on all sides
- Shower floor pre-sloped to drain at 1/4” per foot minimum
- Linear or center drain system fully waterproofed before tile
- Niche recesses fully waterproofed — often missed
- Seams and corners reinforced with membrane tape
Bathroom floors:
- Moisture meter reading below 19% in subfloor before any flooring installation
- Vapor barrier specified for slab-on-grade installations
- Appropriate uncoupling membrane (e.g., Schluter Ditra) for tile over wood subfloor
Kitchen backsplash:
- Cement board or equivalent substrate behind tile at sink area
- Caulk (not grout) at tile-to-countertop transition — grout cracks; silicone flexes
Exterior wall assemblies:
- Proper flashing tape at all window and door rough openings
- WRB (weather-resistant barrier) installed correctly — lapped shingle-style, not reversed
- No penetrations left unsealed
The 19% threshold: A moisture meter reading above 19% in wood subfloor before flooring installation is a documented failure predictor. Most flooring manufacturer warranties specify a maximum moisture content — typically 12–19% depending on species and format — and installation above that threshold voids the warranty regardless of how well the floor is installed.
7. What Happens When You Skip Surface Prep
Surface preparation is unglamorous. It’s also the single most common reason finishes fail prematurely — peeling paint, debonding tile, hollow-sounding LVT, hardwood floors that squeak within a year of installation.
The mechanism varies by material but the principle is the same: adhesion requires a clean, stable, appropriately profiled substrate. When that substrate is glossy, dusty, contaminated with wax or oil, or structurally unstable, even a perfectly applied finish will fail.
Surface Prep vs. Failure Outcome by Material
| Material | Commonly Skipped Prep | Resulting Failure |
|---|---|---|
| Interior paint | Priming new drywall or bare wood | Bleed-through, uneven sheen, adhesion failure |
| Ceramic/porcelain tile | Cleaning and profiling substrate, checking flatness | Hollow spots, debonding, grout cracking |
| LVT/LVP flooring | Filling subfloor low spots, checking for deflection | Floor bounce, locking joint failure, adhesion loss |
| Hardwood flooring | Acclimation, moisture testing, subfloor flatness check | Cupping, gapping, squeaking, structural failure |
| Exterior cladding | Priming cut ends, back-priming boards | End-grain moisture absorption, paint failure, rot |
| Tile on plywood | Installing cement board or uncoupling membrane | Tile flex, cracked grout, debonding |
The flatness tolerance issue is particularly underestimated with large-format tile. A floor that looks flat to the eye can have variation of 3–5mm over a 3m span — well beyond the 3mm in 3m tolerance required for 60×60cm tile installation. Without grinding high spots and filling low spots, lippage (tiles sitting at different heights) is inevitable. It looks unprofessional and creates trip hazards that tile setters will refuse to warranty.
8. Voiding Your Product Warranty Without Knowing It
This is the information gap that surprises homeowners most, because they don’t discover it until after installation — often years after, when they’re trying to make a warranty claim.
Most product warranties for flooring, tile, and cabinetry contain specific installation prerequisites. Meeting those prerequisites isn’t just good practice — it’s the condition under which the warranty is valid. Deviate from them, even slightly, and the manufacturer has grounds to deny any claim regardless of the defect’s cause.
Commonly Missed Warranty Requirements
Engineered and solid hardwood flooring:
- Acclimation period: typically 3–5 days in the installation environment at final temperature and humidity
- Subfloor flatness: usually 3/16” in 10 feet; some manufacturers specify 3/16” in 6 feet
- Moisture content: subfloor within 4% of flooring moisture content at time of installation
- Expansion gap: minimum 1/2” at all walls, posts, and fixed objects — often omitted by installers rushing through the perimeter
Large-format porcelain tile (60cm+ per side):
- Movement joints required at all changes in plane, perimeter walls, and typically every 20–25 feet of field tile
- These are not cosmetic — they accommodate thermal expansion and substrate movement
- Grouting wall-to-floor corners solid (instead of caulking) consistently voids warranties and causes cracking
LVT/LVP (Luxury Vinyl Tile/Plank):
- Subfloor flatness typically specified as 3/16” in 10 feet — stricter than most installers check
- Temperature range requirements during installation (some products require 65–85°F)
- Subfloor must be structurally sound — floating LVT over a springy subfloor voids warranty and causes locking joint failure
Cabinetry:
- Wall mounting requirements specify stud spacing and fastener type — cabinets mounted with drywall anchors alone void manufacturer warranties
- Leveling requirements affect door alignment warranties
Before installation begins, read the installation guide. Not the summary sheet — the full technical document. One missed requirement can void a warranty worth thousands of dollars.
9. How Mid-Project Changes Multiply Costs

Every experienced contractor has a version of the same story: a client who asks, mid-project, to move a window by 600mm. The change sounds trivial. The invoice is not.
Mid-project design changes are expensive for reasons that aren’t immediately obvious. They don’t just cost the price of the new work — they cost the labor to undo work already completed, the re-mobilization fees charged by subcontractors when they’re called back to a site, the materials that can’t be returned because they were already cut, and the delay ripple that pushes every subsequent trade back by days or weeks.
Why Change Order Costs Are Disproportionate
A change order is a formal modification to a signed contract after work has begun. The pricing logic is different from original contract work:
- Completed work may need partial demolition — a moved window means framing already installed is partially removed
- Materials may be non-returnable — cut lumber, pre-ordered tile batches, cabinets built to spec
- Subcontractor re-mobilization fees — tradespeople charge to return to a site after they’ve demobilized; fees of $300–$800 per trade per return visit are common
- Schedule compression — if the change delays one trade, it delays all subsequent trades, some of whom may charge for lost scheduling time
- Changed scope is not tendered competitively — you’re negotiating with the contractor already on site, not selecting from multiple quotes
The industry estimate is that the same design change made mid-construction costs 3–5× more than it would have cost if resolved on paper before work began. A window relocation that costs $800 in the design phase may cost $3,500–$4,000 mid-project.
The practical implication: Complete all design decisions before demolition begins. Walk through every room, every surface, every appliance specification, every outlet location. It feels overcautious. It pays for itself every time.
10. Renovation Hazards You Cannot See: Asbestos and Lead Paint
This section has a clear, hard rule that no amount of DIY enthusiasm changes: if your home was built before 1980, test before you disturb anything.
Asbestos-containing materials were used extensively through the late 1970s in insulation (pipe lagging, ceiling insulation batts), floor tiles (9×9” vinyl composition tile is a known indicator), ceiling tiles, textured coatings (artex, popcorn ceilings), and joint compound. Lead paint was standard on virtually all painted surfaces in homes built before 1978 in the US.
Neither material is dangerous when intact and undisturbed. Both become significant health hazards when cut, sanded, drilled, or demolished — activities that are inherent to renovation.
Jurisdiction-Specific Requirements
| Country | Asbestos Testing Requirement | Lead Paint Requirement |
|---|---|---|
| United States | EPA requires contractors to follow NESHAP; homeowners legally may do their own work but assume full liability; testing strongly recommended | EPA RRP Rule requires certified renovators for pre-1978 homes when disturbing 6+ sq ft of painted surface |
| United Kingdom | HSE duty to manage asbestos in commercial properties; domestic: testing recommended, legal obligation if you’re a landlord | No legal requirement for testing in residential owner-occupied homes, but contractor obligations exist |
| Canada | Provincial variation; most provinces prohibit disturbance without testing in commercial; residential owner-builder rules vary | No federal mandate; provincial health authorities recommend testing for pre-1960 homes |
| Australia | Strict regulations on friable asbestos removal; non-friable limited to 10m² DIY; licensed removalist required above threshold | No national mandate for residential, but awareness campaigns are active in most states |
Hard stop: If testing confirms asbestos-containing materials in the disturbance zone, stop work. Encapsulation or removal must be performed by a licensed asbestos contractor. This is not a judgment call about risk tolerance. The remediation cost for improper asbestos disturbance in a residential setting regularly exceeds $20,000 — and that doesn’t include any regulatory penalties.
11. Electrical and Plumbing Work That Requires a Licensed Trades person

The logic that leads homeowners to attempt unlicensed electrical and plumbing work is usually the same: the work looks manageable, the licensed professional costs more, and nothing visibly goes wrong immediately.
The problem is that “nothing visibly goes wrong” is not the same as “nothing went wrong.”
Improperly installed electrical circuits don’t fail immediately. They fail when load changes, connections loosen, or insulation deteriorates — sometimes years later. And when they do, the insurance claim for fire damage can be denied if the investigation reveals unlicensed work.
DIY vs. Licensed Trade by Task and Jurisdiction
| Task | USA | UK | Canada | Australia |
|---|---|---|---|---|
| Painting, drywall, tiling | DIY OK | DIY OK | DIY OK | DIY OK |
| Replacing light fixtures (like-for-like) | DIY OK (with circuit off) | Notifiable in Scotland; DIY in E&W with conditions | DIY OK in most provinces | Licensed required in most states |
| New electrical circuits | Permit + inspection required; homeowner may pull own permit in most states | Part P certified electrician required (or self-certification scheme) | Licensed electrician required | Licensed electrician required |
| Panel/service upgrades | Licensed electrician required | Licensed electrician required | Licensed electrician required | Licensed electrician required |
| Replacing tap/faucet | DIY OK | DIY OK | DIY OK | DIY OK in most states |
| Modifying drain/DWV | Licensed plumber required in most jurisdictions | Licensed plumber required | Licensed plumber required | Licensed plumber required |
| Gas line work | Licensed gasfitter required everywhere | Gas Safe registered engineer required | Licensed gasfitter required | Licensed gasfitter required |
| Structural wall removal | Engineer + permit required | Building Regs application required | Engineer + permit required | Engineer + permit required |
On insurance implications: Work performed by an unlicensed tradesperson on insured systems (electrical, plumbing, gas) can void coverage for related claims. An insurer investigating a kitchen fire will ask whether the wiring was done by a licensed electrician. If it wasn’t, the claim for fire damage may be denied — entirely legally.
How to Verify a Contractor’s License and Insurance
- US: Verify license number through your state contractor licensing board (search “[state] contractor license lookup”)
- UK: Electrical — NICEIC or NAPIT register; Gas — Gas Safe register; Plumbing — WaterSafe approved contractor
- Canada: Provincial trade licensing bodies; ECRA in Ontario for electrical
- Australia: Fair Trading in NSW/QLD; Consumer Affairs in VIC; check Licence Check portal
Always request a certificate of insurance directly from the insurer — not a summary document from the contractor.
Full Renovation Mistake Reference Tables
Cost Contingency Summary
| Home Age | Minimum Contingency | Realistic Contingency | Common Hidden Costs |
|---|---|---|---|
| Post-2000 | 10% | 10–15% | Minor code variances, material waste |
| 1980–2000 | 12–15% | 15% | Aluminum wiring, HVAC updates, subfloor issues |
| Pre-1980 | 15–20% | 20–25% | Asbestos, lead, knob-and-tube, cast iron plumbing, structural surprises |
Remediation Cost Ranges: Catching It Before vs. After
| Mistake | Caught Before Finish | Caught After Finish | Cost Multiplier |
|---|---|---|---|
| No waterproof membrane in shower | ~$200–400 (materials + labour) | $3,000–8,000 (full demo + rebuild) | 10–20× |
| Incorrect subfloor flatness under LVT | $300–600 (grinding + levelling) | $1,500–3,500 (floor removal + correction) | 4–6× |
| Non-structural wall treated as load-bearing | $0 | $8,000–25,000 (structural repair + drywall) | Uncapped |
| Unpermitted electrical | $150–500 (permit fee) | $5,000–15,000 (open walls, inspection, repair) | 15–30× |
| Paint over unprimed new drywall | $80–150 (primer + time) | $600–1,200 (sand, re-prime, re-paint) | 5–8× |
FAQ
What is the most expensive renovation mistake to fix after the fact?
Structural errors and moisture control failures share the top position. Improper load-bearing wall removal can require full structural remediation including beam installation, joist sistering, and full interior finish replacement — costs that routinely exceed $25,000. Moisture failure behind shower tile requires complete demolition of the finished shower, which in a mid-range bathroom typically runs $3,000–$8,000 just to get back to square one.
Can I renovate without a permit if I’m doing the work myself?
Permit requirements apply based on the scope of work, not who performs it. In most jurisdictions, owner-builders are permitted to pull their own permits and perform their own work — but the work is still subject to inspection and must meet code. “I did it myself” is not a permit exemption anywhere.
How do I know if a wall is load-bearing before I remove it?
Preliminary indicators include perpendicular orientation to floor joists, position directly above a basement beam, and location along the center ridge of the house. These are starting points only. Confirmation requires a structural engineer who can trace the full load path. A visual check is never a substitute for an engineering assessment.
What is a realistic contingency budget for a renovation?
For homes built after 2000, 10–15%. For 1980–2000 homes, 15%. For pre-1980 homes, 20–25%. These figures reflect the consistent pattern of hidden conditions driving cost overruns — not pessimism. The 10% figure most contractors suggest is inadequate for any property with age-related risk factors.
What happens if unpermitted work is discovered when I sell my home?
Depending on jurisdiction: mandatory disclosure to the buyer, requirement to retroactively permit and bring work up to code, possible requirement to demolish non-compliant structures. Costs for retroactive permitting and repair typically far exceed the original permit cost. Buyers and their lenders are increasingly sophisticated about spotting unpermitted work in title searches.
Can poor tile installation cause mold?
Yes, directly. Inadequate waterproofing in wet areas allows moisture to penetrate through grout joints into the substrate. Without a waterproof membrane, moisture reaches framing lumber, where it creates conditions for mold growth, structural rot, and eventual tile debonding. The mold typically grows invisibly for 12–24 months before surface signs appear.
Why is the final renovation cost almost always higher than the original quote?
Because quotes are based on visible conditions. Hidden issues — rotted subfloor, outdated wiring, collapsed cast-iron plumbing — are discovered only after demolition reveals them. These are not errors in the original quote; they’re genuinely unknowable until walls and floors are opened. The contingency budget exists precisely to absorb these discoveries.
What trades require a licensed professional in a renovation?
In most jurisdictions: electrical panel and circuit work, plumbing drain and supply modifications, HVAC system changes, and gas line work. Requirements vary by country, state, and province. Some jurisdictions also require permits and inspections for structural work, waterproofing, and window/door rough opening modifications. When in doubt, check with your local building department before starting.
What is scope creep and how does it affect renovation budgets?
Scope creep is the progressive expansion of a project beyond its original definition — usually through small additions or changes that each seem minor. “While you’re in there, can you also…” is the phrase that triggers it. Each addition is priced as a change order, where costs are disproportionate to the apparent size of the change. Projects with significant scope creep routinely run 30–50% over original budget.
Does skipping primer before painting count as a renovation mistake?
Yes — especially on new drywall, bare wood, and previously glossy surfaces. New drywall is highly porous and will absorb topcoat unevenly without primer, resulting in flashing (areas of uneven sheen that show through the finished coat). On glossy surfaces, adhesion without primer is poor — paint peels within months of application in high-wear areas.
How common is asbestos in homes built before 1980?
Extremely common. Asbestos-containing materials were used in floor tiles, ceiling tiles, pipe lagging, insulation batts, textured coatings, and joint compound from the early 1900s through the late 1970s. In homes built between 1940 and 1978, multiple asbestos-containing materials are likely present. Testing before any disturbance is the only way to know what you’re working with.
What is a change order and why does it cost more than expected?
A change order is a formal amendment to a construction contract after work has begun. Costs are elevated because work already completed may need to be partially undone, materials may be non-returnable, and subcontractors charge re-mobilization fees when recalled to site. The same modification costs 3–5× more mid-project than it would have cost as a design decision made before construction started.
Is it a mistake to start renovation work before all materials arrive on-site?
For most projects, yes. Starting demolition before materials are confirmed and delivery is scheduled creates extended exposure periods — open subfloors, unprotected framing — that invite moisture infiltration, debris contamination, and material damage. It also creates timeline dependency on supplier lead times that are frequently longer than expected.
Can a renovation mistake affect my home insurance coverage?
Yes. Unpermitted structural or electrical work can void coverage for related claims. Work performed by unlicensed contractors on insured systems (electrical, plumbing, gas) may also provide grounds for claim denial following a related loss event. Insurers investigate the cause of losses — and documentation of permit compliance and licensed contractor work is relevant to that investigation.
All cost ranges are approximate and vary by location, project complexity, and market conditions. Permit requirements, licensing obligations, and regulatory frameworks vary by country, state, and municipality. Consult a licensed contractor, structural engineer, or building department for advice specific to your project.