How to Get Curry Smell Out of a Rental House
-
 Olivia Reed
 - 07 Jun, 2026
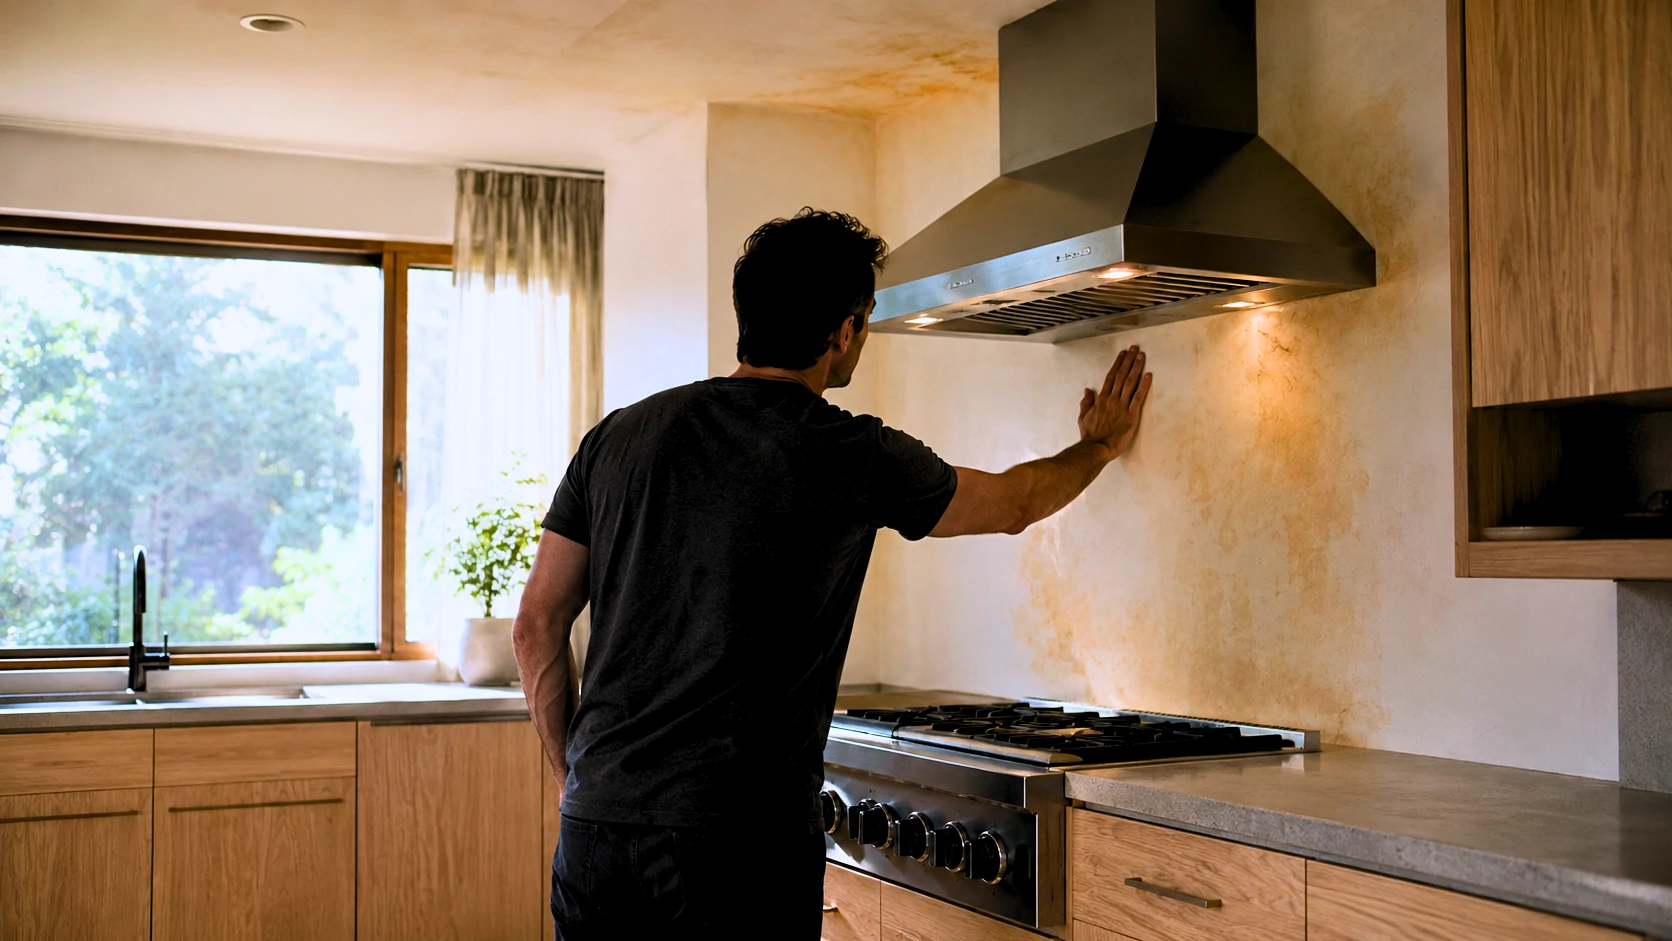
Moving into a rental that carries years of embedded curry smell is one of those problems that makes you question whether anything will actually work. You open every window. You run fans. You try a few sprays and a bowl of baking soda. A week passes. The smell is still there — if anything, it seems worse on warm afternoons.
Here’s the honest explanation for why that happens, and what actually fixes it.
The direct answer: Curry odor is not an air quality problem — it’s a material penetration problem. Spice-based oils called oleoresins and terpene compounds bond to porous building materials, including drywall paper, wood, grout, and the biofilm that forms on HVAC evaporator coils. Cleaning and ventilation remove what’s floating in the air. They do nothing to what’s sitting inside the wall. Permanent remediation requires encapsulating those surfaces with an oil-based or shellac-based blocking primer, fully cleaning the HVAC system (coil and drain pan included), treating or replacing the subfloor beneath any carpet, and using ozone treatment for severe cases — after sealing is complete, not instead of it.
Quick Takeaways
- Ceilings typically hold more embedded odor than walls — cooking vapor rises and deposits on ceiling drywall, particularly above the stove and around recessed fixtures
- KILZ Original (oil-based) outperforms KILZ Restoration for severe cases; Zinsser BIN (shellac) provides the strongest encapsulation and is the professional standard for extreme contamination
- Ozone cannot replace sealing — it oxidizes airborne compounds and surface-adjacent molecules, but doesn’t penetrate porous materials. Run it after priming, not instead of it
- The subfloor beneath old carpet frequently holds years of accumulated odor and will contaminate new flooring if left untreated
- Smell returning after treatment almost always means an unsealed surface or an inadequately cleaned HVAC system — not a failure of the products themselves
- Standard duct cleaning is not full HVAC odor remediation. The evaporator coil and drain pan must be included in the scope
Why Curry Smell Is Harder to Remove Than Other Cooking Odors
Not all cooking odors behave the same way. Bacon grease leaves a surface residue. Garlic creates a strong airborne smell that dissipates over days. Curry is a different problem entirely.
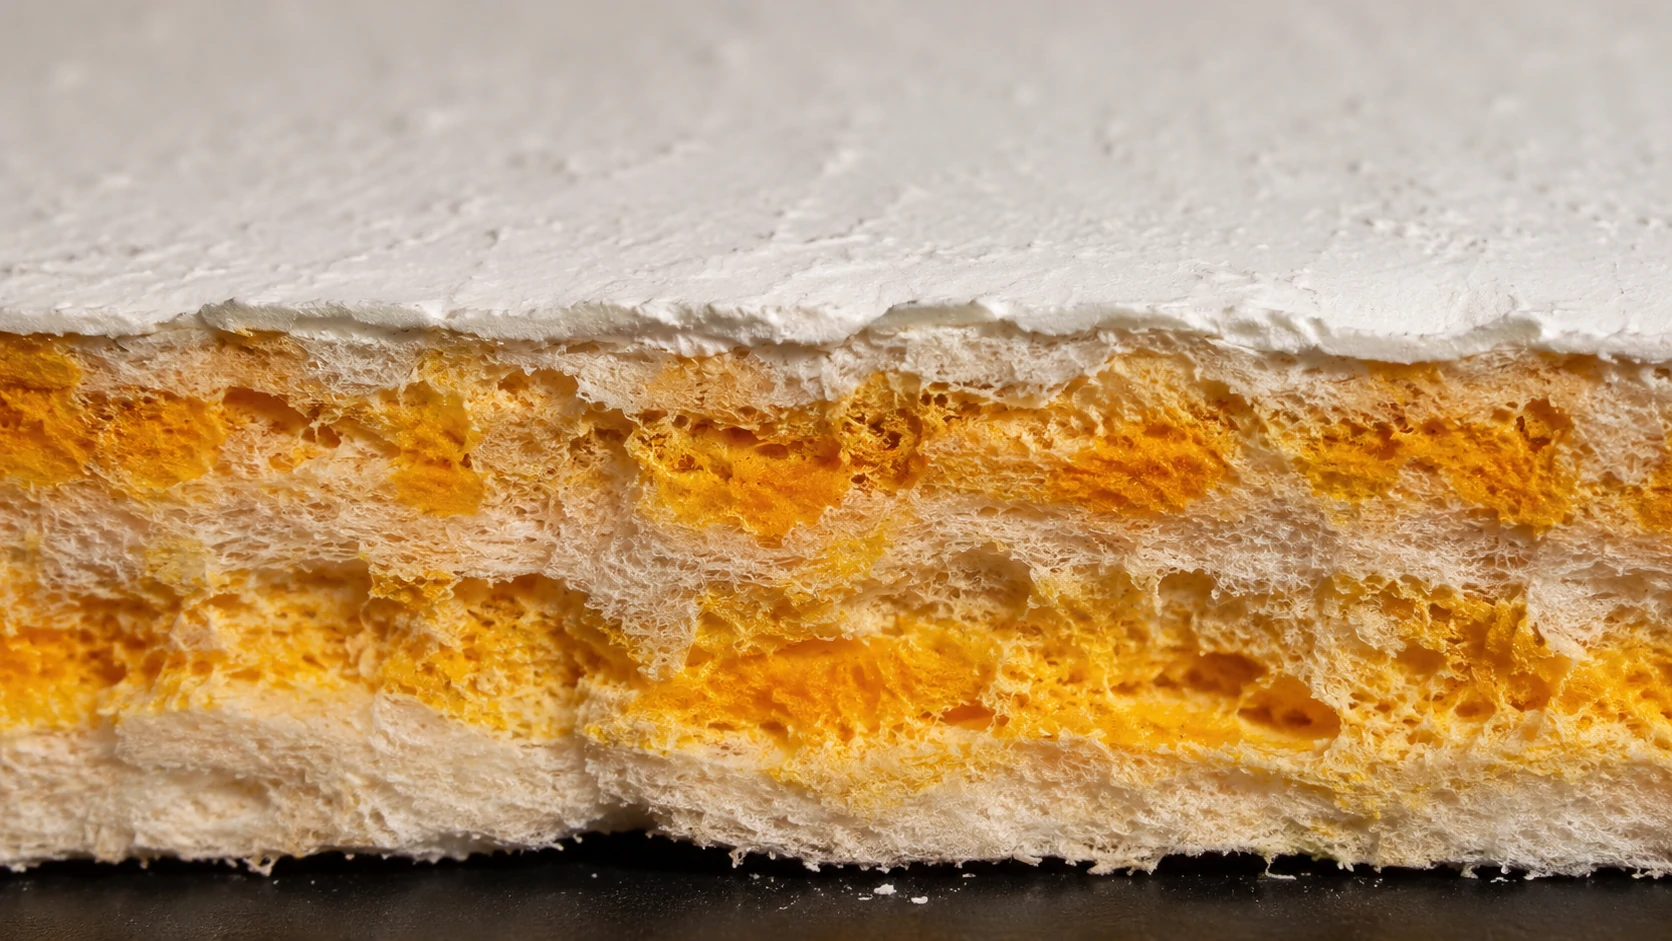
The spice blends used in curry-based cooking — turmeric, cumin, coriander, fenugreek, and others — contain oleoresins and terpene-based volatile organic compounds that are oil-soluble, highly adhesive, and persistent. Curcumin, the active compound in turmeric, is particularly stubborn. It deposits on surfaces as a yellow-orange pigment, bonds chemically to porous materials, and continues volatilizing over time. This means the embedded compound keeps releasing odor even after the cooking stopped years ago.
In practical terms, the smell isn’t floating in the air anymore — it’s inside the wall. The paper facing on drywall is porous enough to absorb these compounds during repeated cooking and trap them permanently at a depth where surface cleaning can’t reach.
This explains why homeowners who scrub thoroughly, paint over everything, and still smell curry on warm, humid days aren’t imagining things. They painted over an active off-gassing source without encapsulating it first. The heat and humidity increased the compound’s volatility, and it pushed right through the finish coat.
Ventilation, baking soda, vinegar wipes, and air purifiers can reduce airborne concentration temporarily. None of them address what’s embedded in the material.
Where Curry Smell Actually Hides
Most remediation attempts that fail do so because they treat 80% of the sources and leave the rest. Whatever is left keeps off-gassing indefinitely. Before starting any treatment, identify every contaminated surface in the property.
Walls are the obvious starting point, but they’re not always the worst. Wall surfaces adjacent to the cooking area accumulate deposits over time, but the extent depends on how the space was used and ventilated.
Ceilings are consistently underestimated — and consistently ignored by most remediation guides. Cooking vapor rises. The ceiling above and around the stove, extending throughout the kitchen and into adjacent rooms, often holds more embedded odor than the walls. The area around recessed light fixtures is especially problematic, because warm air gathers at fixture openings and deposits compounds on the surrounding drywall.
Cabinet interiors — the shelf boards, drawer boxes, and interior cabinet box sides — are raw or minimally finished wood that has absorbed cooking vapors through open cabinet doors for years. These surfaces are heavily contaminated in most homes with persistent curry odor and are almost universally skipped.
Drawer boxes and any paper or cardboard cabinet liners should be removed and discarded. The liner material is too porous to treat effectively.
The subfloor beneath carpet is one of the most overlooked sources in the entire remediation process. Carpet acts as a filter. Over years of use, cooking vapors pass through the carpet and deposit in the padding and the OSB or plywood subfloor beneath. The carpet and padding get removed. The contaminated subfloor stays, and the odor migrates up through whatever new flooring gets installed.
Grout lines in kitchen and dining area tile are highly porous and hold volatile organic compounds from spice oils at a depth that standard cleaning doesn’t reach. The tile itself is usually fine. The grout is not.
HVAC ductwork accumulates odor compounds through particulate settling in ducts over time. This is well-known and usually addressed by duct cleaning.
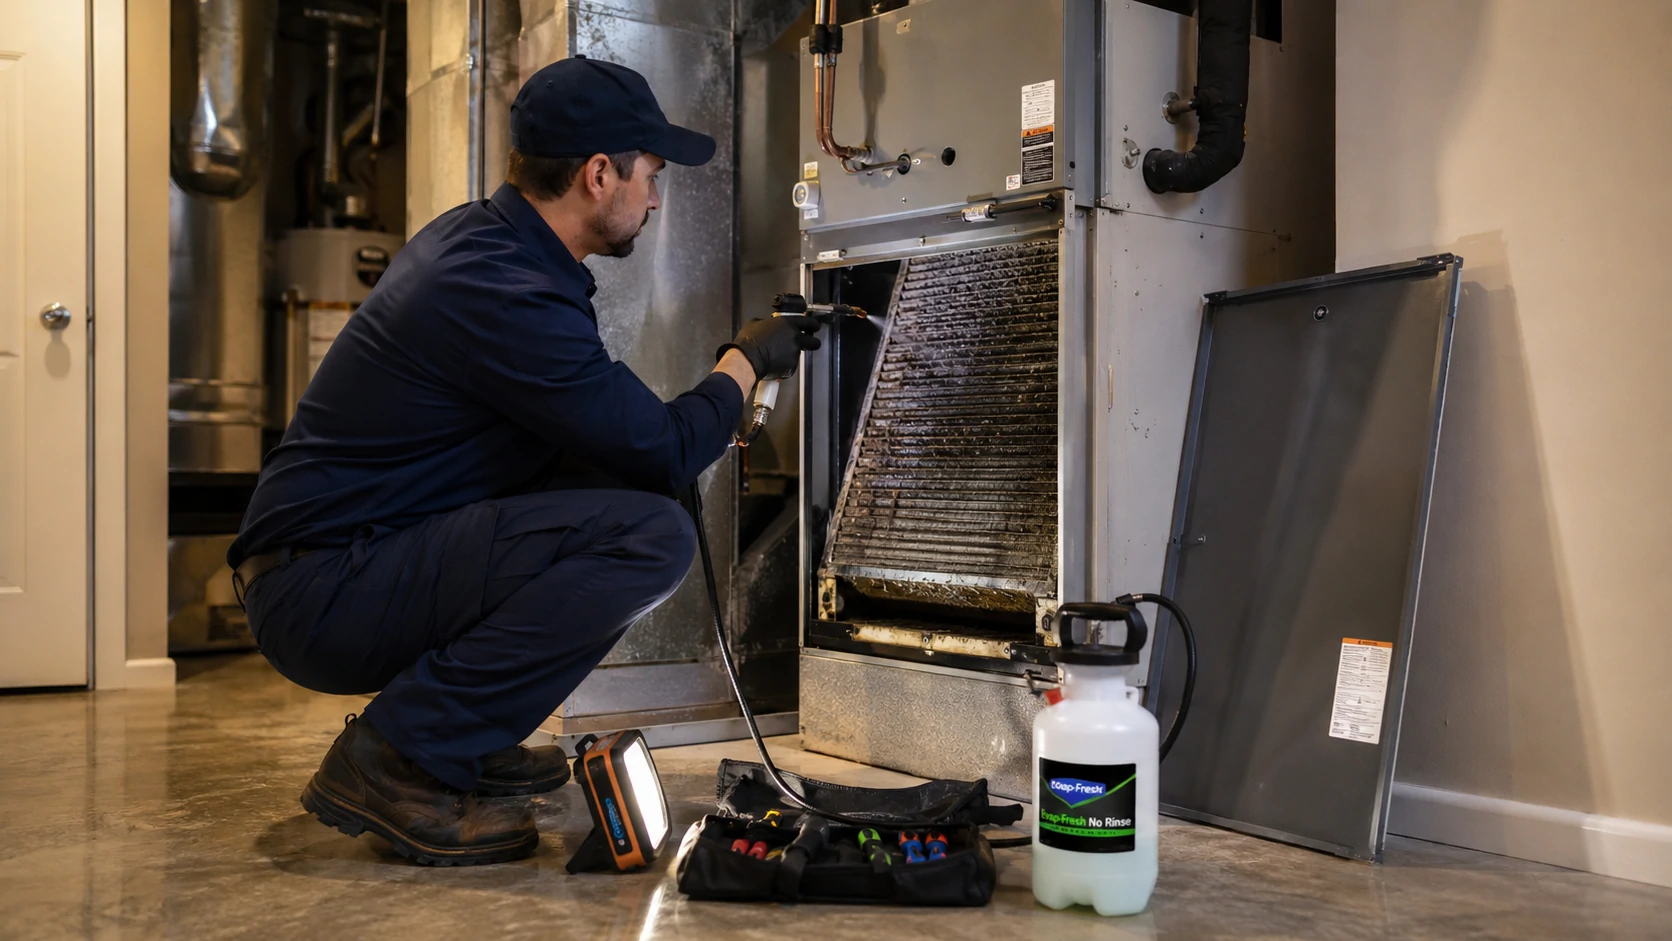
The evaporator coil and drain pan are less well-known but often more problematic than the ducts themselves. The coil surface develops a biofilm — a layer of organic matter that acts as an adhesive for odor compounds. The drain pan beneath it accumulates moisture and organic residue. Standard duct cleaning typically doesn’t touch either of these.
Exhaust fan housings — the actual metal housing of the kitchen range hood and bathroom exhaust fans — accumulate grease and odor compounds in the body of the unit, not just in the removable filters.
Window frames and sills, particularly in kitchens where condensation and cooking vapor repeatedly interact, accumulate surface deposits.
Baseboards and trim — the finished paint surface can be cleaned, but if the underlying wood was never properly primed, it absorbed compounds through the paint layer over time.
Hollow-core interior doors are rarely mentioned in odor removal discussions, but the cardboard honeycomb core inside a standard hollow-core door is surprisingly absorbent. A kitchen door that’s been in daily use during heavy cooking can hold detectable odor even after everything else has been treated.
The Correct Remediation Sequence
The order of operations matters more than most people realize. Working out of sequence means cleaning a surface and then re-contaminating it, or installing new flooring over an untreated subfloor.
Step 1 — Replace HVAC filters immediately Before anything else, install fresh filters. Running the HVAC system during cleaning with contaminated filters recirculates odor compounds back into the space throughout the entire project.
Step 2 — Remove contaminated soft materials Carpet, padding, fabric window treatments, and cardboard cabinet liners need to leave the property. They cannot be treated in place to an acceptable standard when contamination is severe.
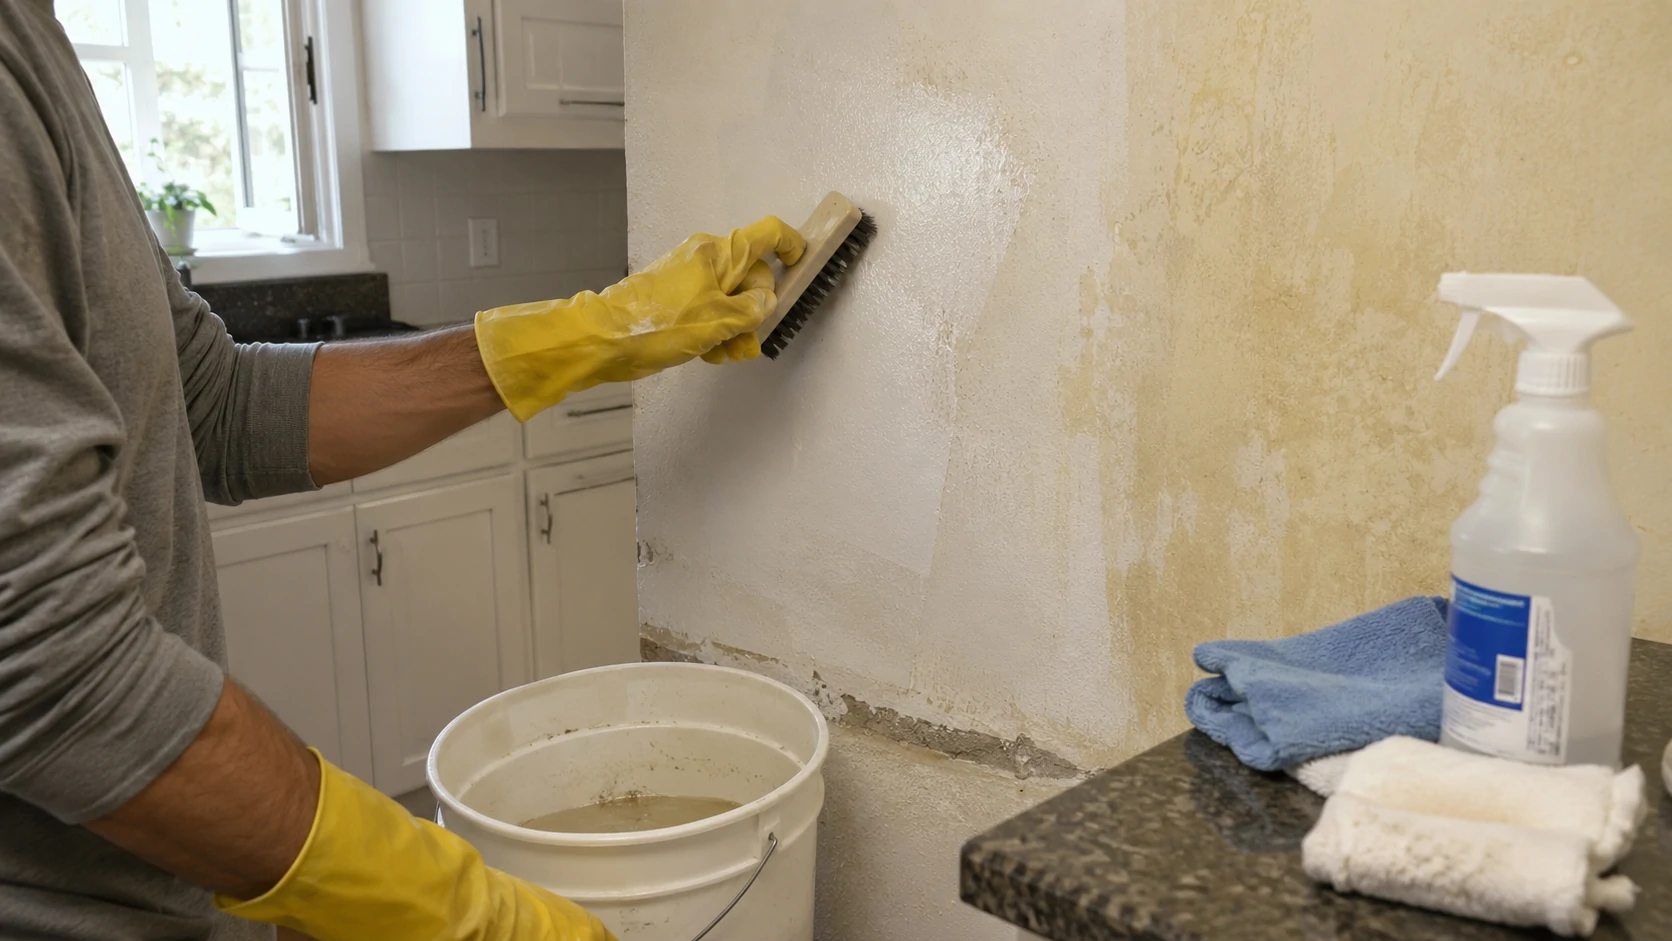
Step 3 — Clean all hard surfaces with TSP solution Trisodium phosphate (TSP) mixed per product instructions — typically ¼ cup per gallon of warm water — removes surface grease, odor residue, and improves primer adhesion significantly. Scrub walls, ceilings, cabinet interiors (interior and exterior surfaces), trim, baseboards, and window frames. Wear chemical-resistant gloves and eye protection; TSP is caustic. Allow surfaces to dry completely before priming — at least 24 hours in a ventilated space.
⚠️ Safety note: TSP should not be used on aluminum, polished metals, or bare wood floors. Rinse surfaces with clean water after scrubbing and before priming.
Step 4 — Schedule full-scope HVAC cleaning Book HVAC cleaning to happen after surface cleaning but before final priming and painting. If the HVAC system runs contaminated air over freshly primed surfaces during the project, compounds will re-deposit on those surfaces. The HVAC cleaning scope must include coil cleaning, not just duct brushing — see Section 6 for exactly what to confirm.
Step 5 — Assess and treat the subfloor After carpet removal, inspect and smell-test the subfloor before any new flooring goes down. If odor is present, prime the subfloor before installation — see Section 7 for the full protocol.
Step 6 — Prime all porous surfaces Walls, ceilings, cabinet interiors, subfloor, trim, and baseboards — every porous surface gets a coat of blocking primer. The primer choice is critical and depends on odor severity. Do not skip the ceiling.
Step 7 — Ozone treatment (when indicated) Ozone is most effective after surfaces are sealed. Running ozone before sealing treats airborne compounds but leaves the embedded source material intact — and the odor returns as the source continues off-gassing. If using ozone, run it after priming and before final paint and flooring installation.
Step 8 — Apply finish paint over dried primer Two coats of quality latex paint over fully cured primer.
Step 9 — Install new flooring Only after the subfloor is treated, ozone cycle is complete, and the space has fully aired.
Step 10 — Final filter replacement Install fresh HVAC filters after all work is complete. This starts the occupancy period with a clean baseline.
Choosing the Right Primer — KILZ Restoration vs. KILZ Original vs. Zinsser BIN

This is the single most important product decision in the entire remediation process, and it’s the one most guides handle vaguely or incorrectly.
KILZ makes multiple products with different base chemistries that perform meaningfully differently on severe cooking odors. Treating “KILZ” as a single solution is a common mistake that leads to incomplete results and repeated priming cycles.
| Primer | Base Chemistry | Odor-Block Level | Best Use Case | Key Limitation |
|---|---|---|---|---|
| KILZ Restoration | Water-based latex | Moderate | Mild to moderate odor; easy cleanup | May not fully encapsulate severe embedded cooking odors |
| KILZ Original | Oil-alkyd | Strong | Moderate to severe odor; established cooking contamination | Slow dry time; solvent cleanup; significant fumes — ventilate well |
| Zinsser BIN | Shellac (alcohol-based) | Highest | Severe odors; years of cooking contamination; extreme cases | Strong application odor; shorter shelf life after opening; cleanup requires ammonia or denatured alcohol |
How to choose:
If the curry smell is moderate and the property wasn’t used for heavy daily cooking, KILZ Restoration is worth testing first. Apply it, let it cure fully — 24 hours minimum — then smell-test the primed surface before painting. If odor is still detectable through the dried primer, the Restoration coat is not sufficient and needs to be followed by KILZ Original or Zinsser BIN before painting.
If the smell is strong, has clearly been accumulating for years, or there is visible yellow-orange staining on wall or ceiling surfaces, start with KILZ Original or Zinsser BIN. Applying Restoration and discovering it’s inadequate costs time and materials without gaining useful ground.
Why shellac outperforms oil and latex:
Zinsser BIN is dissolved shellac — a natural resin — in denatured alcohol. When it dries, it forms a denser, less permeable film than either oil-alkyd or latex primers. The shellac film is essentially non-porous, which is why it’s the professional standard for extreme smoke and cooking odor situations. It encapsulates rather than just covering.
The practical trade-offs are real. Shellac dries to touch in roughly 45 minutes, which is fast enough to create lap marks if application pace is slow. Cleanup requires ammonia or denatured alcohol, not water. The application odor is significant — open windows, run fans, wear a respirator rated for solvent vapors.
Applying BIN over existing Restoration:
If KILZ Restoration is already on the walls and drying hasn’t eliminated the detectable odor, applying Zinsser BIN over the fully dried Restoration coat is a standard and effective approach. Shellac adheres over most dried paint and primer surfaces. This avoids stripping the existing Restoration coat and is commonly used when initial treatment proves insufficient.
Ozone Treatment — What It Does, What It Doesn’t, and Whether You Need It
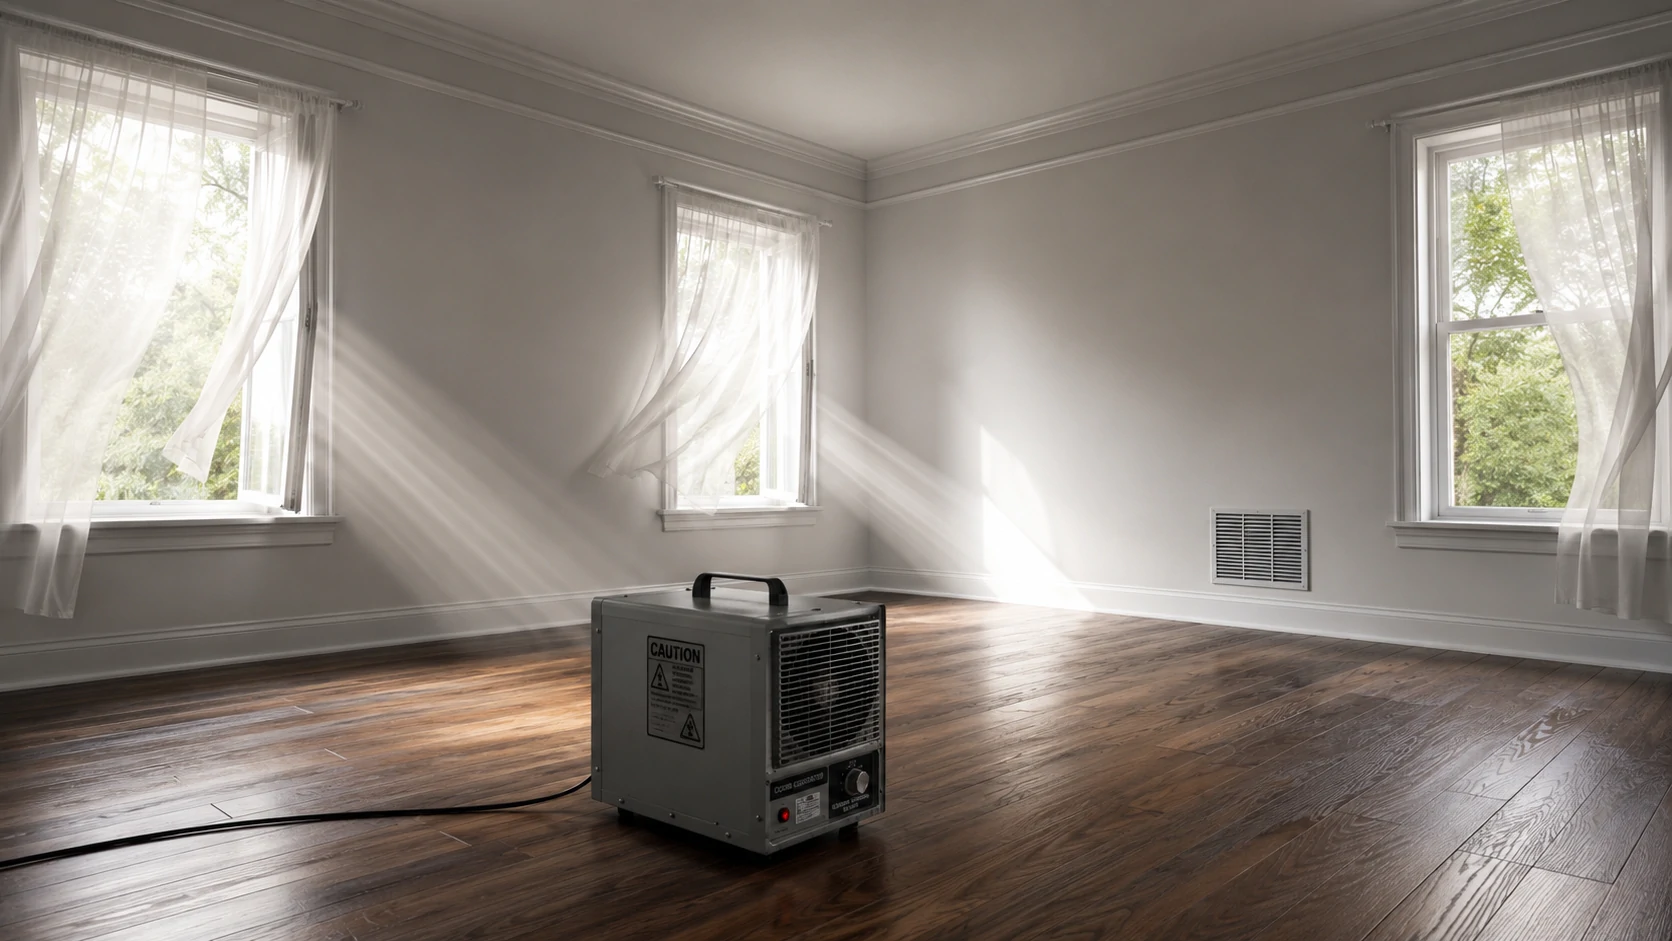
Ozone (O₃) works through oxidation. The unstable third oxygen atom breaks apart odor-causing molecules by attaching to them and disrupting their chemical bonds. It’s effective on airborne volatile organic compounds and on molecules present at or very near the surface of materials. It does not penetrate significantly into porous materials like drywall, OSB subfloor, or wood.
This is where the misunderstanding causes failures. A homeowner ozone-treats a house, the smell disappears, and then returns two weeks later. The ozone eliminated what was airborne and accessible at the surface. The embedded oleoresins inside the drywall paper kept off-gassing after the ozone dissipated. Without sealing first, the ozone treatment addressed the symptom while the source continued.
Ozone is a complement to encapsulating primer. It is not a replacement for it.
⚠️ Ozone Safety — Non-Negotiable Requirements
Ozone is hazardous to humans, pets, birds, and certain materials at treatment concentrations. OSHA’s permissible exposure limit for ozone is 0.1 parts per million. Treatment generators operate at many times this level. The following requirements are not optional:
- Every person and animal must completely vacate the building before treatment begins, including pets in cages and fish tanks (cover tanks and disconnect pumps)
- Post-treatment airing period is a minimum of 4–6 hours with active ventilation before re-entry — longer is safer
- Protect or remove rubber components — refrigerator door gaskets, HVAC rubber seals, rubber weatherstripping, leather furniture
- Electronics and artwork should be removed from treatment areas
- Before re-entering, confirm the generator is off and smell for ozone’s distinctive sharp, metallic scent — if detectable, continue ventilating
- Do not rely on timer-only shutdown; physically verify
Professional vs. Consumer Rental Equipment
Consumer ozone rental units typically generate under 600 mg/hr output. Professional remediation equipment operates at 1,000–4,000 mg/hr or higher. For a full house with severe contamination, a rental unit may require extended run times and still fall short of professional-grade results in larger spaces.
If the home is significantly contaminated and larger than approximately 1,000 square feet, comparing the cost of professional ozone treatment ($200–$600 depending on square footage) against multiple rental days plus the time investment is worthwhile. The gap in equipment output is real.
Hydroxyl Generators — The Occupant-Safe Alternative
Professional remediation companies increasingly use hydroxyl radical generators as an ozone alternative. Unlike ozone, hydroxyl generators can operate with people present, don’t damage rubber or electronics, and are effective on residual airborne compounds after sealing is complete. They act more slowly than ozone, which makes them better suited for ongoing treatment rather than a single shock treatment. Consumer rental availability is limited but growing.
Ozone Decision Framework
| Situation | Recommendation |
|---|---|
| Mild smell, all surfaces fully sealed and painted | Ozone likely unnecessary — ventilate and reassess after 30 days |
| Moderate smell, surfaces sealed but some odor remains | Ozone treatment beneficial as a final step before occupancy |
| Strong smell with unsealed surfaces still present | Seal first — ozone before sealing wastes the treatment |
| HVAC not yet professionally cleaned | Clean HVAC first — the system will reintroduce odor after ozone treatment |
| Considering rental machine for a full house | Understand output limitations; may require extended treatment or multiple cycles |
HVAC Cleaning — What to Actually Ask For
Standard duct cleaning is not full HVAC odor remediation. The difference matters, and many homeowners don’t discover it until the smell comes back through the vents after they’ve paid for a cleaning.
A typical duct cleaning service inserts brushes and vacuums into accessible duct sections to remove accumulated dust and debris. Useful, but insufficient for embedded cooking odors.
Cooking vapor compounds deposit on the evaporator coil surface, which develops a biofilm over time — a layer of organic matter that acts as an adhesive for additional deposits. The drain pan beneath the coil accumulates moisture and organic residue. The air handler cabinet interior holds contaminated material. None of these are reached by duct brushing.
This is the specific reason homeowners report that the curry smell is still strongest at the supply registers even after professional duct cleaning — the duct interiors were cleaned, but the air handler and coil are still contaminated and conditioned air passes through them on every cycle.
HVAC Cleaning Scope Confirmation Checklist
Before booking, confirm every item on this list with the contractor:
- Evaporator/air handler coil will be cleaned with an approved coil cleaner (not just rinsed)
- Drain pan will be cleaned and treated
- Air handler cabinet interior will be vacuumed and wiped down
- All filters and media will be replaced at the end of service
- Return air plenum (the large return box near the air handler) is included in the scope
- All supply and return registers will be removed, cleaned, and reinstalled
- Kitchen range hood ductwork run will be included if accessible
A contractor who confirms the full list above is performing complete HVAC odor remediation, not just duct vacuuming. Expect a higher invoice — typically $300–$550 versus $150–$200 for a basic duct cleaning. The additional scope is the correct investment for an odor remediation situation.
On scheduling: A common mistake is completing all surface work and then scheduling HVAC cleaning as a final step. If the system runs contaminated air over freshly primed or painted surfaces during the project, compounds can re-deposit on those new surfaces. Schedule HVAC cleaning to coincide with the mid-project phase — after TSP cleaning, before or during the priming stage.
Carpet Removal and Subfloor Assessment
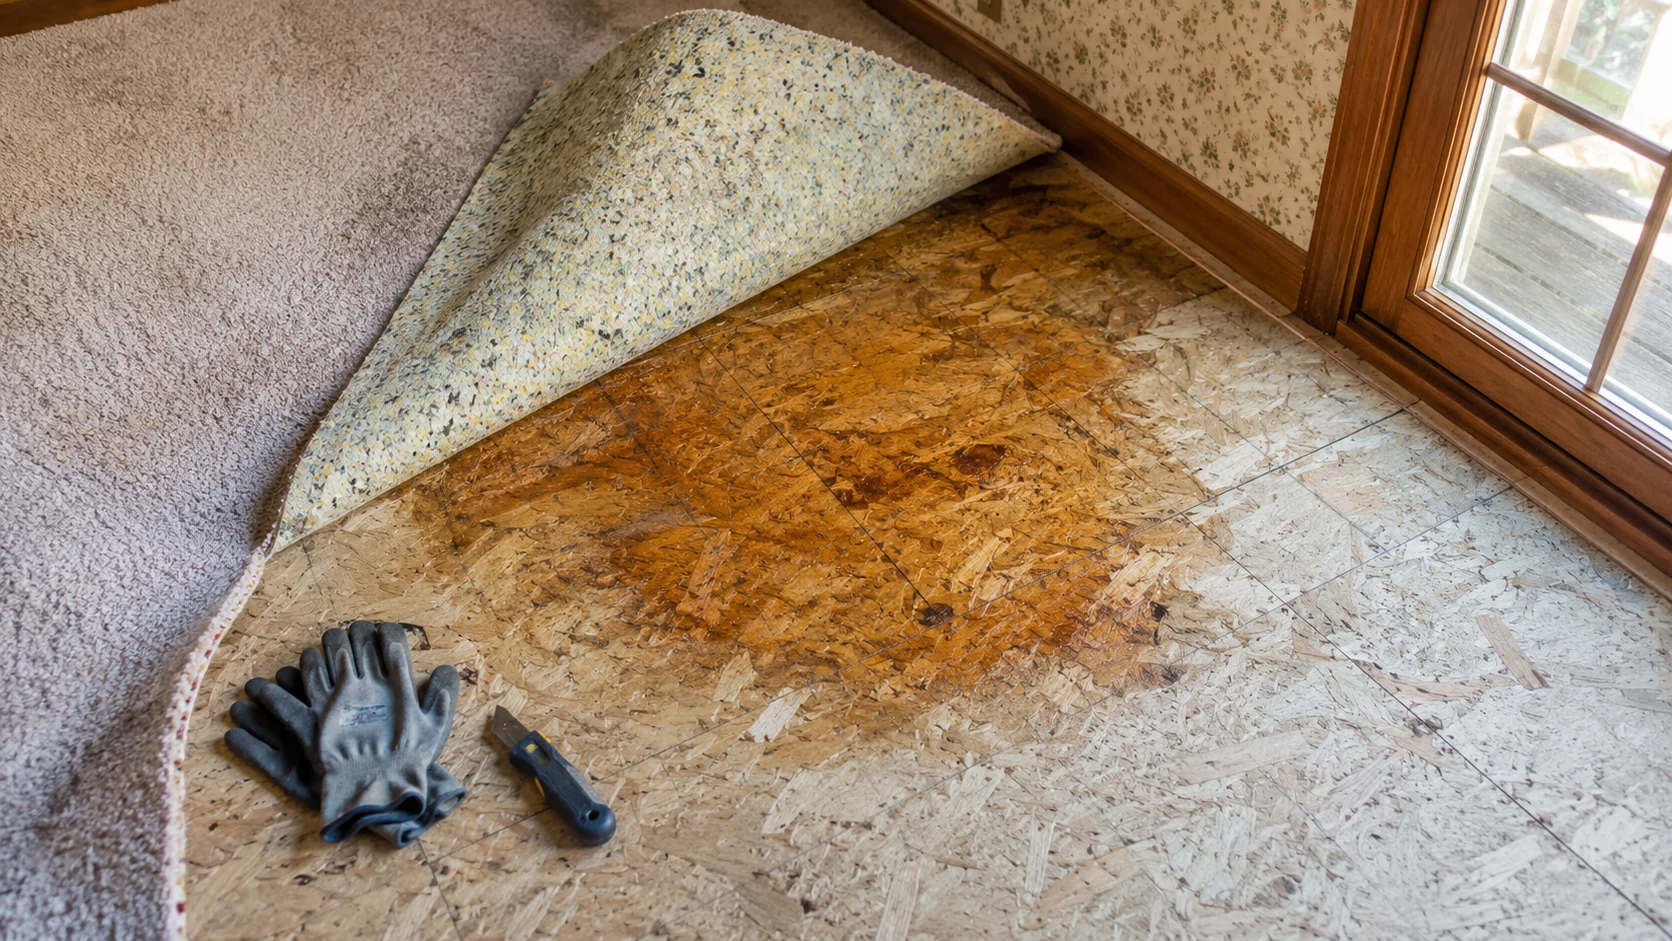
Carpet in a home with years of curry odor is not salvageable through cleaning. The fibers, padding, and often the subfloor beneath have absorbed volatile compounds beyond the threshold that any in-place treatment can address. Remove carpet and padding entirely and dispose of them.
After removal, the critical step that most remediation guides skip entirely: assess the subfloor before installing anything new.
Subfloor Assessment Checklist
- Perform a smell test at floor level immediately after carpet and padding removal (before ambient odor dissipates)
- Visually inspect the OSB or plywood surface for yellow, orange, or brown discoloration, particularly in kitchen-adjacent and high-traffic areas
- Check seams and fastener points where vapors can penetrate over time
- Note any soft spots or moisture-related damage (separate issue, but worth flagging during assessment)
If odor is detectable in the subfloor:
Apply one coat of KILZ Original or Zinsser BIN across the entire subfloor surface, including seams and fastener areas. Allow full cure. Smell-test again before flooring installation. If odor is still detectable through one dried coat, apply a second before proceeding.
When the subfloor may need replacement:
If the OSB or plywood shows significant saturation — particularly in homes where cooking happened on upper floors, or where subfloor has prolonged contact with heavily contaminated carpet padding — replacement may be more practical than continued priming. The specific indicators are:
- Primer coat shows yellow or orange bleed-through discoloration within 24 hours of application (oleoresin is migrating through the primer before it cures)
- Odor remains clearly detectable through two full, dried coats of shellac primer
- Visible organic staining is deep and extensive rather than limited to isolated areas
In these cases, cutting out and replacing the affected subfloor section, then priming the new OSB and the surrounding framing before flooring installation, is the more reliable outcome.
New flooring timing: Never install new flooring before the subfloor smell test passes and primer has fully cured. The odor migrates upward through even non-porous flooring materials via the edges, seams, and expansion gaps.
Surfaces Most People Miss
These are the overlooked sources that cause smell to return after a homeowner has completed what they believe is a full remediation.
Cabinet interiors — the shelf boards, interior box sides, and drawer boxes inside kitchen cabinets are raw or minimally finished wood that has been absorbing cooking vapors for years. Cleaning with TSP, followed by primer application inside each cabinet, is tedious. It’s also necessary. One consistently missed cabinet is the one immediately above the stove, where heat-driven vapor rises directly into the cabinet interior.
Grout lines — kitchen tile is easy to wipe down. The grout between tiles is porous and holds oleoresins at a depth that surface cleaning doesn’t address. After TSP scrubbing, allow grout to dry fully, then apply a penetrating grout sealer. This step is almost universally absent from competing remediation guides.
Ceiling light fixture boxes — recessed lighting creates gaps in ceiling drywall where warm, contaminated air has been gathering for years. Wipe down the interior of each fixture box with TSP solution and prime the surrounding ceiling drywall with extra attention and coverage.
Exhaust fan housing — the range hood and bathroom exhaust fan housings, not just the replaceable filters, accumulate grease and odor compounds in the sheet metal body. Where possible, remove the fan assembly and clean the housing interior with degreaser before replacing with new filters.
Window sills and frames — particularly wooden sills in kitchen areas where condensation and cooking vapor interact repeatedly. These are visually easy to overlook during surface prep.
Hollow-core interior doors — the cardboard honeycomb core inside a standard hollow-core door is absorbent. A kitchen door in daily use during years of heavy cooking can hold measurable odor. Prime all door surfaces, including both sides and edges. If smell persists in a room where every other surface has been treated, temporarily remove the door and compare odor levels. Replacement is the permanent solution when the door is the remaining source.
Return air vent surroundings — the drywall immediately adjacent to return air vents is often more contaminated than surrounding wall surface, because return vents draw air (and airborne compounds) across that area continuously. It’s frequently undertreated because it doesn’t look different from the rest of the wall.
Cost Breakdown — DIY vs. Professional Remediation
One of the more frustrating discoveries mid-project is that incremental DIY spending can quietly approach professional remediation costs without achieving equivalent results. This comparison helps make that decision clearly.
| Item | DIY Cost Range | Professional Cost |
|---|---|---|
| TSP cleaning supplies | $15–$40 | Included in service |
| KILZ Original, per gallon | $30–$42 | Included in service |
| Zinsser BIN, per quart | $24–$30 | Included in service |
| HVAC full-scope cleaning | $300–$550 | $300–$550 |
| Ozone machine rental (per day) | $50–$100 | N/A |
| Professional ozone treatment | N/A | $200–$600 |
| Carpet removal (self-performed) | Disposal fees only | $1–$2 per sq ft (labor) |
| Subfloor primer treatment | $40–$80 | Included in service |
| Full professional odor remediation | N/A | $800–$2,500+ |
For a moderate case in a 1,200 sq ft rental — TSP supplies, two gallons of KILZ Original, HVAC full-scope cleaning, two days of ozone rental, and subfloor primer — DIY material costs typically run $500–$750 before any labor consideration.
Two additional realities worth factoring in:
Failed first rounds have real costs. If KILZ Restoration was purchased and applied before discovering it’s insufficient for the contamination level, that’s $25–$35 per gallon spent without resolution, plus the time to reprime. Multiple partial attempts compound quickly.
Professional mobilization is one event. A professional remediation company that completes the project correctly in a single mobilization at $1,200–$1,500 can be cost-equivalent to a drawn-out DIY process on a badly contaminated property — with better equipment and a cleaner outcome.
The calculation shifts clearly toward professional remediation when: the property exceeds 1,500 square feet, the HVAC system is complex or difficult to access, subfloor replacement becomes necessary, or more than two complete DIY treatment cycles have been attempted without resolving the odor.
When DIY Is Not Enough
The full DIY protocol described in this guide resolves most curry odor situations in rental properties. But there are clear indicators that the contamination level exceeds what consumer products and rental equipment can handle. Recognizing these early prevents continued spending on a situation that requires professional equipment.
⚠️ Consider professional remediation when any of the following apply:
- Smell returns within two to three weeks of completing the full treatment sequence — TSP cleaning, oil-based or shellac primer on all surfaces, full-scope HVAC cleaning, ozone treatment
- Odor is still detectable after two full coats of shellac-based primer on the same surface, after both coats have cured completely
- Smell is strongest at HVAC supply registers despite confirmed coil and drain pan cleaning — suggests contamination is deeper in the air handler or the system has a component that wasn’t addressed
- Primer bleeds through with yellow or orange discoloration within 24 hours of application, indicating oleoresin saturation at a level topical treatment cannot contain
- Subfloor requires replacement and the project scope is expanding significantly
- The property was used for commercial cooking, large-scale food preparation, or catering
Professional odor remediation companies have access to equipment that is not available at consumer rental counters: high-output ozone generators, hydroxyl radical machines, thermal foggers that carry encapsulant deep into porous surfaces, and commercial-grade sealants. For a severely contaminated property, the gap between professional capability and DIY capability is real and meaningful.
If two full rounds of DIY treatment have been completed with continued odor presence, a professional assessment before additional material investment is the right next step. A remediation company can identify what was missed and give a specific estimate — which may confirm the remaining work is DIY-manageable or clarify that professional equipment is needed to cross the finish line.
Frequently Asked Questions
Is KILZ Restoration strong enough for severe curry smell, or do I need the oil-based KILZ Original?
KILZ Restoration (water-based) is adequate for mild to moderate odors where the smell is noticeable but not overwhelming. For severe, long-standing curry contamination — strong odor, visible staining, years of cooking — KILZ Original (oil-based) or Zinsser BIN (shellac) is the appropriate starting point. The latex binder in Restoration forms a less dense film than oil or shellac. If Restoration has already been applied and odor is still detectable through the dried primer, apply a coat of Zinsser BIN over it before painting.
Will curry smell come back after priming and painting if I skip ozone?
If every porous surface is fully and correctly sealed with quality blocking primer, ozone is not strictly necessary. Ozone eliminates residual airborne compounds after encapsulation is complete — it doesn’t replace encapsulation. Smell returning after a seemingly complete treatment almost always indicates a missed surface (cabinet interiors, ceilings, hollow-core doors, grout) or an HVAC system that wasn’t fully cleaned, not the absence of ozone.
What does an ozone machine actually do that cleaning and priming doesn’t?
Ozone oxidizes volatile organic compounds present in the air and at the surface layer of materials by attaching an unstable oxygen atom to odor molecules and breaking them apart chemically. Cleaning removes surface residue. Primer encapsulates embedded compounds. Ozone addresses what remains airborne and surface-accessible after those steps. The three methods target different parts of the problem — they’re complementary, not interchangeable.
How long does a house need to air out after ozone treatment before it’s safe to re-enter?
A minimum of 4–6 hours with active ventilation — windows open, fans running. Larger generators or longer treatment cycles need proportionally longer airing time. Test by smell before entry: ozone has a sharp, distinctive metallic or electrical odor. If it’s detectable at the door, continue ventilating. Don’t shorten this step.
Can curry smell embed in drywall permanently, or does sealing always work?
Without encapsulation, yes — oleoresins bonded to drywall paper can off-gas for years. Proper sealing stops the off-gassing by creating a barrier between the embedded compound and the air. In extreme cases where drywall is heavily saturated and shellac primer bleeds through within 24 hours even after two coats, replacing the affected drywall section and priming the new material before finishing is the more reliable outcome than additional primer layers.
My HVAC was professionally cleaned but I can still smell curry from the vents. What was missed?
The most common answer is that the evaporator coil and drain pan were not cleaned — only the duct interiors were vacuumed. Cooking odor compounds embed in the biofilm on coil fins and in organic residue in the drain pan; standard duct brushing doesn’t address either. Contact the company and ask specifically whether the coil was cleaned with an approved coil cleaner and whether the drain pan was treated. If those items weren’t in scope, schedule a supplementary coil cleaning.
Should I prime the subfloor after removing carpet before laying new flooring?
Yes, if any odor is detectable after carpet and padding removal. New flooring installed over an untreated contaminated subfloor will carry the odor upward through seams, edges, and expansion gaps. Prime with KILZ Original or Zinsser BIN, allow full cure, and smell-test the primed surface before flooring installation.
Does Zinsser BIN shellac primer work over KILZ Restoration that’s already on the walls?
Yes. Shellac adheres over most dried surfaces, including dried latex primer. Allow the Restoration coat to fully cure, lightly sand if the surface is very smooth or glossy for better adhesion, then apply BIN. This combination is commonly used when an initial water-based treatment proves insufficient.
Will a HEPA air purifier eliminate curry smell, or does it just mask it?
HEPA filters capture particulates — airborne particles, dust, and some larger molecules. They have limited effect on volatile organic compounds like the ones responsible for curry odor, which are gas-phase and pass through HEPA media. A purifier that combines HEPA with a substantial activated carbon filter layer will capture some VOCs, but it’s managing the symptom rather than eliminating the source. Air purifiers are a reasonable supplementary measure during and after remediation — not a substitute for encapsulation.
What questions should I ask an HVAC contractor before booking?
Ask specifically whether the scope includes: evaporator coil cleaning with an approved coil cleaner, drain pan cleaning and treatment, air handler cabinet interior cleaning, all filter replacement at completion, return air plenum cleaning, and register cleaning. A contractor who confirms the full list is offering genuine odor remediation scope. One who hedges on coil and drain pan cleaning is quoting standard duct vacuuming, which is insufficient for cooking odor situations.
Can hollow-core interior doors really hold onto curry smell?
The cardboard honeycomb core inside a standard hollow-core door is porous and absorbent. A kitchen door with years of daily use during heavy cooking can hold detectable odor even after every other surface in the room has been treated. If smell persists in a room where everything else is addressed, temporarily remove the door and compare odor levels over 24 hours. If the room improves significantly, the door is a source. Prime all surfaces of the door, including edges, or plan for replacement.
At what point is replacing drywall more practical than continuing to prime?
When two full coats of shellac primer show bleed-through discoloration within 24 hours of application, or when odor remains clearly detectable through two dried shellac coats, the contamination level in that section of drywall may exceed what any topical sealant can contain. At that threshold, cutting out and replacing the affected section, priming the new drywall and the surrounding framing before finishing, is more practical than adding more primer layers.
Is professional hydroxyl treatment a better option than ozone for occupied homes?
Hydroxyl generators are safer around occupants, don’t degrade rubber or electronics, and are effective on residual airborne compounds after sealing. They operate more slowly than ozone, which makes them better suited for ongoing maintenance treatment than a single concentrated shock treatment. For a vacant property being prepared for occupancy, professional ozone with proper evacuation protocol is generally faster. For a situation where the space needs to remain partially occupied during treatment, hydroxyl generation is the more practical option.