Bathroom Remodel Ideas Before and After: One Dated Full Bath, Completely Transformed
-
 Olivia Reed
 - 13 Jun, 2026
Quick Answer: A full bathroom remodel transforming a dated tile-and-chrome bathroom into a modern double-vanity space with matte black hardware, large-format tile, and a patterned wallpaper accent wall typically costs $8,000–$25,000 depending on scope. The cosmetic upgrades shown here — vanity swap, new tile throughout, hardware change, wallpaper accent wall — are where the visual transformation lives. Plumbing and electrical work are the cost variables that push the range up or down the most.
Quick Takeaways
- The five upgrades with the most visual impact per dollar: vanity, hardware finish, floor tile, wallpaper accent wall, ceiling texture removal
- Matte black hardware costs under $500 for a full bathroom set and creates immediate high-contrast visual impact
- Peel-and-stick wallpaper only works reliably in bathrooms with a functioning exhaust fan — no exceptions
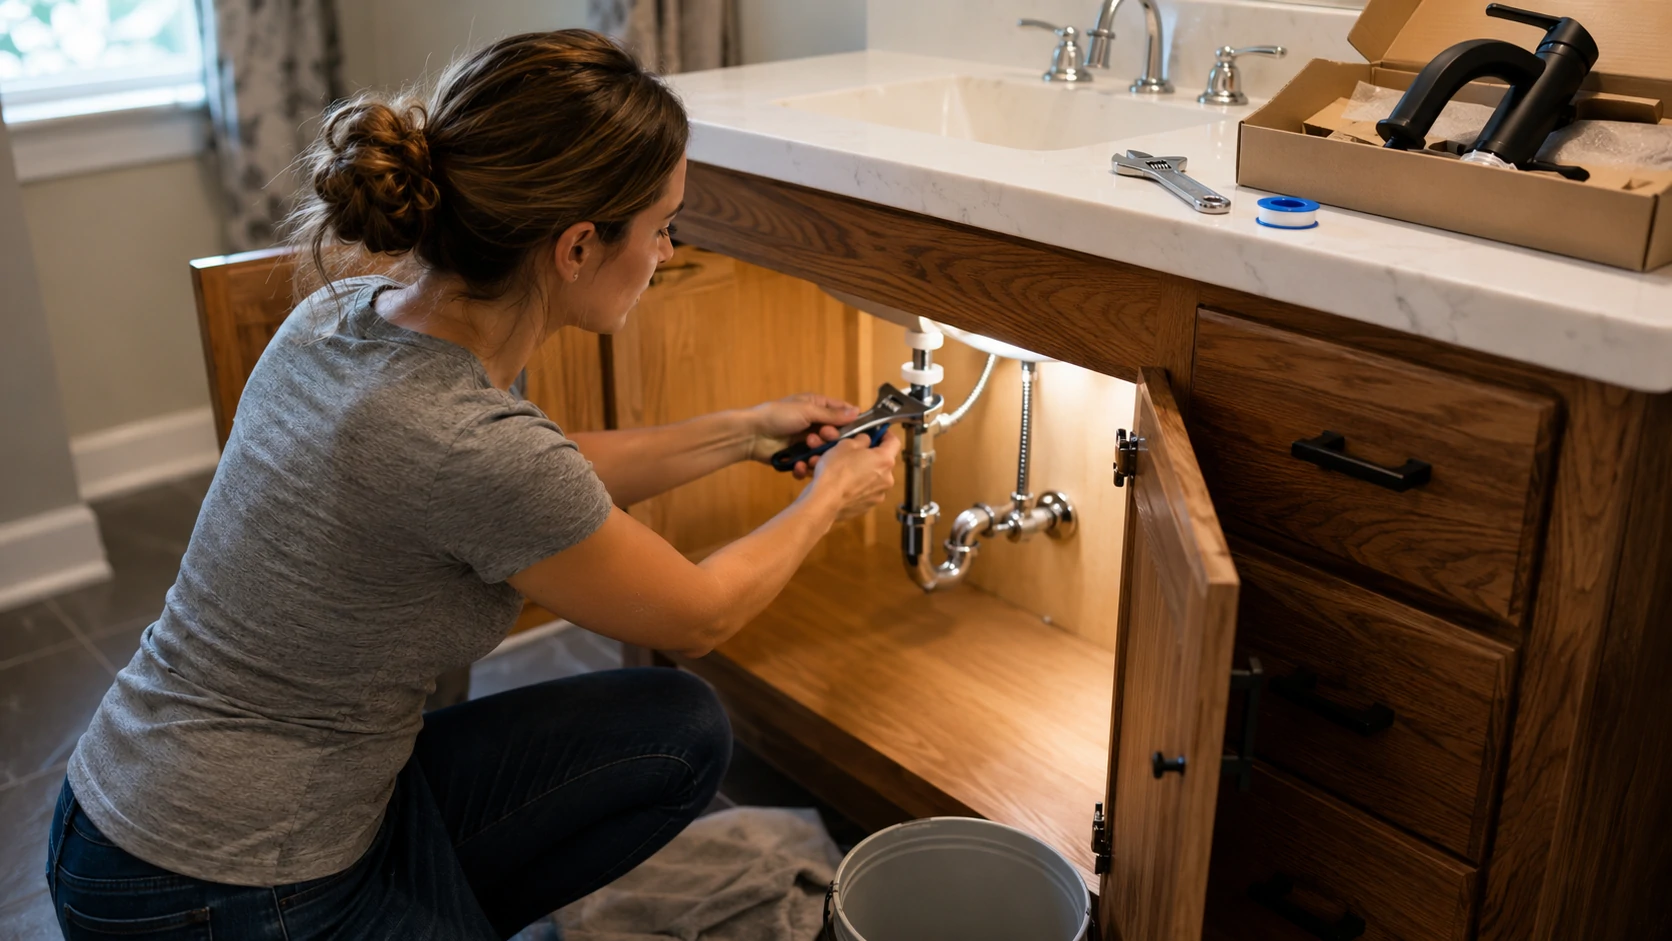
- A double vanity conversion is either a $300–$400 vanity swap or a $3,000 plumbing job, depending entirely on where your existing drain rough-in sits
- Large-format floor tile requires rectified tile (precision-cut) to achieve the minimal grout joints that actually make a small bathroom look bigger
- Built-in shower niches must be waterproofed with a membrane before tiling — tiling over drywall backer alone causes water infiltration within 2–5 years
- Popcorn ceilings in pre-1978 homes require asbestos testing before any removal begins
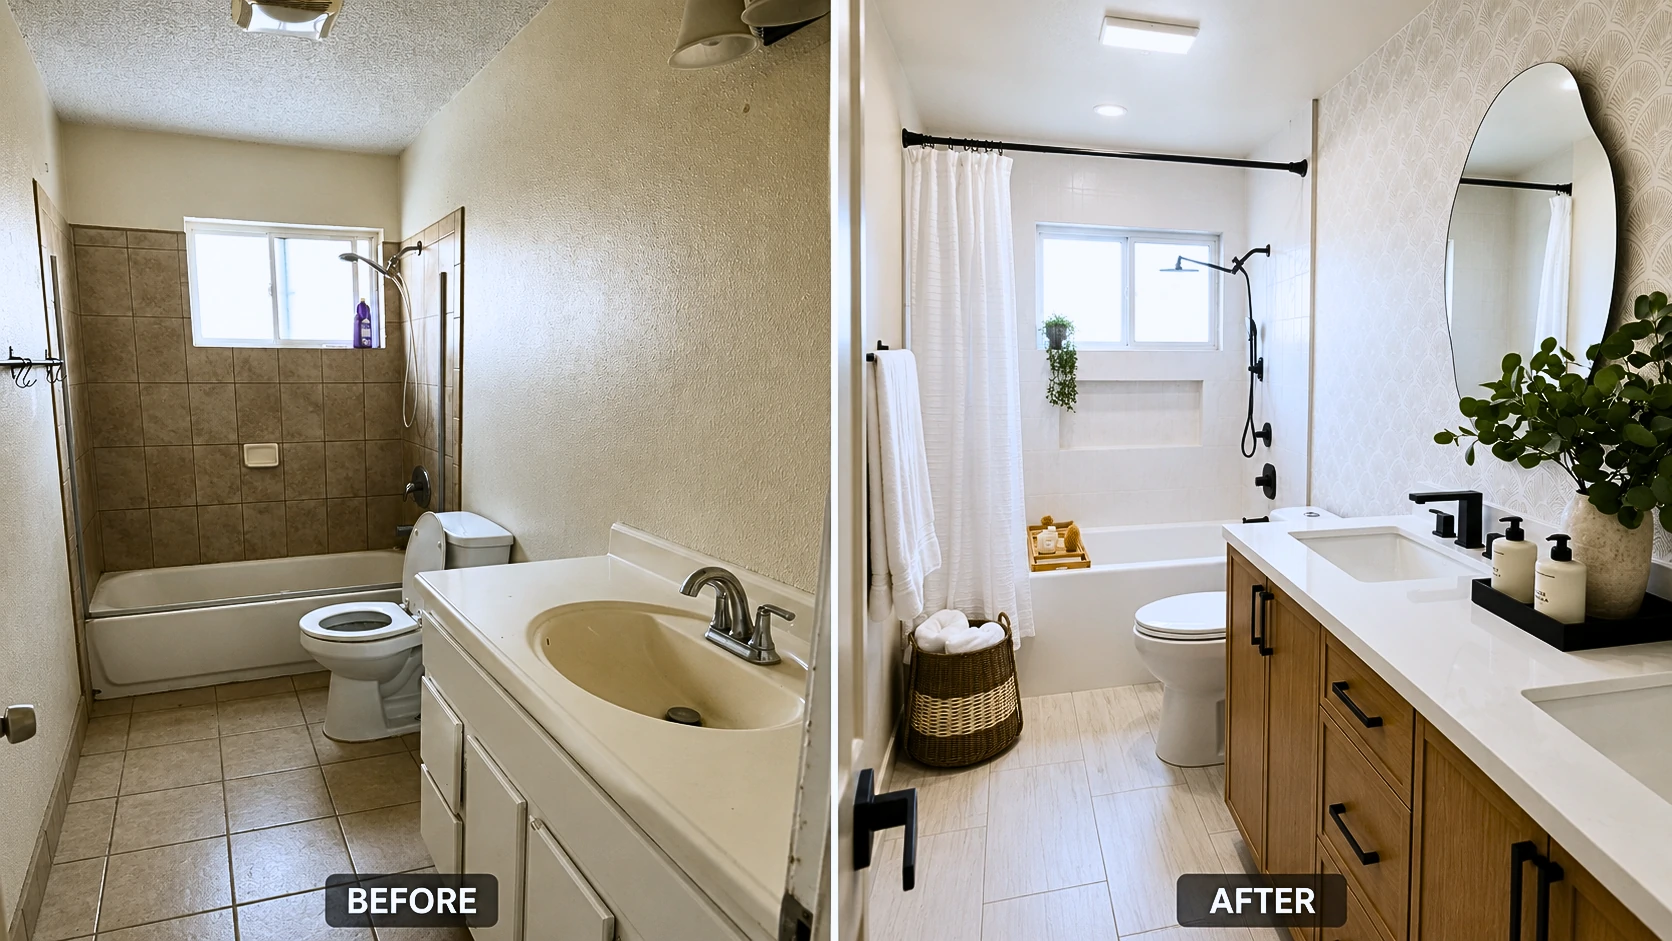
There’s a kind of bathroom that exists in millions of homes. Brown ceramic tile climbing the tub wall. Popcorn ceiling doing nothing useful. A single white vanity with an integrated drop-in sink and chrome faucet that’s technically functional but looks like it belongs to a different decade entirely. A floor that’s never quite clean-looking even right after you mop it.
That’s exactly what this bathroom was before this remodel.
And that’s precisely what makes this transformation worth unpacking in detail — because it started from a real place. Not a designer’s staged canvas. Not a luxury renovation with an unlimited budget. Just a dated bathroom that a lot of homeowners look at every single morning and think: there has to be a better version of this room.
If any of that sounds like your bathroom, this article will actually be useful to you.
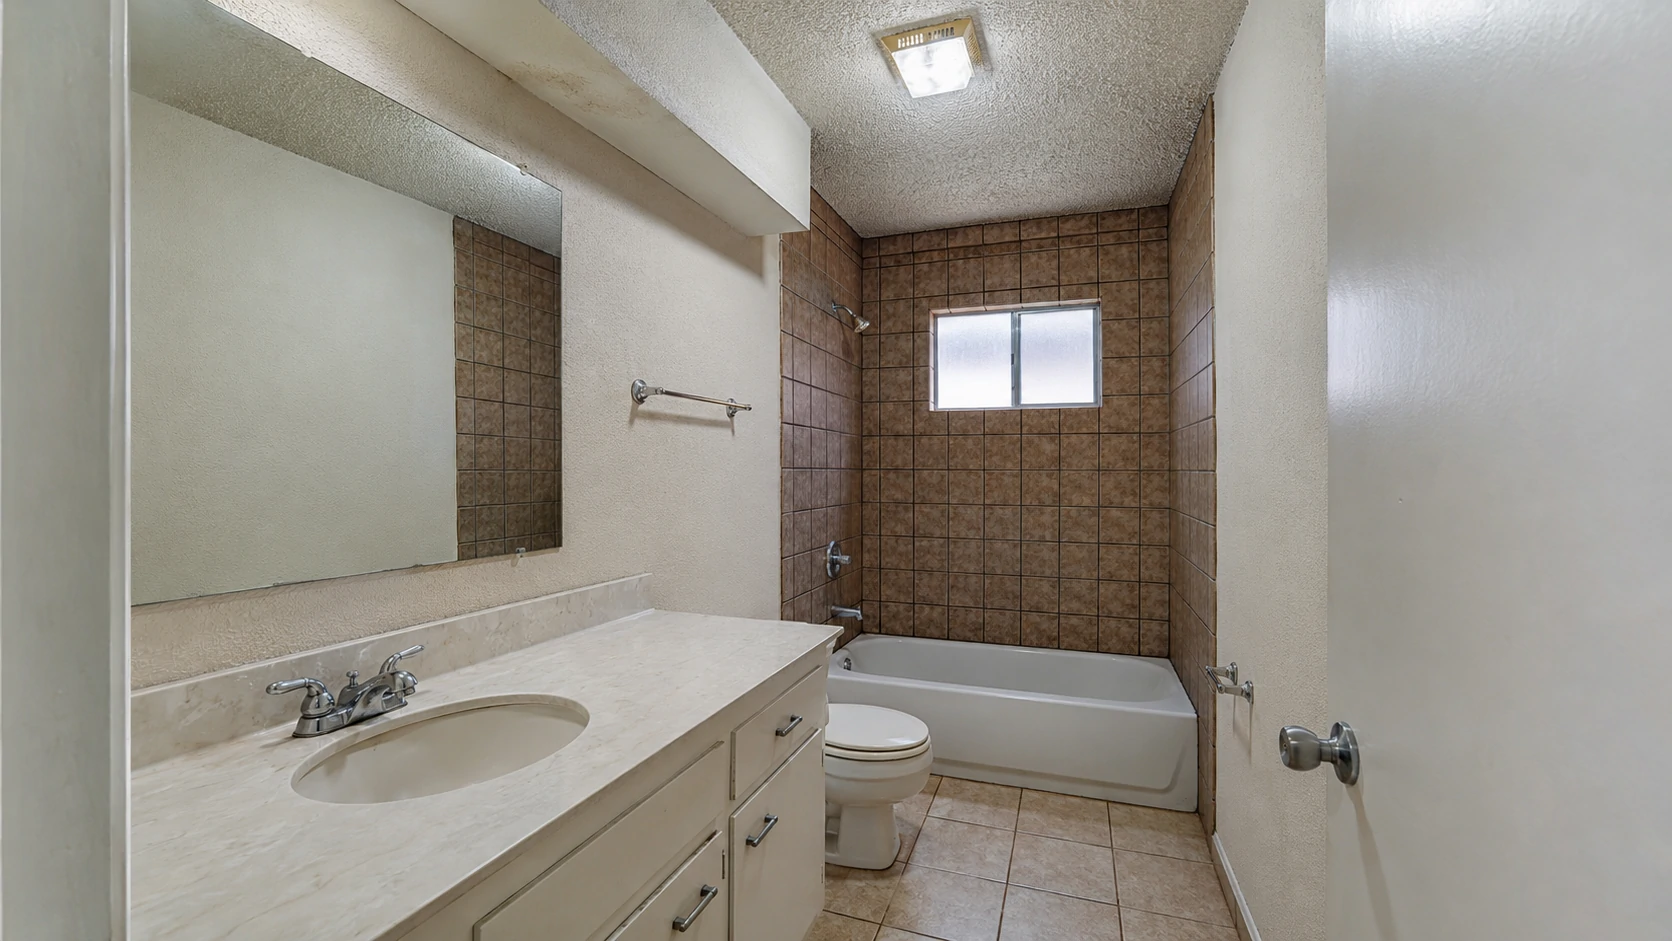
The Before State: What This Bathroom Actually Looked Like
Before the contractor touched anything, here’s what existed:
Ceiling: Thick popcorn texture. The kind that diffuses overhead light and makes even a decently lit room feel cave-like. It wasn’t just visual — the texture absorbed and scattered light instead of reflecting it, which made the entire room feel dimmer than it was.
Tub surround: Brown 12×12” ceramic wall tile, floor-to-ceiling on the tub wall. The grout had darkened significantly with age — not from neglect, just from years of being wet tile grout. No niche, no storage ledge, no visual interest. The chrome shower valve and tub spout sat against that brown tile like fixtures forgotten in place.
Floor: Builder-grade ceramic in a tan/beige tone — 12×12” tiles set with standard grout joints. The kind of floor tile that looks slightly dated the moment it goes in and gets progressively more so over time. The grout lines had discolored. The floor pattern had no visual direction to it.
Vanity: Single white drop-in vanity with an integrated cultured marble top and oval single-basin sink. Chrome faucet, chrome pulls, white painted MDF cabinetry. Functional. Nothing more.
Walls: Orange-peel texture throughout. No focal point. No accent, no color, no visual layering of any kind.
Fixtures: Chrome everywhere — shower valve, tub spout, towel bar, toilet paper holder, door hardware. All the same finish. All forgettable.
Lighting: A single flush-mount ceiling fixture. No recessed lighting, no vanity light bar — just the one fixture doing all the work, poorly.
There was no hidden disaster here — no water damage behind the tile during demo, no rotted subfloor, no significant structural surprises. This homeowner was lucky on that front. But the bathroom hadn’t changed meaningfully in thirty years. It looked exactly like that.
What Changed: The Complete Upgrade Breakdown
The transformation across these photos wasn’t one big move. It was ten deliberate ones that compound on each other visually.
Flooring
The old 12×12” beige ceramic came out completely. What replaced it: large-format light gray tile in a plank format — approximately 12×24” — laid in a running bond pattern with minimal grout joints.
The floor is probably the first thing that registers differently, even in a thumbnail. The old tile had roughly double the grout lines per square foot. The new floor has almost none, which is what makes a small bathroom feel like it has more square footage than it actually does. More on this mechanism in the flooring section below.
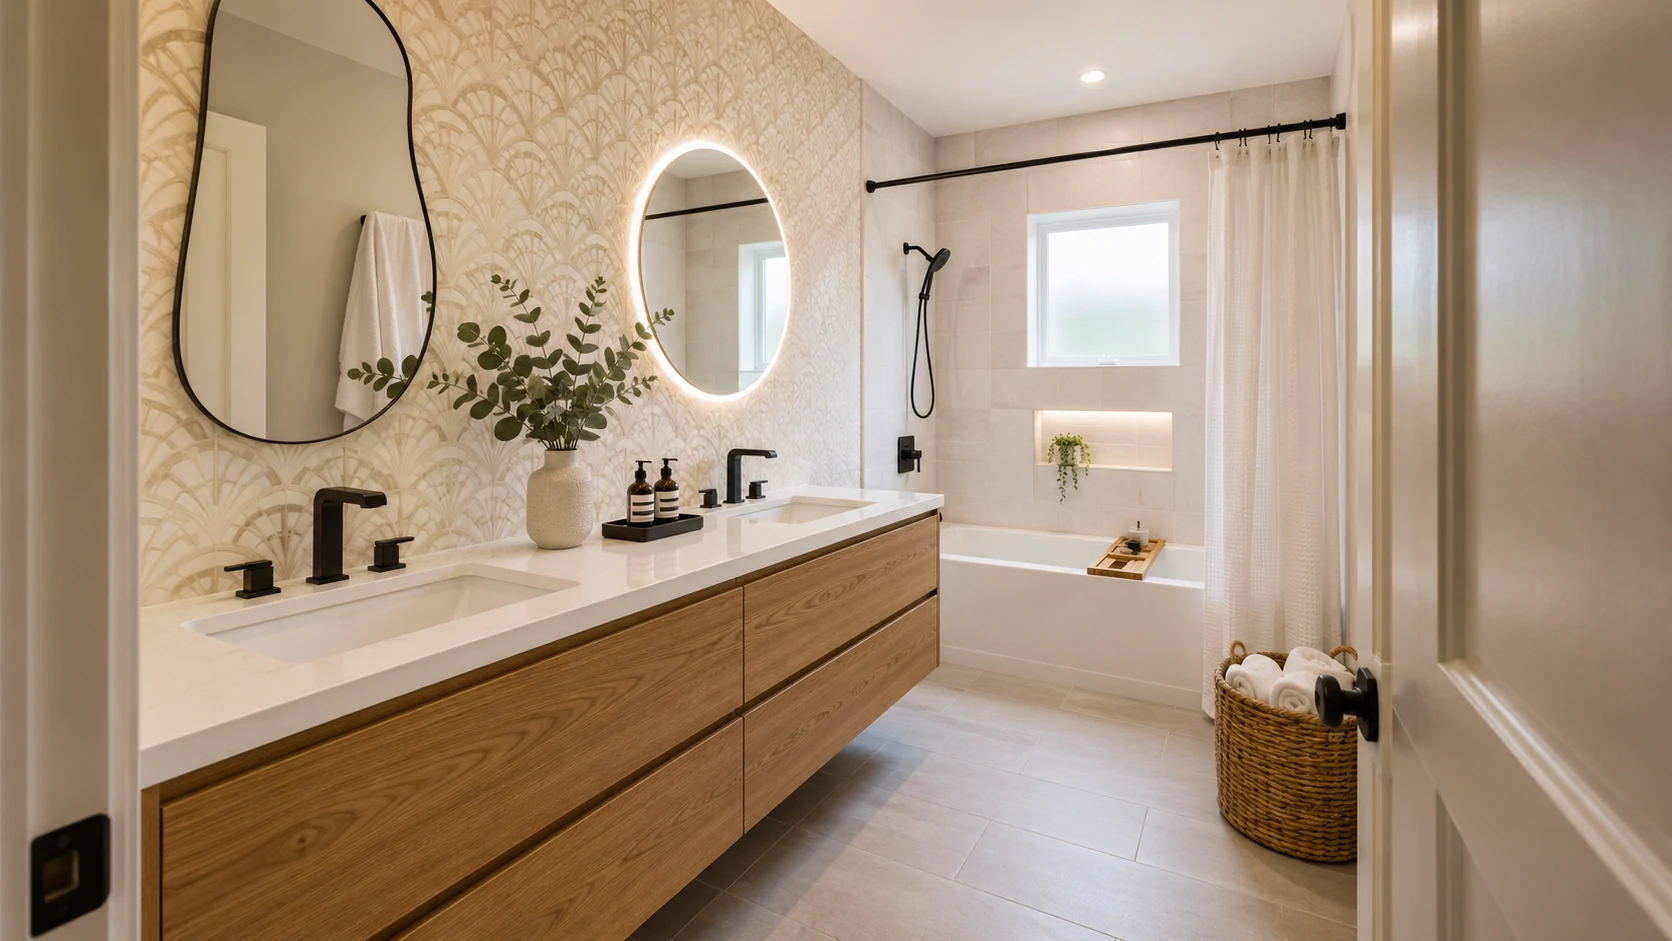
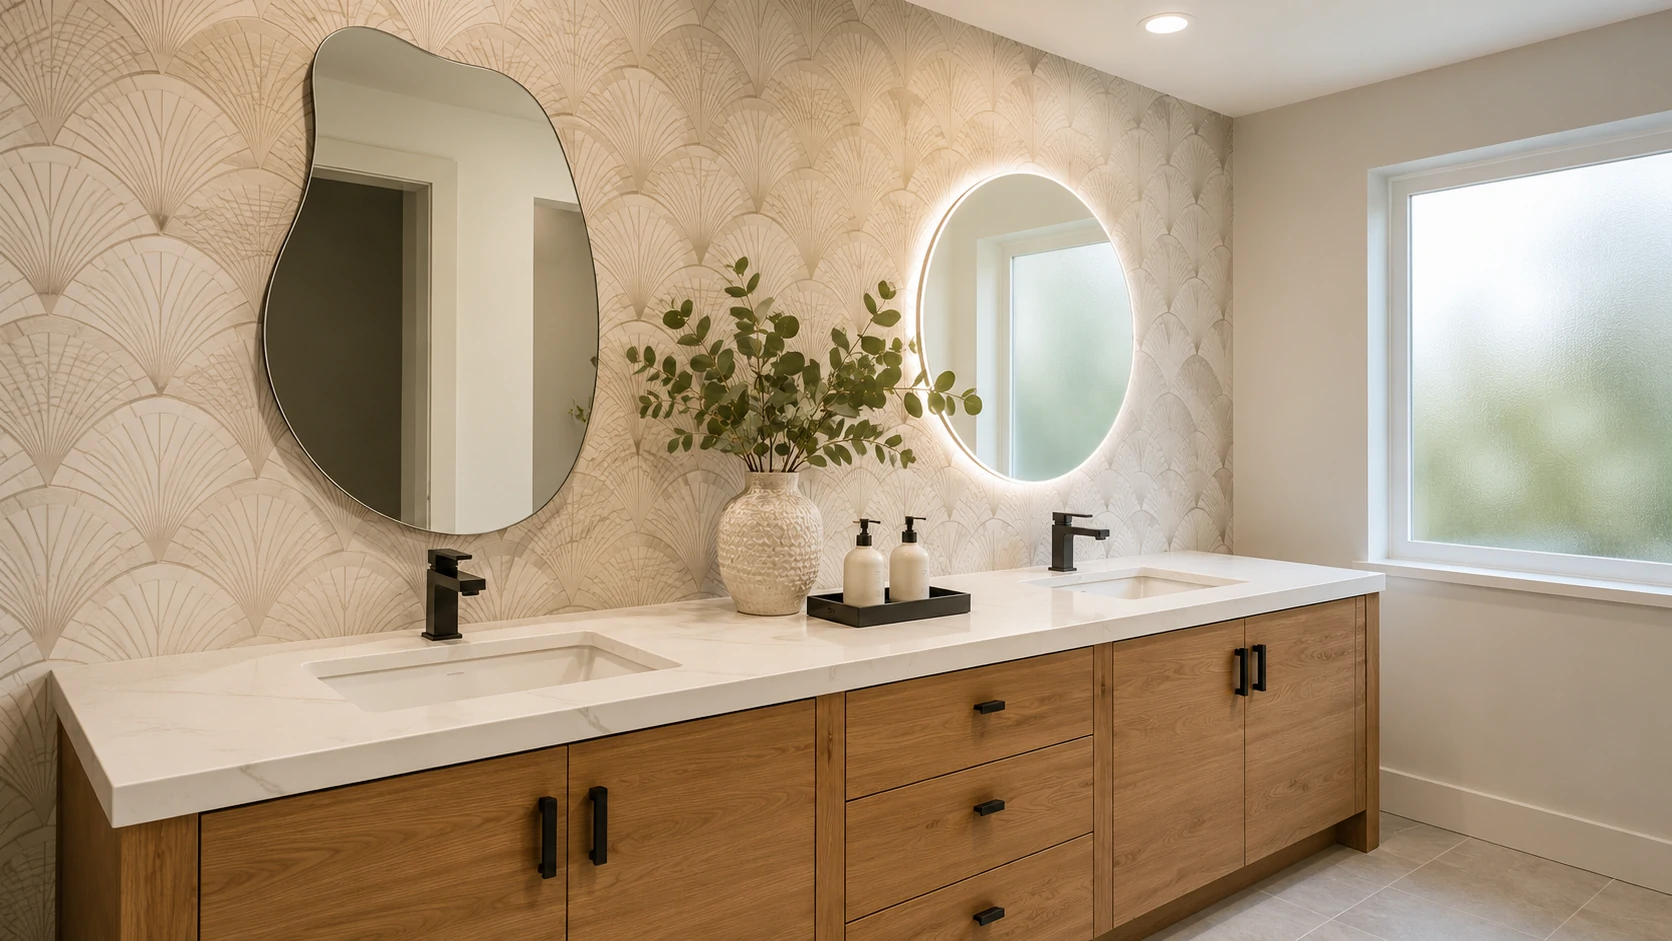
The Vanity
Single white drop-in → double wood-tone vanity with two undermount rectangular sinks and a white quartz countertop.
This is the most structurally significant change in the entire project. Going from one sink to two required confirming that both P-traps could drain into the existing single rough-in via offset routing — which they could here. That’s not always the case, and it’s the detail that determines whether you’re looking at a straightforward vanity purchase or a plumber’s invoice for several thousand dollars. There’s a full section on this below, because it’s the most common expensive surprise in this upgrade category.
The cabinet finish — warm flat-front oak grain — grounds the room with natural material warmth. It prevents the white-and-matte-black palette from reading cold. That balancing act is what makes the color palette feel intentional rather than sterile.
Hardware
Chrome throughout → matte black throughout. Every piece: faucets, shower valve, tub spout, handheld showerhead, shower curtain rod, towel bar, drawer pulls, door hardware.
Looking at the photos, all the matte black fixtures clearly come from a cohesive product line — the finish reads consistently across every element. That consistency matters more than most people realize before they start buying. Matte black from one manufacturer can look meaningfully different from matte black from another — warmer, cooler, slightly sheened versus true flat. Mix hardware from three different brands and the finish variation is visible in photos and in person. Buy a coordinated hardware line and run it throughout.
Tub Surround
Brown 12×12” ceramic → large-format white/light gray tile installed vertically, with tight grout joints. The tub itself was refinished — not replaced. Refinishing a tub costs $300–$600 and looks new if done well; replacing a cast iron tub can run $1,500–$3,500 in labor alone due to weight and access.
The niche is new — a full-width rectangular built-in shelf recessed into the wall between the tub deck and the window sill. It’s properly waterproofed. That last detail is what separates a niche that holds up for decades from one that causes a mold remediation project in five years.
Mirrors
The single builder vanity mirror — frameless, purely functional, visually inert — was replaced with two distinct mirrors positioned over each sink.
Left position: an asymmetric wavy-edge oval mirror. The irregular silhouette is the piece that gives the vanity wall its personality. It breaks up the vertical geometry of the room and looks sculptural against the wallpaper.
Right position: a round LED backlit mirror. Practical and clean.
Paired mirrors over a double vanity work because they give each sink position its own visual anchor, add design interest to the wall, and reflect the wallpaper behind them — effectively doubling its visual footprint without adding any more wallpaper.
Wallpaper
The vanity wall — the first thing you see when you enter — has peel-and-stick wallpaper in a scallop/fan geometric pattern. Cream and warm white tones, subtle but present contrast. It’s visually quiet enough to work as a backdrop for the mirrors and greenery, but present enough to completely eliminate the blank-wall problem.
Materials cost for one accent wall of peel-and-stick: $80–$250 depending on product and square footage. The return on that investment in this bathroom is probably the best ratio of any single element in the room.
There are real caveats. They get their own section.
Ceiling
Popcorn texture removed. Smooth white finish applied. Recessed light added in the center field.
Look at the before and after photos and pay close attention to what the ceiling does in each. The before ceiling absorbs light and creates micro-shadow texture across the entire room. The after ceiling bounces that light evenly. With the recessed fixture, the smooth white surface acts as a passive light diffuser — no additional fixtures needed for the space to feel dramatically brighter.
Smooth ceilings also raise the perceived height of the room even though the actual height is identical. The popcorn texture created a visual plane that compressed the space. Removing it opened the room’s proportions.
Accessories
Wicker storage basket with rolled white towels near the door. Bamboo bath tray on the tub. Eucalyptus stems in a textured white ceramic vase. Black vanity tray holding soap dispensers.
These are styling decisions, not renovation elements. Combined they cost under $200 and could be swapped out in an afternoon. But they complete the photographs in the way that editorial styling completes any image — natural organic textures (wicker, bamboo, eucalyptus) balanced against the clean white-and-black palette. Without them, the after photos would look like a showroom. With them, the room looks like someone actually lives there and chose it intentionally.
What’s Actually DIY-Friendly and What Isn’t
Most bathroom renovation content either oversells DIY (implying everything is a weekend project if you watch enough YouTube) or undersells it (implying nothing should be attempted without a licensed contractor). Neither is accurate for a project like this.
| Task | DIY Level | Why |
|---|---|---|
| Peel-and-stick wallpaper | ✅ Weekend DIY | Wall prep, alignment, smoothing — no tools required |
| Hardware swap (towel bar, pulls, door hardware) | ✅ Weekend DIY | Basic drill and wall anchor work |
| Mirror mounting | ✅ Weekend DIY | Requires stud finder, level, and weight-appropriate anchors |
| Shower curtain rod swap | ✅ Weekend DIY | Standard bracket or tension rod installation |
| Faucet replacement (same config) | ⚠️ Moderate DIY | Shutoff valves, basin wrench, under-sink comfort needed |
| Vanity replacement (same rough-in) | ⚠️ Moderate DIY | Heavy and awkward; requires disconnecting and reconnecting plumbing |
| Floor tile installation | ⚠️ Moderate skill | Subfloor prep, thinset, tile saw rental — mistakes are permanent |
| Popcorn ceiling removal (post-1978) | ⚠️ Moderate skill | Messy; skim coat finishing step is harder than the scraping |
| Tub surround retile | ❌ Hire a pro | Waterproofing membrane is non-negotiable; mistakes cause hidden mold |
| Shower valve replacement | ❌ Licensed plumber | Inside wet area; permit required in most US jurisdictions |
| Adding second drain for double vanity | ❌ Licensed plumber | New drain line = permit + inspection |
| Adding GFCI circuit or outlet near water | ❌ Licensed electrician | Code requirement; no exceptions for “just adding an outlet” |
| Popcorn ceiling (pre-1978 home) | ⚠️ Test first | Asbestos testing required before any disturbance |
The most practical approach for most homeowners: DIY the cosmetic layers — wallpaper, hardware, mirrors, accessories, potentially the vanity swap if the rough-in works in your favor. Hire a licensed plumber for any drain work. Hire an experienced tile setter for the tub surround. This is not the application where you practice tiling.
What a Bathroom Remodel Like This Actually Costs
There’s no honest single number. Here’s how to think about the tiers:
| Scope | What’s Included | Typical Cost (US National) |
|---|---|---|
| Cosmetic-only | Vanity swap (same rough-in), hardware, wallpaper, mirrors, accessories, ceiling skim coat | $3,000–$8,000 DIY / $8,000–$18,000 contractor |
| Mid-range full remodel | All cosmetic work + new tile throughout + new fixture package | $12,000–$22,000 contractor |
| Full gut with plumbing/electrical changes | Layout changes, new rough-ins, new subfloor if needed, complete finish package | $20,000–$40,000+ |
Individual Upgrade Cost Ranges
| Upgrade | DIY Material Cost | Contractor Total | DIY Viable? |
|---|---|---|---|
| Peel-and-stick wallpaper (1 accent wall) | $80–$250 | $200–$500 | ✅ Yes |
| Full matte black hardware set | $300–$700 | $450–$1,000 | ✅ Yes |
| Single vanity replacement (same rough-in) | $400–$1,200 | $800–$2,500 | ⚠️ Moderate |
| Double vanity (with P-trap offset into existing rough-in) | $600–$2,000 + plumber consult | $2,500–$6,000+ | ❌ Plumber for any drain work |
| Large-format floor tile (materials only) | $3–$12/sq ft | $8–$18/sq ft labor | ⚠️ Moderate skill |
| Tub surround retile | $500–$1,500 materials | $1,500–$4,500 total | ❌ Waterproofing critical |
| Popcorn removal + skim coat (post-1978 DIY) | $150–$400 | $1–$3/sq ft professional | ⚠️ Moderate skill |
| Built-in shower niche (new install) | $50–$150 materials | $300–$800 installed | ⚠️ Waterproofing required |
| Asymmetric/wavy mirror (36”–48”) | $150–$500 | N/A — DIY install | ✅ Yes |
| Round LED mirror | $100–$400 | N/A — DIY install | ✅ Yes |
US national averages. Coastal metro markets (Los Angeles, Seattle, New York, Boston) typically run 20–40% higher on labor costs.
Where this specific remodel lands: Based on visible scope — full tile demo and replacement on floor and tub surround, double vanity conversion, new fixture package throughout, wallpaper accent wall, smooth ceiling with added recessed light — this project most likely ran $14,000–$20,000 if contractor-executed in a mid-to-high-cost US market. A homeowner who self-performed the wallpaper, mirrors, hardware, and accessories while hiring out tile, plumbing, and ceiling work could likely get into $8,000–$12,000.
Why Matte Black Hardware Works Here — And When It Doesn’t
The decision to go all-matte-black in this bathroom wasn’t arbitrary trend-chasing. It works here specifically because of the palette it’s working against.
Matte black reads as high-contrast and intentional next to light surfaces — white quartz, cream-white tile, warm wood, light gray floor. The darkness of the fixtures punctuates the room visually. Without that contrast, a bathroom this light can look washed out and undirected. The hardware is what gives the palette definition.
Where matte black doesn’t work as well:
- Very dark or charcoal-dominant color schemes — hardware visually disappears
- Small bathrooms with limited natural light — can feel heavy
- Warm amber, terracotta, or earthy tile tones — brushed brass or unlacquered brass reads better
- Highly contemporary industrial aesthetics — polished stainless or brushed nickel fits the material vocabulary better
The Maintenance Reality
Matte black shows water spots, fingerprints, and soap residue more readily than chrome or brushed nickel. Chrome can absorb a week of daily use before it looks bad. Matte black shows a fingerprint almost immediately.
The correct cleaning routine: pH-neutral soap, soft cloth, dry wipe. No abrasive cleaners, no vinegar, no citrus-based products. Most standard bathroom cleaners are too acidic for matte black — they dull the surface and can cause uneven patching over time if used repeatedly.
For a high-traffic family bathroom, brushed nickel is more forgiving while still reading as modern and updated. For a primary or en-suite bathroom where you’re willing to wipe down fixtures regularly, matte black holds up fine and looks excellent.
The Manufacturer Matching Problem
If you buy faucets from Brand A, towel bars from Brand B, and the shower valve from Brand C — even if everything says “matte black” — the finishes will likely look visibly different under your specific bathroom lighting. Slightly warmer, slightly cooler, slightly sheened. It’s subtle in person and obvious in photographs.
Buy from one coordinated hardware line and run it throughout. This is the non-negotiable detail that separates a bathroom that looks designed from one that looks assembled.
The Wallpaper Accent Wall: What Nobody Tells You Before You Buy
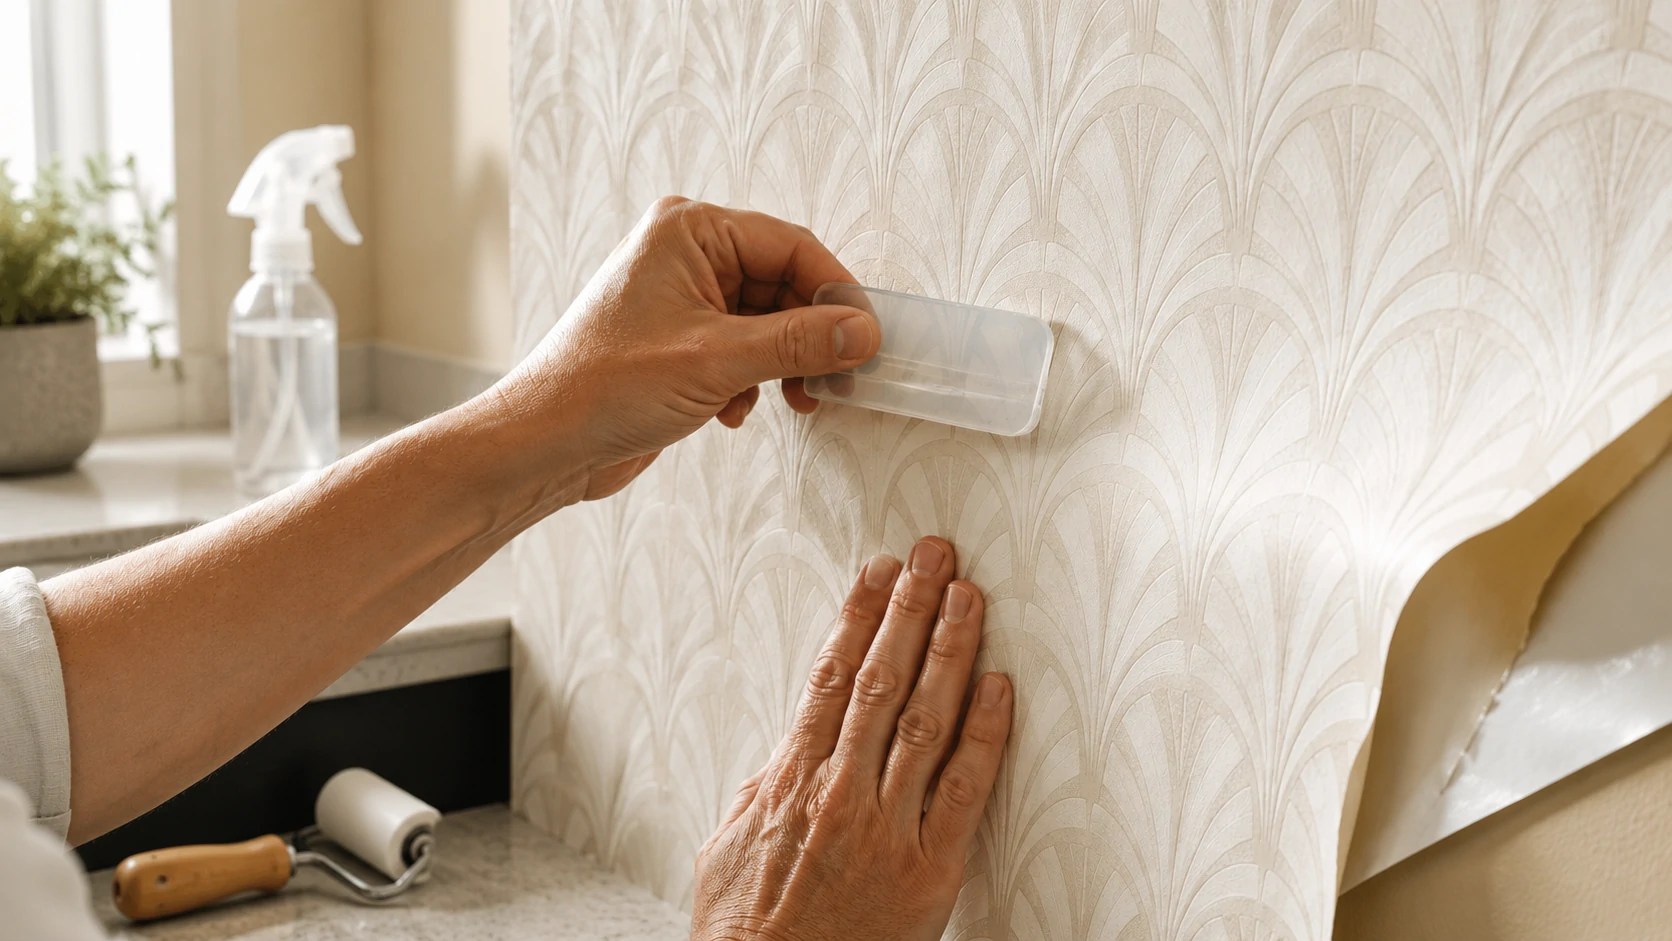
The scallop/fan-pattern peel-and-stick wallpaper in this bathroom is doing a significant amount of visual work. It gives the vanity wall a clear focal point, provides the backdrop for the mirror pairing, and adds organic geometric texture without competing with the tile or hardware.
It also cost somewhere between $80 and $250 in materials. That’s the return-per-dollar champion of this entire renovation.
And it’s one of the most commonly misunderstood products in home improvement.
The Ventilation Requirement Is Not Optional
Peel-and-stick wallpaper in a bathroom lives or dies by ventilation. Steam from daily showers is the enemy. If that steam can’t escape efficiently, it works its way behind the backing layer and begins breaking down the adhesive from the inside.
The failure sequence is predictable: Seams lift first, typically within 6–12 months in a bathroom without adequate airflow. Then bubbles form in the field of the panels. If left unaddressed, the moisture conditions trapped behind PVC-backed wallpaper can create circumstances for mold growth on the wall surface behind it.
Before installing any wallpaper in a bathroom, confirm:
- Your exhaust fan is functional — not just present, but actually moving air
- CFM rating is appropriate for your space (minimum 1 CFM per square foot of floor area; 1.5 CFM is better)
- The fan exhausts to the exterior, not into the attic
- The fan runs for at least 15–20 minutes after showering (consider a timer switch or humidity-sensing fan)
Fabric-Backed vs. PVC-Backed
Fabric-backed peel-and-stick wallpaper is breathable — moisture can pass through it rather than becoming trapped behind it. PVC-backed (which most budget options are) creates a vapor barrier. In a well-ventilated bathroom, both can work long-term. In a bathroom with marginal ventilation, fabric-backed is considerably more forgiving.
Wall Prep Is Everything
Wallpaper applied over orange-peel or knockdown texture will not adhere reliably. The texture creates air pockets behind the backing that cause premature lifting. The before bathroom in this remodel had orange-peel textured walls — those walls were skim-coated and sanded smooth before any wallpaper went up.
Similarly, fresh paint needs to cure fully before applying peel-and-stick. Newly painted walls still off-gas for 30 days — those VOCs interfere with adhesion. Let new paint cure at least four weeks.
⚠️ Warning: Peel-and-stick wallpaper in bathrooms without a functional exhaust fan will fail. It’s not a product quality issue — it’s physics. Steam from daily shower use penetrates the backing and dissolves the adhesive layer from behind. Seam lifting and bubbling are the early signs; mold behind the paper is the end state. If your bathroom doesn’t have adequate ventilation, fix that before considering any wallpaper product.
Adding a Second Sink: The Plumbing Conversation You Need to Have First
One of the most frequent reasons a “simple vanity swap” turns into a $3,000-plus plumbing job is this: the homeowner orders a beautiful 60-inch double vanity, the contractor arrives for installation, and everyone discovers the existing drain rough-in is centered under a single-sink position.
Here’s why that matters.
What a Rough-In Is
Your existing vanity connects to a drain pipe stubbed out from the wall or floor — that’s the rough-in. Every sink connects to a P-trap that connects to this drain. In a single-sink bathroom, there’s one rough-in. When you add a second sink, both need to drain somewhere.
Option 1 — Offset P-trap routing: If both sink drain positions are within roughly 24”–30” of the existing rough-in centerline, a plumber can often route both P-traps to drain into the single existing rough-in via offset connections. This is what happened in this remodel. No structural plumbing work required — both sinks drain to the original rough-in location. Total cost: plumber’s time to confirm feasibility and make connections.
Option 2 — Add a second drain line: If the sinks are farther apart, if the existing pipe diameter won’t accommodate the combined flow volume, or if local code won’t permit shared drain routing for that distance, a plumber needs to add a drain line. That means opening the wall or floor, running new pipe, and in most US jurisdictions obtaining a permit and scheduling an inspection. That’s a materially different scope than a vanity replacement.
Before You Buy a Double Vanity
Have this 20-minute conversation with a plumber. Locate your existing drain rough-in (it’s behind or below your current vanity). Measure the horizontal distance from that rough-in to where the second sink drain will sit. Ask whether shared P-trap routing is feasible for that distance under local code.
If the answer is yes, buy the vanity. If the answer is no, get a quote for the drain line before purchasing — not after.
Standard double vanity widths and typical drain spacing:
- 48” double vanity: sinks approximately 20”–22” apart, center-to-center
- 60” double vanity: approximately 28”–30” apart
- 72” double vanity: approximately 36” apart
Most plumbers can share a P-trap routing for up to about 24”–30”, though this varies by local code and pipe slope requirements. Beyond that, a second rough-in is typically the cleaner and more code-compliant solution.
The Shower Niche: Why So Many DIY Installs Fail Within a Few Years
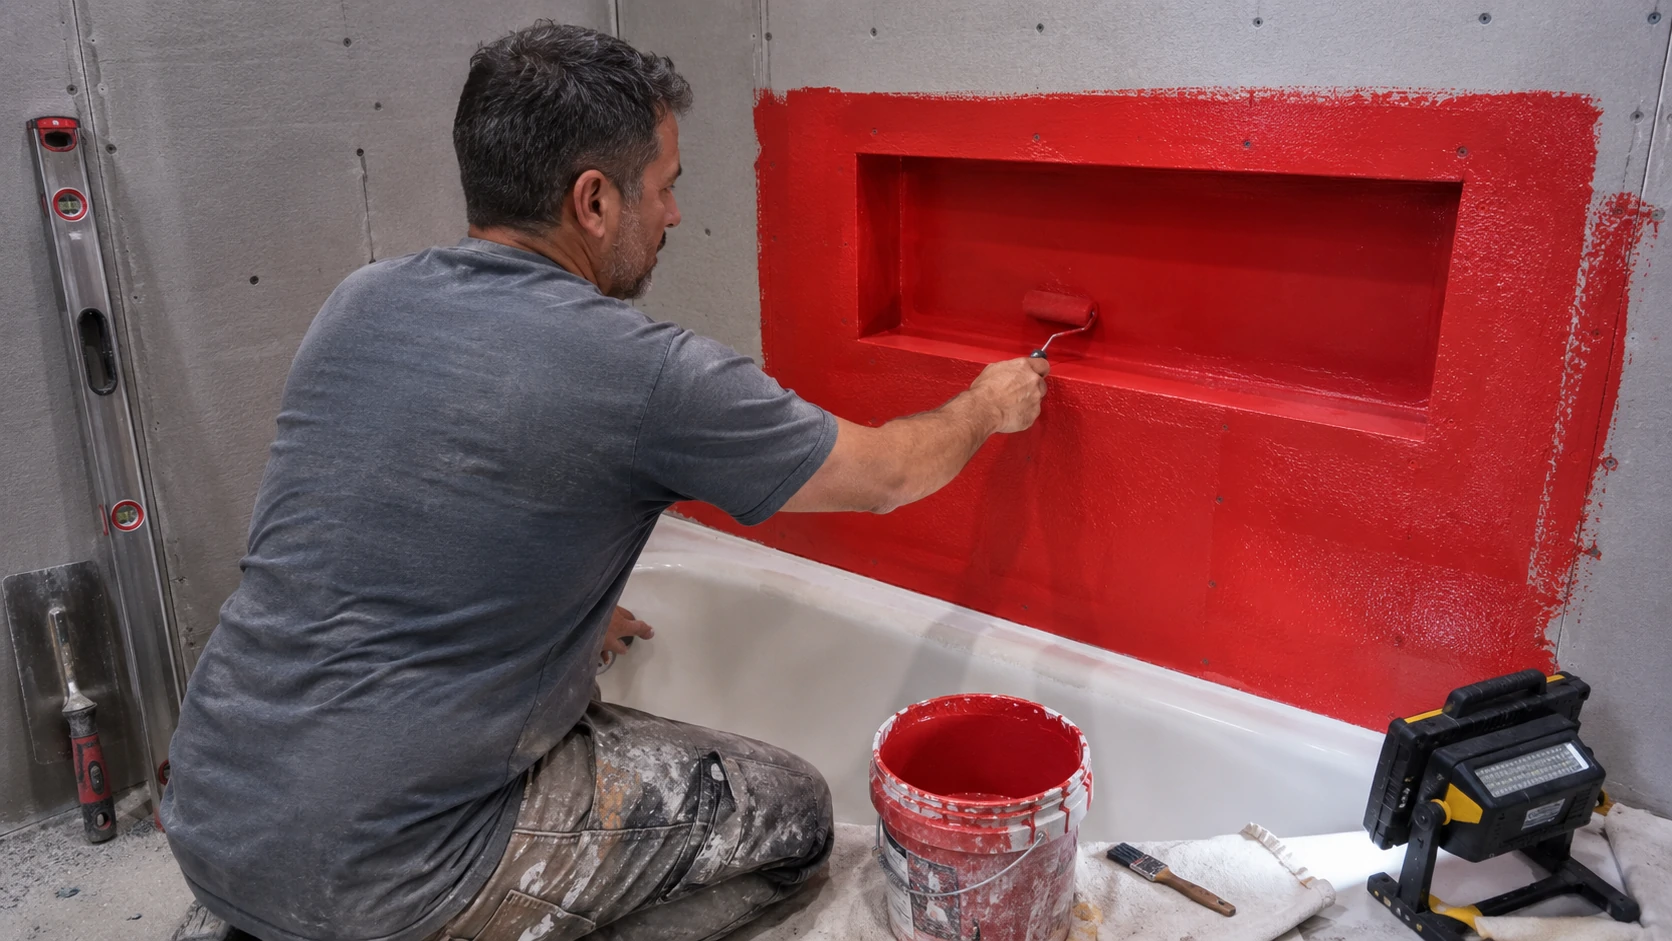
The built-in niche in this bathroom’s tub surround is one of the most visually appealing elements in the after photos. It’s also the element most likely to cause expensive structural problems if installed incorrectly.
This is the part most renovation content buries or skips entirely: a shower or tub niche that is not properly waterproofed will allow water infiltration into the wall cavity. Not might. Will. The question is only how long it takes.
The failure mechanism: water runs off tile surfaces, finds a hairline crack in grout or the corner caulk joint, and wicks into the substrate behind the tile. If that substrate is standard drywall backer without a waterproofing membrane, the wall stays chronically damp. Within 2–5 years, that manifests as staining, loosening tile, or a musty smell — long after any contractor warranty has expired.
The Correct Installation Sequence
- Frame the niche opening between studs, or use a pre-formed foam niche insert
- Install cement backer board on all niche surfaces — sides, top, back, and bottom
- Apply a continuous waterproofing membrane (RedGard, Schluter Kerdi, Wedi, or equivalent) across all niche surfaces and carry it into the surrounding tub surround field — no gaps in the membrane coverage
- The horizontal bottom surface of the niche must slope toward the shower — minimum 1/8” per foot — so water drains out rather than pooling
- Tile using the appropriate thinset for your membrane type (unmodified thinset for sheet membranes like Kerdi; modified for liquid-applied membranes like RedGard)
- Use unsanded grout for joints under 1/8”
- At all interior corners and the horizontal joint where the niche bottom meets the side walls: caulk with 100% silicone — do not grout these joints. Grout at corners develops hairline cracks from thermal movement over time. Silicone flexes.
⚠️ Warning: A tiled niche that skips the waterproofing membrane will infiltrate water into the wall cavity. This is one of the most common sources of hidden bathroom mold found during renovation demo or home inspection. The remediation cost for mold-damaged wall cavities behind a tub surround significantly exceeds the cost of a proper membrane at installation — often by a factor of five or more.
Why Large-Format Floor Tile Makes Small Bathrooms Look Bigger (And the Detail That Makes It Work)
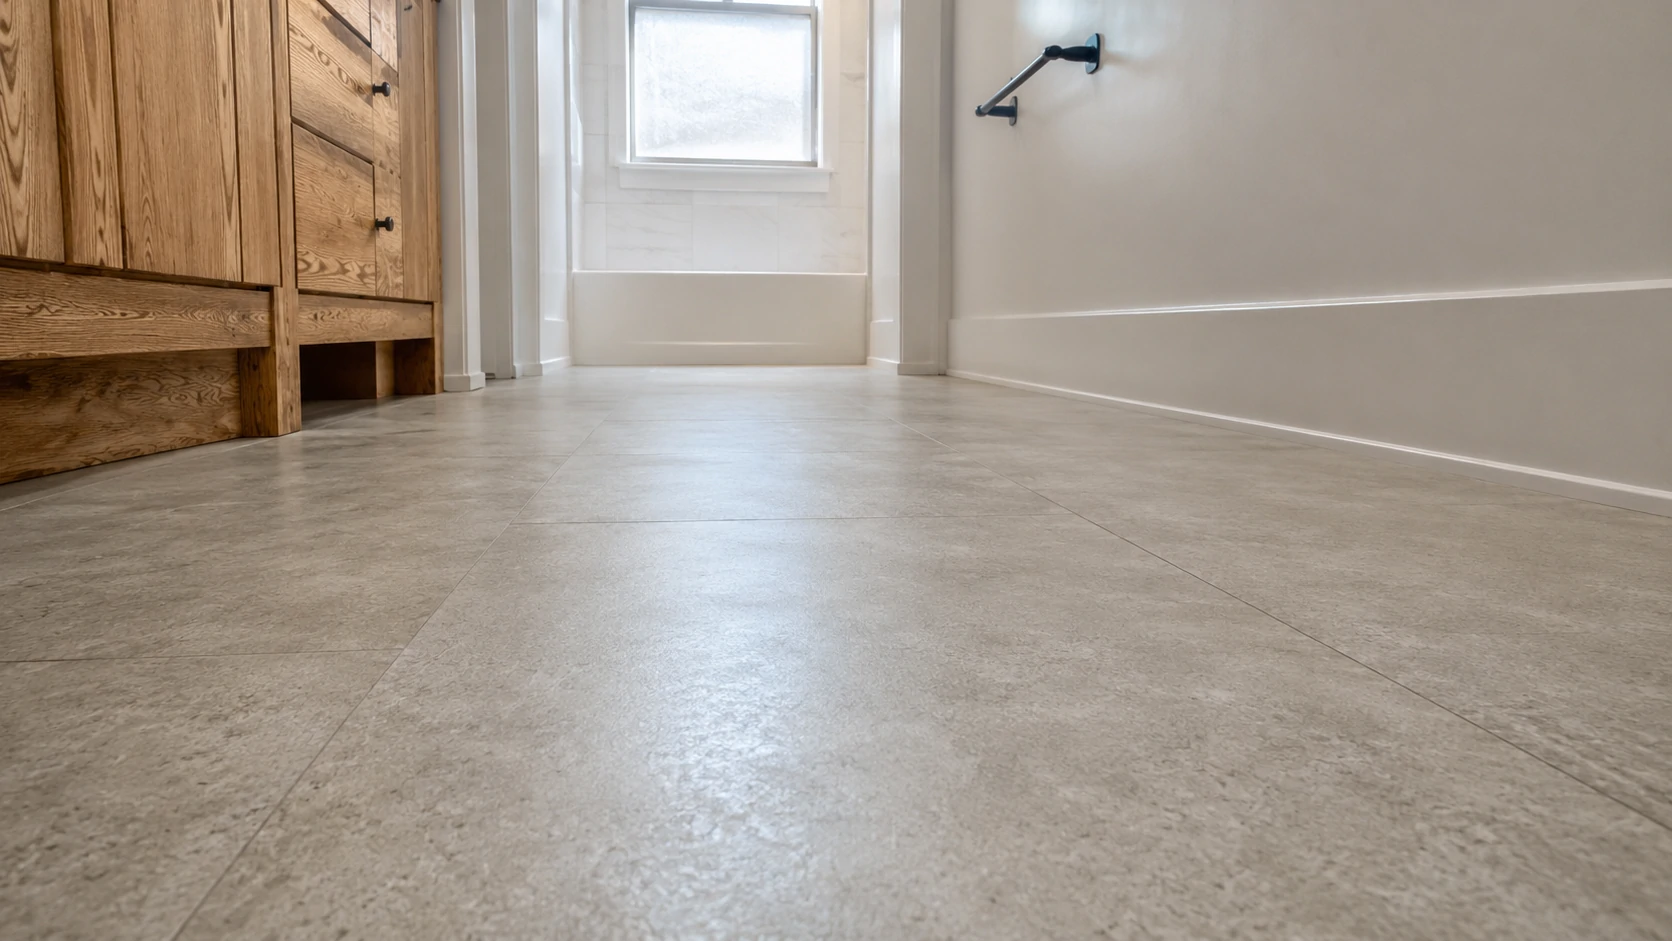
The visual expansion effect of large-format tile is real and well-documented. But it’s almost always explained in ways that miss the key technical variable.
The design logic: Standard 12×12” tile in a 5×8-foot bathroom produces roughly 80 grout lines across the floor. Large-format 12×24” tile in a running bond pattern in the same space produces less than half that number. Fewer lines means fewer visual interruptions means the eye reads the floor as a continuous surface — and the room reads as larger than it is.
What most content leaves out: this only works with rectified tile.
Standard ceramic and porcelain tile carries slight dimensional variation from the manufacturing process — tiles can vary by 1–2mm in size from piece to piece within the same production batch. To accommodate this variation, standard tile is set with grout joints wide enough to absorb the inconsistency — typically 1/8”–3/16”.
Rectified tile is precision-cut after firing, with edges ground to exact dimensions within ±0.5mm or tighter. This allows grout joints as narrow as 1/16” — which is what produces the near-seamless floor look you see in high-quality renovations like this one. If you use non-rectified large-format tile and try to run tight joints, you get lippage — tile edges at slightly different heights — which looks poor and creates a trip hazard.
The slip resistance question nobody asks at the tile store
Builder-grade polished and high-gloss floor tile often fails the DCOF (Dynamic Coefficient of Friction) wet floor threshold. The required DCOF for wet floor areas is above 0.42. Many glossy tiles test in the 0.30–0.35 range when wet — technically not safe for bathroom floors.
The gray floor tile in this remodel has a subtle matte texture, which is appropriate. When selecting large-format floor tile, ask for the DCOF wet rating before purchasing. Any reputable tile retailer can pull this from manufacturer spec sheets.
Subfloor flatness requirement: The larger the tile, the flatter the subfloor needs to be. TCNA standards allow no more than 3/16” variation in 10 feet for standard tile; large-format tile over 15” tightens that tolerance to 1/8” in 10 feet. Low spots and high spots need to be addressed with floor leveling compound before any tile installation begins.
Popcorn Ceiling Removal: The Step Most Renovation Blogs Get Dangerously Wrong
Removing popcorn texture and going to a smooth painted ceiling is one of the highest-impact changes in this bathroom. The before/after photos make this clear — the smooth white ceiling in the after is doing real visual work, bouncing recessed light evenly and making the room read as taller and larger.
But there’s a step that a significant number of renovation articles treat as optional fine print, and it isn’t.
Pre-1978 homes require asbestos testing before disturbing any ceiling texture.
Asbestos was commonly added to textured ceiling products — including popcorn and cottage cheese finishes — through the late 1970s. Sanding, scraping, or wet-disturbing asbestos-containing material releases fibers into the air. Inhaled asbestos fibers cause mesothelioma — a cancer with a median survival of 12–21 months after diagnosis. This is not a liability disclaimer. It is the reason to stop and test before you touch that ceiling.
Pre-Removal Checklist
- Confirm your home’s build year (original permit, HUD form, or prior appraisal)
- If pre-1978: purchase an EPA-certified DIY asbestos test kit ($30–$50) or hire a certified asbestos inspector ($200–$500)
- Send samples to an accredited laboratory (included with most DIY kit purchases)
- If results are positive: Do not proceed with DIY. Contact a licensed asbestos abatement contractor. Federal regulations require licensed abatement for friable asbestos materials.
- If results are negative (or post-1978 home): Proceed with wet-scrape removal
Wet-Scrape Method (Post-1978, No Asbestos)
- Remove all fixtures, cover floor and vanity completely with plastic sheeting taped at the edges
- Wet the ceiling with a garden pump sprayer — texture should be damp, not soaked; over-wetting weakens drywall paper
- Use a 4”–6” drywall knife in long, smooth passes; resist the urge to dig in
- Fill any gouges in the drywall with lightweight joint compound; let dry fully
- Apply a skim coat (joint compound thinned to approximately pancake batter consistency) with a 12”–14” drywall knife — this is the step most DIYers underestimate; getting a smooth ceiling without visible ridges or trowel lines takes practice
- Sand with 120-grit on a pole sander, prime with PVA drywall primer, paint with flat ceiling paint
⚠️ Warning: Homes built before 1978 — do not scrape, sand, or otherwise disturb ceiling texture before testing for asbestos. DIY test kits are widely available at hardware stores and online. If results are positive, only EPA-certified licensed abatement contractors can legally remove the material. Attempting DIY removal of confirmed asbestos-containing materials is a federal violation and a serious long-term health risk.
Ongoing Maintenance: What This Bathroom Requires Going Forward
Nobody likes this section, but skipping it leads to expensive problems. A bathroom this invested in needs consistent, low-effort maintenance to stay looking like the after photos.
| Item | Task | Frequency |
|---|---|---|
| Matte black fixtures | Wipe with soft cloth and pH-neutral soap; dry immediately | Weekly |
| Grout lines (floor) | Inspect; reseal if water no longer beads on surface | Annually |
| Caulk at tub-to-wall joint | Inspect for cracking, lifting, or discoloration; replace if compromised | Annually |
| Shower niche horizontal joint | Re-caulk with 100% silicone — do not regrout this joint | Annually |
| Wallpaper seams | Inspect for edge lifting; re-adhere with seam repair adhesive | Every 6 months |
| Exhaust fan | Clean grille; hold tissue paper to grille to confirm active airflow | Every 6 months |
| Undermount sink silicone bond | Inspect the bond between sink rim and countertop underside | Annually |
| Handheld showerhead connection | Check for seepage at hose connections | Seasonally |
The exhaust fan maintenance matters more than it looks. Most bathroom fans accumulate lint and dust on the grille within 3–6 months and lose meaningful CFM airflow without anyone noticing. An underperforming fan means elevated humidity — which shortens wallpaper adhesive life, accelerates grout deterioration, and creates conditions for mold growth. Clean it every six months and actually test it. Hold a single sheet of toilet paper up to the grille with the fan running. If it holds against the grille, the fan is pulling adequate air. If it falls, clean the fan housing and blades — or consider replacing an undersized unit with a proper CFM-rated model.
Decision Framework: DIY or Hire Out?
| Situation | Recommended Approach |
|---|---|
| No plumbing moves, no electrical changes, budget is the primary constraint | Full DIY viable for cosmetic layers |
| First time tiling, or tiling inside a wet area | Hire an experienced tile setter — not a handyman |
| Adding a second sink | Hire a plumber to evaluate rough-in before purchasing the vanity |
| Popcorn ceiling, unknown home age | Test for asbestos first; then decide |
| Selling within 3 years | Hire licensed trades for all permitted work; workmanship matters at inspection |
| Contractor quote feels high | Get a second and third bid; verify what’s included in each scope |
The hybrid approach works well for most homeowners: DIY the cosmetic layers (wallpaper, hardware, mirrors, accessories), hire licensed trades for anything that touches plumbing, electrical, or tile in a wet area. You keep costs down where the skill barrier is genuinely low, and you don’t create expensive problems where it isn’t.
Frequently Asked Questions
How much does a full bathroom remodel cost in 2025–2026?
A cosmetic-only remodel with no plumbing or electrical moves — vanity swap at the same rough-in, hardware replacement, wallpaper, new mirrors, accessories — typically runs $3,000–$8,000 if you DIY significant portions, or $8,000–$18,000 contractor-executed. A full mid-range remodel with new tile throughout, new vanity, and new fixture package runs $12,000–$22,000 with a contractor. Full gut renovations involving layout changes, plumbing moves, and electrical reconfiguration can reach $30,000–$45,000 in higher-cost markets. Labor rates by region are the biggest variable — a $14,000 project in Phoenix may cost $19,000–$22,000 in Los Angeles or New York.
Can you put peel-and-stick wallpaper in a bathroom?
Yes — with conditions. Your exhaust fan must be functional and appropriately sized (minimum 1 CFM per square foot of floor area). The wall must be smooth, sealed, and fully cured after painting (at least 30 days). Fabric-backed products are more moisture-forgiving than PVC-backed in high-humidity environments. In a bathroom without adequate ventilation, no peel-and-stick wallpaper product will hold long-term — this is a ventilation problem, not a product quality problem.
What’s the easiest way to update a bathroom without a full renovation?
In order of visual impact per hour of work: hardware swap (faucets, towel bars, shower curtain rod) → mirror replacement → peel-and-stick wallpaper accent wall → new shower curtain and accessories. These four changes, done over a weekend, can make a dated bathroom feel designed and intentional. Combined material cost: roughly $400–$1,200 depending on hardware quality and product choices.
Is matte black hardware hard to keep clean?
More demanding than chrome, yes. It shows water spots, fingerprints, and soap residue readily. The cleaning routine is pH-neutral soap and a soft cloth, nothing abrasive, no vinegar or citrus-based cleaners. For a high-traffic family bathroom, brushed nickel is more maintenance-forgiving while still looking updated. For a primary bathroom where you’re willing to wipe fixtures down regularly, matte black is absolutely manageable and looks excellent long-term.
Do I need a permit to remodel a bathroom?
Cosmetic work — swapping fixtures in existing locations, painting, wallpaper, mirror replacement — generally does not require a permit in most US, UK, Canadian, and Australian jurisdictions. Moving plumbing supply or drain lines, adding or relocating electrical circuits, replacing a shower valve, or making structural changes all typically require permits. Unpermitted plumbing and electrical work creates complications at resale and can affect insurance coverage for related damage. When uncertain, a five-minute call to your local building department clarifies requirements.
How do I add a second sink to a bathroom that only has one?
First, locate your existing drain rough-in. If a plumber can route both P-traps to drain into the existing single rough-in via offset routing — feasible for sinks roughly 24”–30” apart center-to-center — you can add the second sink without structural plumbing work. If the sinks will be farther apart, or if the drain slope won’t permit shared routing, a second drain line is required. That’s a permit-required plumbing job. Have this conversation with a plumber before purchasing the vanity.
What tile size makes a small bathroom look bigger?
Large-format tile (12×24” or larger) reduces the number of grout lines per square foot, which makes the floor read as a continuous surface and visually expands a small space. This only produces the intended effect with rectified tile — precision-cut tiles that allow grout joints as narrow as 1/16”. Standard tile with wider joints partially cancels the visual expansion benefit you’re installing it for.
How long does a bathroom remodel take?
A cosmetic weekend project — hardware, wallpaper, mirrors — can be completed in two days. A full tile-and-vanity replacement by a contractor team typically runs 1–2 weeks. Projects requiring permits, plumbing inspection, and coordination across trades usually run 3–5 weeks from demo day to punchlist. Add 2–4 weeks to any timeline if permits are required — permit processing times vary significantly by jurisdiction.
What’s a realistic budget for a 5×8 bathroom remodel?
A 5×8 is the most common full bathroom footprint in US homes. Budget by tier: cosmetic-only refresh (hardware, wallpaper, mirrors, accessories) $500–$2,500; mid-range full remodel with new tile, vanity, and fixtures $8,000–$16,000 contractor-executed; full gut renovation with plumbing changes $18,000–$30,000. Regional labor is the biggest variable — a $12,000 project in Phoenix may cost $17,000–$20,000 in Los Angeles or Seattle.
Can you tile over existing bathroom floor tile?
Sometimes. The conditions that make it feasible: existing tile is fully bonded to the substrate with no hollow spots, the subfloor is structurally sound and level, and the added floor height (typically 3/4”–1” for two tile layers plus thinset) won’t create problematic transitions at doorways or thresholds. The primary concern is the height addition — it affects door clearance, transitions to adjacent rooms, and sometimes toilet flange height. When existing tile is cracked, uneven, or loosely bonded, full demo is the correct approach.
Is a bathroom remodel worth it before selling?
A mid-range bathroom remodel returns roughly 60–70 cents on the dollar nationally (per Remodeling Magazine cost vs. value data). That return varies by market — in high-demand coastal markets, updated bathrooms carry more buyer weight. The highest-ROI pre-sale moves: replace vanity and countertop, update hardware to a current finish, re-grout and re-caulk, replace a dated toilet, and improve lighting. Full gut renovations rarely return full investment at resale unless the existing bathroom is genuinely dysfunctional for buyers.
What should be done first in a bathroom remodel?
Correct sequence: demo first → address substrate damage found during demo → rough plumbing before cement board goes in → cement board and waterproofing membrane before tile → tile before vanity installation → vanity before quartz countertop templating (template is made after the vanity is level and secured) → countertop before sink mounting → plumbing rough-in before fixtures → electrical before drywall close → flooring before toilet reinstallation and baseboards → painting last. Homeowners who purchase a custom quartz countertop before the vanity is installed often encounter a templating problem. The sequence exists for reasons.
How do I waterproof a shower niche?
Apply a continuous waterproofing membrane across all niche surfaces — sides, top, back, and bottom — and extend that membrane into the surrounding tub surround wall tile area with no gaps in coverage. The niche bottom must slope toward the shower (1/8” per foot minimum). Tile, then caulk all interior corners and the horizontal bottom-to-side-wall joints with 100% silicone. Do not grout these corner joints — they will crack from thermal movement over time.
Can I replace a bathroom vanity myself?
If you’re replacing in the same footprint, same rough-in location, and you’re comfortable shutting off supply valves, disconnecting and reconnecting P-traps and supply lines — yes, this is a moderate DIY project. The challenge is physical: weight, awkward geometry, working in a confined space. Where it exceeds DIY scope: if supply lines need moving, if the drain rough-in changes, or if you’re adding a second sink that requires drain work.
What exhaust fan CFM rating do I need for my bathroom?
The Home Ventilation Institute (HVI) minimum recommendation is 1 CFM per square foot of floor area. A 5×8-foot bathroom (40 sq ft) needs at minimum a 40 CFM fan — though a 50–60 CFM unit is a more practical target that accounts for fan aging and performance degradation over time. Bathrooms with enclosed showers, high ceilings, or heavy daily use benefit from 80–110 CFM. If you’re installing wallpaper, budget for the higher end. Humidity-sensing fans that run automatically until moisture clears are worth the modest cost premium — they eliminate the single most common ventilation failure mode, which is simply forgetting to turn the fan on.
Regional costs, permit requirements, and product availability vary. Cost ranges reflect US national averages as of 2025–2026. Consult licensed plumbers, electricians, and your local building department for project-specific requirements.